English
Espanol
Francais
S a f e t y W a r n i n g s
A v i s o s d e S e g u r i d a d
C o n s i g n e s d e S é c u r i t é
4
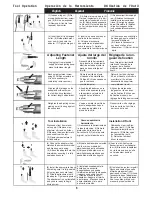
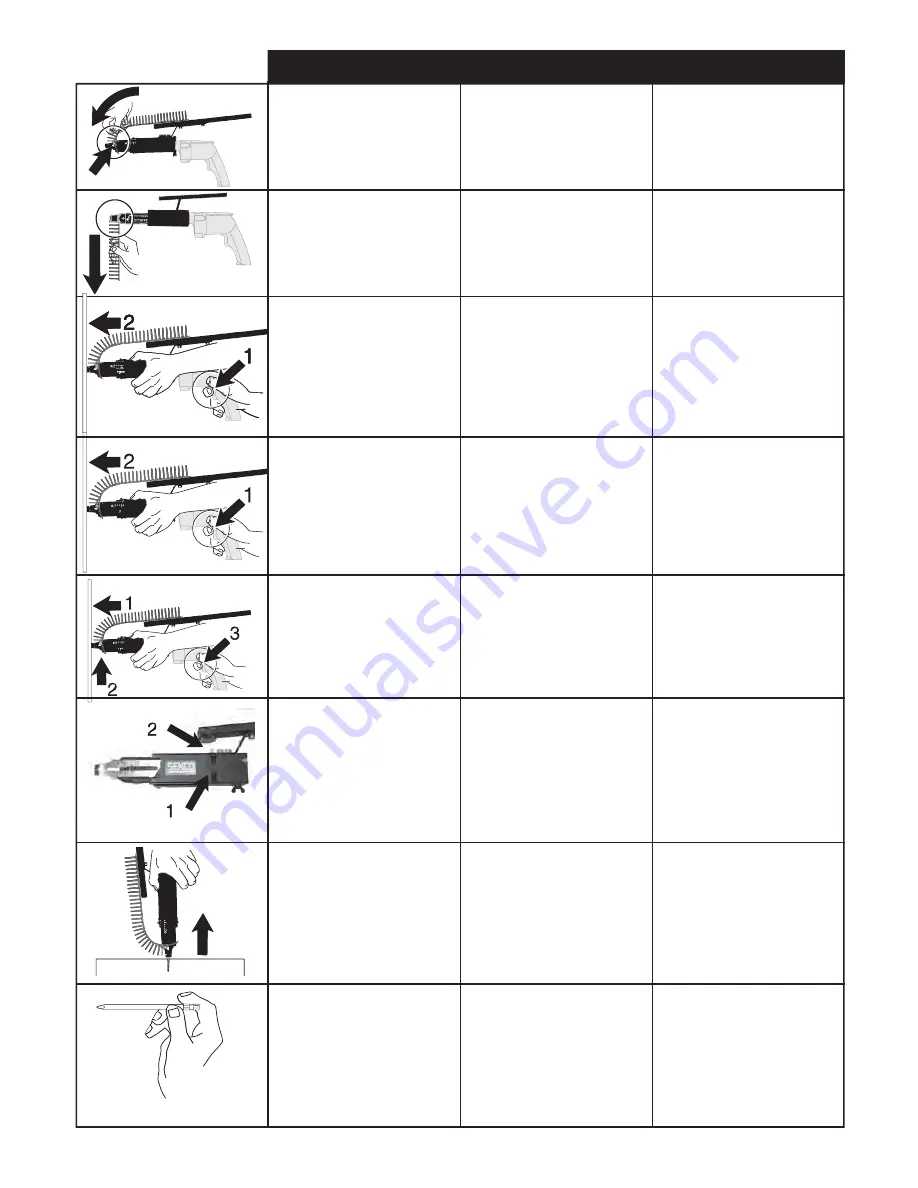
Move the strip forward until
the first screw is aligned with
the bit. This will allow for the
proper strip advancement
once the nosepiece is de-
pressed.
Haga avanzar la faja hasta
que primer tornillo quede
alineada con la broca. De este
modo, se permitirá que la faja
avance en forma adecuada se
presione la pieza de la boca.
Faîtes avancer la bande
jusqu’à ce que première vis
alignée avec la broche. Ceci
permettra un avancement cor-
rect de la bande dès que l’on
fera pression sur le nez.
To remove the strip, pull it
through from the bottom of the
nosepiece.
Para retirar la faja, tire de ella
a travès de la parte inferior
de la pieza de la boca.
Pour enlever la bande, tirez-la
par le bas de líextrèmitè
rotative.
(1) Pull the trigger to start the
motor. Engage trigger lock if
desired.
(Be sure Screwgun
is operating in forward
(clockwise) direction. Screw
will not advance and Bit will
be damaged).
(1) Presione el accionador
para arrancar el motor.
(Ase-
grese de que la herramienta
colocadora de tornillos estè
funcionando hacia adelante
(a la derecha). El tornillo no
avanzar y se daòar la
broca).
(1) Appuyez sur la gâchette
pour démarrer le moteur.
(Assurez-vous que le
pistolet est placè en mode
avant (sens horaire). La vis
níavancera pas et la tige de
vissage sera endommagèe).
(2) Press the nosepiece, with
constant force, against the work
surface. Do not remove the tool
from the work surface until the
clutch disengages and the bit
stops rotating, signaling a fully
driven screw.
(2) Presione la pieza de la
boca, ejerciendo una fuerza
constante, contra la super-
ficie de trabajo. No retire la
herramienta de la superficie de
trabajo hasta que el embrague
se desenganche y la broca
deje de girar, lo que indica
que el tornillo se ha embutido
totalmente.
(2) Appuyez le nez sur la sur-
face de travail avec une pres-
sion constante. N’enlevez pas
l’outil de la surface de travail
avant débrayage et arrêt de la
rotation de la broche indiquant
que l’opération de vissage est
complètement terminée.
(3) Continue to allow the mo-
tor to run. The next screw will
be automatically fed into place
when the tool is removed from
the work surface.
(3) Continúe haciendo funcio-
nar el motor. El siguiente tor-
nillo se alimentará automáti-
camente cuando quitado de la
superficie de trabajo.
(3) Appuyez de nouveau sur
la gâchette pour permettre au
moteur de tourner. La vis
suivante sera automatiquement
alimentée à l'outil est enlevé de
surface de travail.
Para ajustar la profundidad de
clavado, 1) libere la ruedecilla
para el ajuste deslizando y
deteniendo el seguro hacia la
posición de abierto. Después,
2) gire la ruedecilla para el
ajuste en la posición deseada.
Pour régler la profondeur de
clouage, il faut 1) relâcher la
molette de réglage en glissant
le bloc et en le tenant à la
position de déverrouillage.
Ensuite, il faut 2) tourner la
molette de réglage jusqu'à la
position désirée.
This tool has a depth-sensing clutch.
When the screw is countersunk to
the pre-set depth, it automatically
disengages and makes a click or
racheting sound. This is normal and
signals completion of the drive.
Esta herramieenta tiene un em-
brague que determina la profundi-
dad. Cuando el tornillo se embute a
una profundidad preconfigurada, el
embrague se desacopla automática-
mente y hace un clic o un sonido de
trinquete. Esto es normal e indica la
finalización
del impulso.
Cet outil posséde un dispositif
de mesure de profondeur avec
débrayage. Lorsque la vis arrive
à la profondeur prédéterminée, le
dispositif se débraie automatique-
ment et produit un clic, signifiant que
le vissage est terminé.
Changing the bit:
Due to wear or damage, the
bit will need to be replaced
periodically or when changing
from Phillips to Square Drive
fasteners.
Cambio de la broca:
La broca se deberá reem-
plazar periódicamente a
causa del desgaste o daños o
cuando se cambia de tornillos
Phillips a tornillos para broca
de punta cuadrada.
Changement de la
broche :
La broche doit être remplacée
périodiquement en raison
d’usure ou de dommage ou
de changement entre vis à
tête Phillips ou carrées.
To adjust the depth of drive,
1) release the adjustment
thumbwheel by sliding and
holding the block to the
unlock position. Then 2) turn
the thumbwheel to the
desired position.


