Blue Jay
FUSELAGE
❑
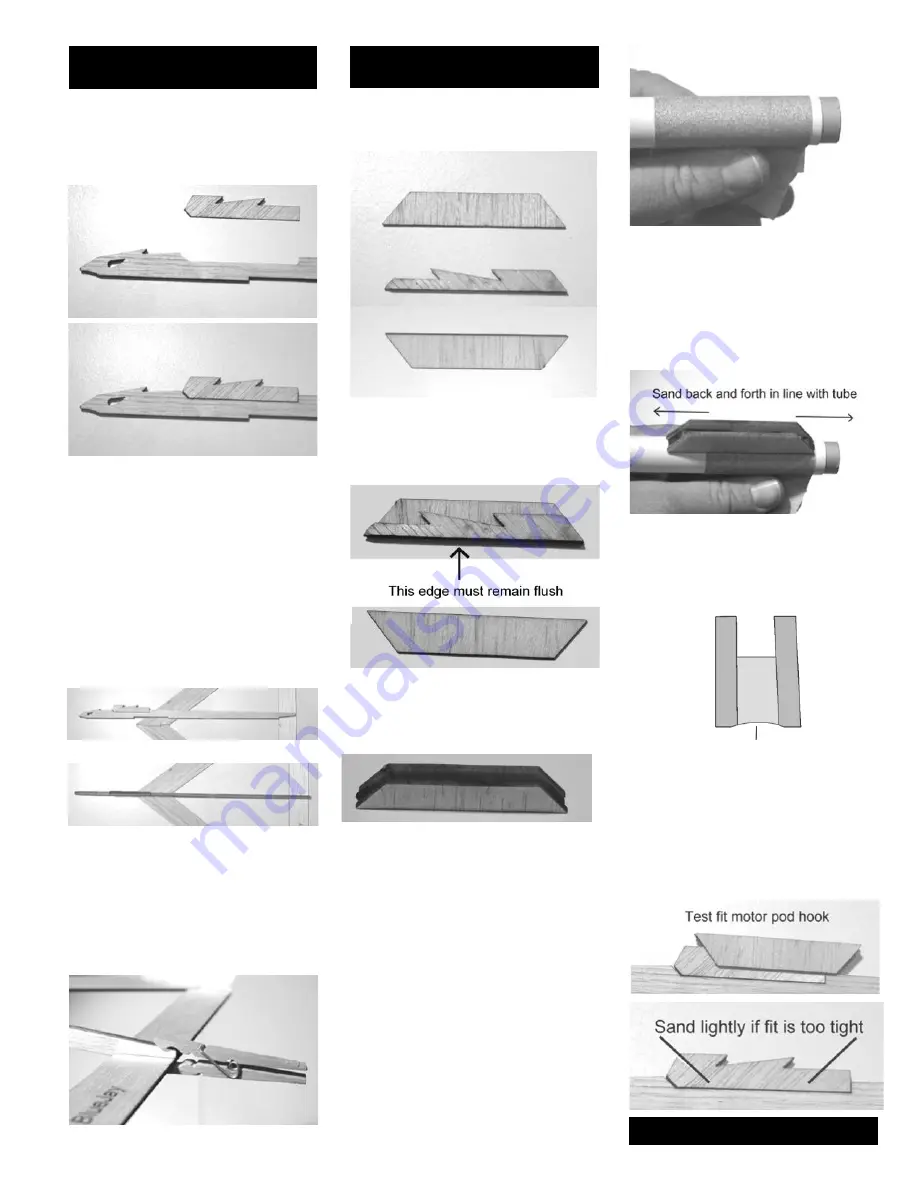
10.
Locate the 3 pieces of the
motor pod hook.
Viewed from the end, the motor pod
hook should look like this when con-
tour sanding is finished.
❑
13.
Sand a contour into the motor
pod hook so it fits snugly onto the
motor tube. Take an empty motor
casing and insert it into the motor
pod tube. Leave about 1/4 inch hang-
ing out so you can grab it to pull it
out later. Wrap a piece of sandpaper
around the tube and hold it in place.
❑
11.
Glue the hook to the cheek
while making sure the bottom edges
are aligned.
❑
14.
Take the motor pod hook in
hand and sand it gently back and
forth, making sure to keep it aligned
with the tube. Do your best to apply
light, even pressure while sanding. If
you don’t sand it straight, you’ll end
up with divergent thrust and your
rocket won’t fly straight.
❑
15.
Test fit the motor pod hook
and the fuselage hook. If the fit is too
tight, the motor pod won’t separate
when the motor fires the ejection
charge. Lightly sand the fuselage
hook with fine sandpaper until the
motor pod hook slides off smoothly.
❑
7.
Attach the hook to the fuselage
as shown. Make sure the hook is
flush with both sides of the fuselage
before gluing in place.
❑
8.
After the glue on the hook has
cured, attach the fuselage to the
wing. The notch in the underside of
the fuselage aligns with the leading
edge of the wing while the other end
aligns with the notch in the rear
wing. Only glue the leading edge of
the wing to the underside of the fu-
selage at this time. Just like the up-
rights, make sure the fuselage is at a
90 degree angle to the wing.
❑
9.
After the glue has dried from
step 8,
the tail of the glider is glued
to the fuselage to form the elevator.
Clamp in place with hobby clamps or
a clothespin while the glue dries.
MOTOR POD
❑
12.
Glue on the other cheek and
you’ll have an assembly that looks
like this.
Note contour


