background image

7.1

6.1

6.2

6.3

7.2

6

7

English

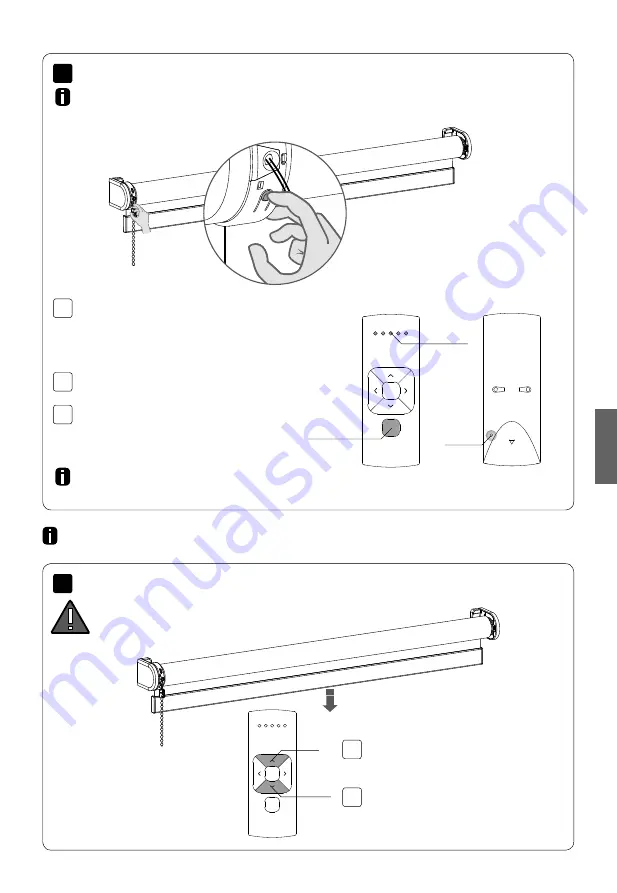
Shortly press the 

down

 button to check if the 

blind unrolls the right way. If the blind moves 

up, the rotational direction must be changed. 

Pair a remote control that is able to program blinds. See pages 4 and 5 

for remote control details. In this manual, CM-12 is displayed.

WARNING: 

risk of damage. 

Stop the blind before reaching 

the end positions.

End limits must be programmed to use a blind properly and to prevent it from being damaged.

Proceed to step 12 if end limits are already set. 

Shortly press the 

program

 button on the 

motor. The blind will start stepping, indicating 

that program mode has been activated.

(The blind keeps stepping until the program 

mode is deactivated.)

Repeat steps 6.1 - 6.3 to remove a blind from 

a channel.

Press the 

pair

 button on the back of the remote 

control to pair the blind with the selected channel. 

The blind will shortly stop stepping, indicating that 

the remote has been paired to the blind. 

Select a desired channel for the blind using the 

channel selection

 button on the remote control. 

Channel 

Selection

Pair

 button

Channel 

indicator

Up

Down

Pair a remote

Check rotational direction

Simultaneously press the 

up

 and 

down

 button 

to change the rotational direction.

MOTION


CM-03/05 LI-ION TUBULAR MOTOR

Содержание MOTION CM-01

Страница 1: ...MANUAL CM 01 02 C Li ion battery powered tube motors with pull operation MANUAL CM 01 02 MOTION CM 01 02 LI ION TUBULAR MOTOR Do NOT remove band around shade until installed...

Страница 2: ...Motor features Control options Support USB Rechargeable Rechargeable with micro USB Wireless Cable free installation Happy Programming Dummy proof programming using pull control Favourite Position Pr...

Страница 3: ...window covering cords Do not tie cords together Make sure cords do not twist together and form a loop Cleaning Follow these general rules when cleaning the outside of the device and its components Us...

Страница 4: ...vicinity When operating a biased switch make sure that other persons are kept away Do not operate when maintenance such as window cleaning is being carried out in the vicinity The tube motor must onl...

Страница 5: ...Click Click 1 2 3 4 5 MOTION CM 01 02 LI ION TUBULAR MOTOR Charge before first use See step 17 A green LED will flash The motor can be used during charging Installing the blind Charge to activate the...

Страница 6: ...old again Adjust until the desired bottom limit has been reached Save the position by pushing the button until the blind moves up and down Pull and hold the chain until the blind has reached the upper...

Страница 7: ...LAR MOTOR Save the position by pushing the button until the blind moves up and down Pull the chain shortly to start or stop the blind Pull the chain shortly to start or stop the blind Operating the bl...

Страница 8: ...ll and hold the chain for approximately 7 seconds until the blind moves up and down Go to any position other than the saved favourite position Hold the chain for 5 seconds The blind moves to the favou...

Страница 9: ...approximately 10 seconds After 5 seconds the blind will move up and down Keep pushing the button until the blind moves up and down again Repeat steps 6 9 to save new end limits Pull and hold the chain...

Страница 10: ...s fully charged English Recharge battery or Activate deactivate the motor Hold the program button and pull twice to activate or deactivate the motor The motor can also be activated by charging it with...

Страница 11: ...s red The battery of the motor is empty Charge the motor See step 17 Motor is not charging Charger is not plugged in or does not work Try a different charger or make sure the charger is plugged into t...

Страница 12: ...C Li ion battery powered tube motors with pull and remote operation MANUAL CM 03 05...

Страница 13: ...eless Cable free installation Connectivity Compatible with home and building automation Speed Control Consistent rolling speed Bi directional Two way communication for real time response Video How to...

Страница 14: ...ensnare a child s neck Move beds cots and furniture away from window covering cords Do not tie cords together Make sure cords do not twist together and form a loop Cleaning Follow these general rules...

Страница 15: ...ed switch make sure that other persons are kept away Do not operate when maintenance such as window cleaning is being carried out in the vicinity The tube motor must only be supplied with safety extra...

Страница 16: ...omply with the limits for a class B digital device pursuant to Part 15 of the FCC Rules These limits are designed to provide reasonable protection against harmful interference when the equipment is op...

Страница 17: ...held remote 1 unlimited CM 12 Hand held remote 5 unlimited CM 13 Hand held remote 15 unlimited CM 15 Wall remote 1 unlimited CM 16 Wall remote 4 unlimited CM 17 Table remote 4 unlimited CM 18 Pull rem...

Страница 18: ...concrete wall CR2430 3 0V 120 mm 45 mm 14 mm n a 433 MHz 30 m with 1 concrete wall CR2430 3 0V 66 mm 32 5 mm 13 8 mm n a 433 MHz 30 m with 1 concrete wall 3 x CR2430 3 0V 86 mm 86 mm 17 mm n a 433 MH...

Страница 19: ...button Channel Selection Channel indicator Up Down Centre stop favourite Centre stop favourite Up Channel indicator Down Right Left CM 11 1 Channel Remote CM 12 5 Channel Remote MOTION CM 03 05 LI IO...

Страница 20: ...Previous Channel Next Channel Centre stop favourite Left Channel 1 Channel 3 Channel 2 Channel 4 Down Up Centre stop favourite Pair button Pair button CM 13 15 Channel Remote CM 17 4 Channel Table Rem...

Страница 21: ...CM 15 1 Channel Wall Remote CM 16 4 Channel Wall Remote Pair button Pair button Up Right Down Left Centre stop favourite Down Up Centre stop favourite MOTION CM 03 05 LI ION TUBULAR MOTOR...

Страница 22: ...CM 18 1 Channel Tassel Remote CM 20 Motion Bridge See manual CM 20 Pair button English MOTION CM 03 05 LI ION TUBULAR MOTOR...

Страница 23: ...or by charging it with a micro USB cable A green LED will start flashing The motor can be used during charging To activate the motor without a micro USB cable see step 25 Install the blind Activate th...

Страница 24: ...he program button on the motor The blind will start stepping indicating that program mode has been activated The blind keeps stepping until the program mode is deactivated Repeat steps 6 1 6 3 to remo...

Страница 25: ...he desired bottom position WARNING risk of damage Slowly approach the bottom position Set bottom position Simultaneously hold the centre and the up button until the blind stops stepping and starts ste...

Страница 26: ...blind reaches the desired top position WARNING risk of damage Slowly approach the top position Up English Simultaneously hold the centre and the down button until the blind stops stepping and starts...

Страница 27: ...eactivate program mode The blind stops stepping and can be operated Centre Deactivate program mode Hold the centre button to save this Favourite position The blind shortly stops stepping indicating th...

Страница 28: ...o move the blind to the end positions Pull again to stop the blind Remote control Choose the channel with which the blind has been paired using the channel button Press the up or down button to operat...

Страница 29: ...am button on the motor to activate program mode The blind starts stepping Hold the program button until the blind stops stepping approximately 5 seconds to deactivate or reactivate direct control When...

Страница 30: ...the button until the blind stops stepping for the second time approximately 10 seconds Factory reset to reset the blind to factory defaults hold the button for at least 20 seconds The blind will stop...

Страница 31: ...ngle select simultaneously hold the centre button and press the pair button To search for the next blind press the right button Search mode will be activated To find the previous blind press the left...

Страница 32: ...ving to physically press the program button on the blind To search for the next blind press the right button Search mode will be activated To find the previous blind press the left button To exit Sing...

Страница 33: ...t remote Select a new channel on the new remote Channel select makes it possible to copy blinds in between channels remotes without having to physically press the program button on the motors Select t...

Страница 34: ...the motor See step 6 Motor LED flashes red The battery of the motor is empty Charge the motor See step 19 Blind is not charging Charger is not plugged in or does not work Try a different charger or m...

Страница 35: ...MANUAL CM 20 MOTION Wi Fi bridge English 0 Motion Wi Fi bridge 115x115 indd 1 18 10 18 16...

Страница 36: ...nable voice control and a variety of smart automation options This box includes the following items CM 20 MOTION Wi Fi Bridge Micro USB cable 75cm For the latest information and updated manuals visit...

Страница 37: ...m 2 1 in 25mm 1 in 100mm 4 in 54mm 2 1 in 25mm 1 in 100mm 4 in Micro USB 5VDC Reset button Power indicator Internet connectivity Data transfer Set button 0 Motion Wi Fi bridge 115x115 indd 3 18 10 18...

Страница 38: ...tection against harmful interference when the equipment is operated in a commercial environment This equipment generates uses and can radiate ra dio frequency energy and if not installed and used in a...

Страница 39: ...the device Rough handling can break internal circuit boards Cleaning Follow these general rules when cleaning the outside of the device and its components Use a damp soft lint free cloth Avoid getting...

Страница 40: ...ling Download the MOTION Blinds app from the App Store or Google Play with your smartphone or tablet Open the MOTION app and create an account App Store Download the MOTION Blinds app rtube nl red981...

Страница 41: ...ed Bridge is powered on Center Blinking purple Bridge connecting mode Center Blinking red Not connected to Wi Fi Center Solid Yellow Connected to Wi Fi not connected to MOTION cloud Center Solid Blue...

Страница 42: ...n for the MOTION bridge in your home Connect your smartphone or tablet to your home Wi Fi network to check the strength of the Wi Fi signal at this location To avoid interference please make sure the...

Страница 43: ...setup your bridge Choose Edit at the top right of your screen and open Settings Click on your location MyHouse to add the MOTION bridge to this location The MOTION Blinds app allows to create 5 diffe...

Страница 44: ...the app and press Connect Now a MOTION Wi Fi network is created by the bridge Make sure the MOTION bridge is powered ON Open the Wi Fi settings of your mobile device and connect to the Wi Fi network y...

Страница 45: ...en blue Now the bridge is connected to your Wi Fi network and the MOTION cloud Keep the MOTION Blinds app running on the background while opening the Wi Fi settings of your mobile device Choose the MO...

Страница 46: ...back to the start screen in the app and open your location Navigate to Blind and press the button to add a new blind Make sure your blind has a top and bottom position programmed If your blind does n...

Страница 47: ...button Program button on motor Shortly press the program button on the blind Please see the manual of your motor to see where the program button is located The blind will start stepping indicating tha...

Страница 48: ...ove the blind to 0 Edit blind Hold and slide to set the favorite position Tap to move the blind to the favorite position Blind position Press to move the blind Open blind Tap to move the blind to 100...

Страница 49: ...e favorite position Tap to move the blind to the favorite position Blind position Slide to move the blind to any position Close blind Tap to move the blind to 0 Open blind Tap to move the blind to 100...

Страница 50: ...dit blind Mid rail position Slide to move the mid rail to any position Blind position Press to move the blind Open blind Tap to move the blind to 100 Dual control Slide to move both rails at the same...

Страница 51: ...de to set the favorite position Tap to move the blind to the favorite position Edit blind Blind position Press to move the blind Tilt control Press to tilt Open blind Tap to move the blind to 100 Tilt...

Страница 52: ...linds in a room at the same time Shortly click on a room to see control all the blinds in this room Position slider Press the button to add a new room Target Position Add room Click and hold on a room...

Страница 53: ...A SCENE Create a scene Scenes can be created to move your blinds to preset positions Edit scenes Swipe right to edit Add new scene Play scene Swipe left to delete 0 Motion Wi Fi bridge 115x115 indd 19...

Страница 54: ...a timer Timers can be created to automate blinds and scenes to make the home seem inhabited Edit timers Swipe right to edit Add new timer Turn on off timer Swipe left to delete 0 Motion Wi Fi bridge...

Страница 55: ...over third party connections for MOTION blinds rtube nl red1062 The MOTION bridge allows to seamlessly connect motorised blinds to smart home applications Scan the QR code below to discover the third...

Страница 56: ...too far Move the bridge closer to the blind The bridge is turned off Power the bridge Can not pair your bridge Wrong password Start the setup wizard again and use the right password The password is ca...

Отзывы: