background image

70

D

FEHLER

LÖSUNG

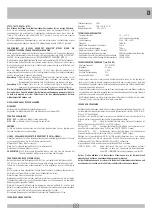
Nachdem die verschiedenen Verbindungen gelegt sind und Strom angelegt wurde, sind alle 
LEDs ausgeschaltet.

Auf der Platine befinden sich rücksetzbare Sicherungen, die im Kurzschlussfall 
eingreifen und den ihnen zugeordneten Ausgang unterbrechen.
Bei der Fehlerbehebung ist es ratsam, alle lösbaren Steckverbinder abzutrennen und 
nacheinander zu stecken, um die Fehlerursache leichter erkennen zu können.

Die Integrität der Schmelzsicherungen F1 überprüfen. 
Falls die Schmelzsicherung unterbrochen ist nur eine angemessenen Werts benutzen   
F1 = T 5A.

Der Motor öffnet und schließt, aber hat keine Antriebskraft und bewegt sich langsam.

Regulierung der Trimmer TORQUE und LOW-SPEED überprüfen.

Das Tor führt die Öffnung aus, schließt aber nicht nach der Zeit, die eingestellt ist.

Kontrollieren, dass der Trimmer TCA aktiviert ist und die LED DL6 leuchtet. 
Taste OPEN immer eingeschaltet => die Taste des OPEN-Befehls ersetzen. 
Fotozellen Auto-Test fehlgeschlagen => Überprüfen Sie die Verbindungen zwischen dem 
Bedienfeld und den Fotozellen.

Das Tor öffnet und schließt beim Betätigen der verschiedenen START, RADIO, OPEN und 
CLOSE Tasten nicht.

Kontakt der Stop, Kontaktleiste oder Photozelle bei DIP 4 OFF defekt => Reparieren oder 
ersetzen Sie den fehlerhaften Kontakt.
Fotozellen Auto-Test fehlgeschlagen => Überprüfen Sie die Verbindungen zwischen dem 
Bedienfeld und den Fotozellen.

Das elektrische Schloss funktioniert nicht.

Vergewissern, dass DIP 8 auf ON gestellt ist.
Überprüfen Sie das Kabel.

Der Summer gibt 2 lange Töne ab und das Tor bewegt sich nicht. 

Kontaktleiste mit 8,2 K

 Widerstand. Entfernen Sie den Widerstand oder konfigurieren Sie 

den EDGE-Eingang über die RIB GATE-App

Die Fernbedienung funktioniert nicht. LED DL12 leuchtet rot Fehlendes.

Fehlendes Funkmodul im Stecker J5 oder defektes Funkmodul.

OPTIONEN -

   Für die Anschlüsse und die technischen Daten der Zubehöre verweisen wir auf die entsprechenden Betriebsanleitungen.

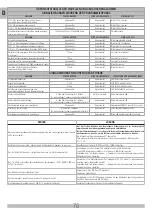
ÜBERSICHTSTABELLE DER VISUELLEN UND AKUSTISCHEN ALARMEN

SIGNALISIERUNGEN WÄHREND DER PROGRAMMIERPHASE

EREIGNIS

STATUS BUZZER

STATUS BLINKLEUCHTE

STATUS LED DL 1 

DIP 1 ON (“befehl gedrückt gehalten”-modus) 
oder defekt einer sicherheitsvorrichtung

Abgeschaltet

Abgeschaltet

Blinkt 250 ms ein-aus

DIP 2 ON (laufprogrammierung ganz)

Abgeschaltet

Abgeschaltet

Blinkt 500 ms ein-aus

DIP 2>1 ON (laufprogrammierung fussgänger)

Abgeschaltet

Abgeschaltet

Blinkt 500 ms ein-aus

programmierverahren unterbrochen wegen auslösung 
einer sicherheitsvorrichtung

10 Sekunden Ton mit 2 Sekunden Pause

Abgeschaltet

Fix aufleuchtend

EREIGNIS

STATUS BUZZER

STATUS BLINKLEUCHTE

STATUS LED DL12 

Kein funkcode eingegeben

Abgeschaltet

Abgeschaltet

Blinkt abwechselnd rot/grün

DIP 1 > 2 Programmierung funkcodes vollöffnung 

Abgeschaltet

Abgeschaltet

Blinkt rot für 10 sekunden

DIP 1 > 3 Programmierung funkcodes fussgänger

Abgeschaltet

Abgeschaltet

Blinkt grün für 10 sekunden

DIP 1>2>3 Programmierung funkcodes R-AUX relais

Abgeschaltet

Abgeschaltet

Blinkt orange für 10 sekunden

Bestätigte Programmierung Funkcodes vollöffnung und 
R-AUX relais

1 Töne

Abgeschaltet

Leuchtet 1 mal grün auf 

Bestätigte Programmierung Funkcodes fussgänger

1 Töne

Abgeschaltet

Leuchtet 1 mal rot auf 

Funkcode nicht im speicher vorhanden

Abgeschaltet

Abgeschaltet

Leuchtet 1 mal rot auf 

Speicher der Funkcodes voll (1000 gespeicherte codes)

Abgeschaltet

Abgeschaltet

Blinkt 6 mal grün

Löschung der Funkcodes für vollöffnung, 
fussgängeröffnung, R-AUX relais

2 Töne

Abgeschaltet

Blinkt 2 mal grün

SIGNALISIERUNGEN WÄHREND DES BETRIEBS

EREIGNIS

STATUS BUZZER

STATUS BLINKLEUCHTE

LEDZUSTAND UND AUSGANGSSIGNAL

Stopptaste eingedrückt

Abgeschaltet

Abgeschaltet

LED DL6 schaltet sich ab

Eingriff des Photozelle

1 Tön

Abgeschaltet

LED DL7-8 schaltet sich ab

Eingriff des Kontaktleiste

2 Töne

Abgeschaltet

LED DL9-10 schaltet sich ab

Defekt einer sicherheitsvorrichtung oder 
sicherheitsvorrichtung für eine längere zeit belegt

Abgeschaltet

Abgeschaltet

LED DL1 blinkt 250 ms ein-aus

Alarm von Kontaktleiste

2 Töne alle 5 Sekunden für 1 Minute 

(Es wird verlängert, indem man einen Befehl erteilt)

Aktiv für 1 minute

Keine kombinierte LED

Alarm selbsttest fehlgeschlagen

4 Töne alle 5 Sekunden für 1 Minute

(Es wird verlängert, indem man einen Befehl erteilt)

 Abgeschaltet

Keine kombinierte LED

Funktionsblock aktiviert von Smartphone

Abgeschaltet

Abgeschaltet

Zweifarbige LED DL12 leuchtet fix grün auf

Erreichung von set-zyklen

6 Töne alle 5 Sekunden

(Es wird verlängert, indem man einen Befehl erteilt)

Abgeschaltet

keine übereinstimmenden LEDs

Energiesparen aktiviert durch Smartphone

Abgeschaltet

Abgeschaltet

Blaue LED blinkt einmal alle 5 Sekunden

Содержание IDRO C 27/1B

Страница 1: ... C 27 1B AD00756 Il corretto funzionamento dell operatore è garantito solo se viene gestito da un quadro di comando RIB Le bon fonctionnement de l opérateur n est garanti que s il est géré par un panneau de contrôle RIB The correct operation of the operator is guaranteed only if it is managed by a RIB control panel Die korrekte Bedienung des Bedieners ist nur gewährleistet wenn er von einem RIB Be...

Страница 2: ...osservanza nell installazione delle norme di sicurezza e delle leggi attualmente in vigore ATTENTION POUR LA SECURITE DES PERSONNES IL EST IMPORTANT DE SUIVRE TOUTES LES INSTRUCTIONS CONSERVER SOIGNEUSEMENT CES INSTRUCTIONS 1 Si ce n est pas prévu dans la centrale installer en amont de celle ci un interrupteur de type magnétothermique omnipolaire avec ouverture minimum des contacts de 3 mm qui por...

Страница 3: ...the non observance during the installation of the safety standards and of the laws in force at present ACHTUNG FÜR DIE SICHERHEIT DER PERSONEN IST ES WICHTIG DASS ALLE ANWEISUNGEN GENAU AUSGEFÜHRT WERDEN INSTALLATIONSVORSCHRIFTEN BEACHTET WERDEN 1 Wenn nicht bereits an der elektrischen Schaltzentrale vorgesehen muss vor der Schaltzentrale ein thermomagnetischer Schalter installiert werden omnipola...

Страница 4: ...sa asta standard Peso operatore con olio Quantità olio Olio tipo 260W 310W IDRO C 27 1B 230 V 10 50 60Hz Hz 1 14A 1 44A 2000N 2500N 17 5 sec 21 5 sec 2 m 0 9 m Peso max anta 250 kg 20 70 C 1002 mm 5 270 mm 8 kg 0 6 lt RIB Oil HC13 IP 55 n cicli normativi 30 17s 2s n cicli consigliati al giorno 200 Servizio 60 n cicli consecutivi garantiti 50 Grado di protezione 90 97 5 274 1060 720 70 Misure in mm...

Страница 5: ...NTO ATTACCHI Nella tabella seguente C1 sono riportati i dati consigliati per definire la posizione degli attacchi dell attuatore rispetto al centro di rotazione dell anta Determinando le quote A e B si stabiliscono La corsa utile C del pistone La velocità periferica dell anta L angolo di massima apertura dell anta La tenuta del blocco in relazione alla quota E che deve sempre risultare inferiore a...

Страница 6: ...lonna mediante viti di fissaggio C4 Le dimensioni della piastra di rinforzo vanno proporzionate alle dimensioni della colonna Attenzione Qualora le dimensioni della colonna lo consentano utilizzare la piastra standard RIB in dotazione 3 1 3 Attuatore fissato su pilastri in muratura Se i pilastri di sostegno delle ante del cancello sono in muratura occorre predisporre su ciascuno una piastra metall...

Страница 7: ...i allegate a parte Se si utilizza la piastra tipo B Inserire i prigionieri C9 pos 5 nelle guaine se si utilizza la piastra tipo B Inserire la piastra di ancoraggio C9 pos 7 nei prigionieri Se si utilizza invece la piastra tipo C Inserire i prigionieri C9 pos 5 in uno dei due lati delle nicchia Inserire la piastra di ancoraggio C9 pos 7 nei prigionieri Inserire i due prigionieri restanti C9 pos 8 A...

Страница 8: ...datura si sarà raffreddata è necessario ricoprirla con vernice antiruggine 3 3 INSTALLAZIONE PROVVISORIA DELL ATTUATORE È necessario installare provvisoriamente l attuatore per determinare correttamente la posizione di fissaggio dell attacco anteriore Attenzione Maneggiare con cura l attuatore durante le fasi di montaggio Inserire sul fondello dell attuattore la relativa forcella C13 pos 1 Bloccar...

Страница 9: ...tore dall attacco anteriore rimuovere completamente l attuatore stesso dagli attacchi provvisori chiudere la flangia di sblocco con il relativo sottotappo completare la saldatura proteggendo in qualche modo panno pulito o nastro adesivo il perno C19b pos 5 dalle scorie e rimuovere le scorie stesse con una spazzola metallica C19b pos 6 Attenzione Durante la puntatura ad elettrodo dell attacco anter...

Страница 10: ...o ruotando a fondo in senso orario la chiave di sblocco 3 5 3 Collegamento elettrico Eseguire il collegamento elettrico facendo riferimento allo schema B1 nel paragrafo Allacciamento elettrico del sistema Collegare il condensatore fornito all apparecchiatura elettrica di controllo facendo riferimento allo schema elettrico della stessa 3 5 4 Montaggio del carter di protezione e rimozione vite di sf...

Страница 11: ... con un cacciavite a lama piatta larga in senso orario per aumentare la pressione o in senso antiorario per diminuirla La regolazione va effettuata sia sulla valvola di regolazione pressione in apertura argento E7 pos 2 che in chiusura oro E7 pos 1 Cautela Tarare la spinta in apertura dell anta leggermente superiore a quella di chiusura Dopo avere effettuato la regolazione ricontrollare con il din...

Страница 12: ...inare il collegamento dell attacco anteriore cilindro se presenti contattare il Centro riparazioni RIB valore Attivando il comando di apertura l anta non si muove ed il motore elettrico dell attuatore non entra in funzione Se l attuatore è dotato di sblocco idraulico controllare che la valvola di sblocco manuale sia chiusa 6 0 Manutenzione Informazioni Si consiglia di effettuare periodicamente un ...

Страница 13: ...E LED R 2 2K 1 4W SERRATURA ELETTRICA CHIUDE APRE COMUNE CHIUDE APRE COMUNE ANTENNA 433 MHz SCHERMATURA CAVO D ANTENNA LAMPEGGIATORE 230Vac 40W FINECORSA APERTURA M1 FINECORSA CHIUSURA M1 COMUNE FINECORSA APERTURA M2 FINECORSA CHIUSURA M2 COMUNE COMUNE COMUNE COMUNE FOTOCELLULA 1 STOP COSTA 2 FOTOCELLULA 2 COSTA 1 ALIMENTAZIONE 230Vac 50 Hz 700 W MAX ...

Страница 14: ...hiusura M2 J14 COM A Comune dei contatti Positivo 24 Vdc STOP Contatto impulso di stop NC PHOT 1 Contatto fotocellule 1 NC PHOT 2 Contatto fotocellule 2 NC EDGE 1 Contatto costa 1 NC EDGE 2 Contatto costa 2 NC J15 COM A Comune dei contatti Positivo 24 Vdc B I O Contatto orologio PED Contatto comando apertura pedonale NA START Contatto impulso singolo NA CLOSE Contatto impulso di chiusura NA OPEN C...

Страница 15: ...tura totale e 15 secondi di pausa dopo l apertura pedonale prima di avere la chiusura automatica del cancello R AUX CONTATTO RELÉ AUSILIARE NA Di default questo relé è impostato come luce di cortesia max 700 W 3 A 230 Vac per funzionare 3 minuti ad ogni comando con rinnovo del tempo ad ogni comando È possibile attivare il contatto R AUX tramite telecomando eseguendo la procedura di memorizzazione ...

Страница 16: ...2 su OFF 5 Fine procedura SEGNALAZIONE MEMORIA SATURA CODICI RADIO DEDICATI ALL APERTURA TOTALE La segnalazione si può ottenere solo a cancello fermo 1 Posizionare prima il DIP 1 su ON e poi il DIP 2 su ON 2 Il led DL12 lampeggia per 6 volte verde segnalando memoria satura 1000 codici presenti Successivamente il led DL12 lampeggia rosso per 10 secondi consentendo un eventuale cancellazione totale ...

Страница 17: ...ETTRICA Mettere il DIP 11 su ON per abilitare il colpo di aggancio della serratura elettrica in chiusura A chiusura avvenuta vengono comandati per 1 secondo i motori a piena tensione per garantire l aggancio della serratura FUNZIONAMENTO ACCESSORI DI SICUREZZA FOTOCELLULE COM A PHOT 1 COM A PHOT 2 NOTA il transito dalle fotocellule è segnalato da un tono di buzzer DIP 4 OFF A cancello chiuso se un...

Страница 18: ... M2 e allo spegnimento di M2 chiuderà M1 Questo movimento separato dei due motori eviterà l accavallamento delle ante CARATTERISTICHE TECNICHE PROBE Tensione di funzionamento 5Vdc Resistenza 10K 2 a 25 C Temperatura di lavoro 30 55 C CARATTERISTICHE TECNICHE Range di temperatura 10 55 C Umidità 95 senza condensazione Tensione di alimentazione 230 o 120V 10 Frequenza 50 60 Hz Assorbimento massimo s...

Страница 19: ...corsa pedonale Spento Spento Lampeggia 500 ms on off Procedura di programmazione interrotta per intervento di una sicurezza Tono da 10 s con pausa di 2 s Spento Acceso fisso EVENTO STATO BUZZER STATO LAMPEGGIATORE STATO LED DL12 Nessun codice radio inserito Spento Spento Lampeggia alternativamente rosso verde Dip 1 2 programmazione codici radio apertura totale Spento Spento Lampeggia rosso per 10 ...

Страница 20: ...rale di comando tramite Bluetooth APP8054 Scheda APP per gestire la centrale di comando tramite Bluetooth APP8064 Modulo Wi Fi per Scheda APP per gestire la centrale tramite rete Wi Fi locale WLAN APP8066 Modulo RJ45 per Scheda APP per gestire la centrale tramite rete dati locale LAN MODULO RADIO 433MHz cod ACG8069 SUN 2CH cod ACG6052 SUN 4CH cod ACG6054 SUN CLONE 2CH cod ACG6056 SUN CLONE 4CH cod...

Страница 21: ...rous de fixation avec tige sortie Course maximale tige standard Poids avec huile Quantité huile Huile type 260W 310W IDRO C 27 1B 230 V 10 50 60Hz Hz 1 14A 1 44A 2000N 2500N 17 5 sec 21 5 sec 2 m 0 9 m Peso max anta 250 kg 20 70 C 1002 mm 5 270 mm 8 kg 0 6 lt RIB Oil HC13 Degré de protection IP 55 n de cycles normatifs 30 17s 2s n de cycles conseillés par jour 200 Service 60 n cycles consécutifs g...

Страница 22: ...bleau suivant C1 illustre les données conseillées pour définir la position des fixations de l automatisme par rapport au centre de rotation du vantail En déterminant les valeurs A et B on obtient la course utile C du piston la vitesse périphérique du vantail l angle d ouverture maximale du vantail la résistance du blocage par rapport à la valeur E qui doit toujours être inférieure à B si l automat...

Страница 23: ...c des vis de fixation C4 Les dimensions de la plaque de renforcement doivent être proportionnées aux dimensions du pilier Attention Si les dimensions du pilier sont adaptées utiliser la plaque standard RIB fournie 3 1 3 Automatisme fixé sur des piliers en maçonnerie Si les piliers de soutien des vantaux du portail sont en maçonnerie il faut fixer sur chaque pilier une plaque métallique dotée d anc...

Страница 24: ...laque du type B Insérer les goujons C9 pos 5 dans les gaines quand l on utilise le type B Monter la plaque d ancrage C9 pos 7 sur les goujons Si au contraire l on utilise une plaque du type C Insérer les goujons C9 pos 5 dans un de deux côtés de la niche Monter la plaque d ancrage C9 pos 7 sur les goujons Insérer les deux autres goujons C9 pos 8 Maintenant soit que l on utilise la plaque B ou la p...

Страница 25: ... la zone de soudage avec de la peinture anti rouille 3 3 INSTALLATION PROVISOIRE DE L AUTOMATISME Il est nécessaire d installer provisoirement l automatisme pour déterminer la position correcte de la patte de fixation antérieure Attention Manier l automatisme avec soin pendant les phases de montage Insérer sur le fond de l automatisme la fourche C13 pos 1 Bloquer la fourche avec le goujon spécial ...

Страница 26: ...la patte avant Enlevez complètement l opérateur des fixations provisoires et fermez la bride de déblocage à l aide du sous bouchon correspondant Complétez le soudage protégez à l aide d un chiffon propre ou d un ruban adhésif le pivot C19b pos 5 contre les résidus et enlevez les au moyen d une brosse métallique C19b pos 6 Attention Lors du soudage par points de la patte avant toujours protéger la ...

Страница 27: ...rnant la clé de déblocage dans le sens horaire 3 5 3 Branchement électrique Pour le branchement électrique voir le schéma B1 du paragraphe Branchement électrique du système Relier le condensateur fourni à l appareil électrique de commande en se rapportant au schéma électrique de l appareil lui même 3 5 4 Montage du carter de protection et démontage de la vis de purge Monter le carter de protection...

Страница 28: ...apets avec un tournevis à lame plate large en tournant dans le sens horaire pour augmenter la pression ou dans le sens contraire pour la réduire Le réglage doit être effectué sur le clapet de pression en ouverture argent E7 pos 2 qu en fermeture or E7 pos 1 Prudence La force de poussée en ouverture doit être légèrement supérieure à celle en fermeture Après le réglage vérifier à nouveau avec le dyn...

Страница 29: ...e le vantail ne bouge pas et le moteur électrique de l opérateur ne marche pas Lorsqu on active la commande d ouverture le moteur électrique de l opérateur marche mais le vantail ne bouge pas Pendant le mouvement l opérateur fonctionne à coup 6 NOTES POUR L INSTALLATEUR 6 0 Entretien Informations Vérifier régulièrement le fonctionnement correct de l automatisme Effectuer ce contrôle au moins une f...

Страница 30: ...ERRURE ELECTRIQUE FERMETURE OUVERTURE COMMUN FERMETURE OUVERTURE COMMUN ANTENNE 433 MHz ENVELOPPE ANTENNE FEU CLIGNOTANT 230Vac 40W FIN OUVERTURE M1 FIN FERMETURE M1 COMMUN FIN OUVERTURE M2 FIN FERMETURE M2 COMMUN COMMUN COMMUN COMMUN PHOTOCELLULES 1 STOP CORDON 2 PHOTOCELLULES 2 CORDON 1 ALIMENTATION 230Vac 50 Hz 700 W MAX 24Vdc 0 4A 15 24Vdc 0 4A 15 ...

Страница 31: ... des contacts Positif 24 Vdc STOP Contact impulsion de stop NF PHOT 1 Contact photocellules 1 NF PHOT 2 Contact photocellules 2 NF EDGE 1 Contact barre palpeuse de sécurité 1 NF EDGE 2 Contact barre palpeuse de sécurité 2 NF J15 COM A Commun des contacts Positif 24 Vdc B I O Contact d une horloge NO PED Contact commande ouverture piétonne NO START Contact impulsion simple NO CLOSE Contact impulsio...

Страница 32: ...our une porte totalement ouverte peut être ajusté d un minimum de 2 secondes à un maximum de 2 minutes Le temps de pause pour portail ouvert avec commande pietonne PED peut être réglé entre 2 secondes minimum et 30 secondes maximum Ex Avec TCA à demi course vous aurez une pause d une minute après l ouverture totale et de 15 secondes après l ouverture pietonne avant d avoir la fermeture automatique...

Страница 33: ...ondes 2 Dans ces 10 secondes appuyez sur le bouton de la télécommande normalement le canal A Si la télécommande est correctement mémorisée la LED DL12 s allume en vert et une tonalité du buzzer confirme la mémorisation correcte Les 10 secondes pour la programmation des codes sont automatiquement renouvelées avec la LED DL12 qui clignote en rouge pour pouvoir mémoriser la télécommande suivante 3 Po...

Страница 34: ...e mouvement d ouverture cela ne produit aucun effet S il est actionné lorsque le portail est ouvert il le ferme S il est actionné pendant la fermeture du portail il le rouvre BOUTON D OUVERTURE PIETONNE COM A PED Commande réservée à l ouverture partielle et à la refermeture Pendant l ouverture la pause ou la fermeture piétonne il est possible de commander l ouverture depuis n importe quelle comman...

Страница 35: ...ge des opérations REPRISE DU FONCTIONNEMENT APRÈS PANNE D ÉLECTRICITÉ Au retour de la courant la led DL1 s allume et reste allumée pendant tout le temps que le portail reste ouvert Elle s éteindra à la complète ouverture ou fermeture du portail Il est conseillé d ouvrir complètement le portail Laissez le portail se fermer tout seul avec la fermeture automatique ou attendez que le feu clignotant ar...

Страница 36: ...d autotest photocellule 4 Tonalités toutes les 5 secondes pendant 1 minute Renouvelée par l actionnement d une commande Éteint Aucune led associée Blocage fonctionnel exécuté par smartphone Éteint Éteint Led DL12 bicolore allumée fixe en vert Réalisation de cycles définis 6 Tonalités toutes les 5 secondes Renouvelée par l actionnement d une commande Éteint Pas de led appariées Économie d énergie a...

Страница 37: ...bleau de contrôle via Bluetooth 4 2 APP8054 Carte APP pour gérer le tableau de contrôle via Bluetooth 4 2 APP8064 Module Wi Fi pour Carte APP pour gérer le tableau de contrôle via un réseau Wi Fi local WLAN APP8066 Module RJ45 pour Carte APP pour gérer le tableau de contrôle via un réseau de données local LAN SUN 2CH cod ACG6052 SUN 4CH cod ACG6054 SUN CLONE 2CH cod ACG6056 SUN CLONE 4CH cod ACG60...

Страница 38: ...ntity Oil type 260W 310W IDRO C 27 1B 230 V 10 50 60Hz Hz 1 14A 1 44A 2000 N 2500 N 17 5 sec 21 5 sec 2 m 0 9 m Max leaf weight 250 kg 20 70 C 1002 mm 5 270 mm 8 kg 0 6 lt RIB Oil HC13 Protection grade IP 55 Nr of normative cycles 30 17s 2s Nr of daily cycles suggested 200 Service 60 Nr of consecutive cycles guaranteed 50 TECHNICAL DATA INSTALLATION 90 97 5 274 1060 720 70 Measurements in mm A1 In...

Страница 39: ...he operator mountings in relation to the centre of rotation of the gate leaf The distances A and B will give The useful stroke length C of the piston The peripheral velocity of the gate leaf The angle of maximum opening of the gate leaf The holding capacity of the lock in relation to distance E which must always be less than B when the operator is fitted with a hydraulic lock the distance E is obt...

Страница 40: ...ews C4 The size of the reinforcing plate must be in proportion to the size of the column Warning If the size of the column allows for it use the RIB standard plate provided 3 1 3 Operator fixed on masonry posts If the supporting posts for the gate leaves are made of masonry fix the special metal plate complete with anchor bolts used to weld on the rear mounting of the operator to each of them Prep...

Страница 41: ...or application method and quantity If the B type plate is used Insert the stud bolts C9 pos 5 into the sheaths if the B type plate is used Fit the anchoring plate C9 pos 7 to the stud bolts If on the contrary the C type plate is used Insert the stud bolts C9 pos 5 into one of the two sides of the inset Fit the anchoring plate C9 pos 7 to the stud bolts Insert the two remaining stud bolts C9 pos 8 ...

Страница 42: ...sidues When the welded zone has cooled down apply a coat of anti rust paint 3 3 TEMPORARY INSTALLATION OF THE OPERATOR Temporarily mount the operator to find the correct fixing position of the front mounting Warning Handle the operator with care during assembly Fit the fork C13 pos 1 to the operator bottom Lock the fork with the special pin C13 pos 2 and fix both with the two snap rings C13 pos 3 ...

Страница 43: ... remove the operator itself from its temporary mountings close off the flange with the correct plug complete the welding covering the pin using a clean cloth or adhesive tape C19b pos 5 to protect it from weld residue and then clean off the residue with a wire brush C19b pos 6 Warning While welding the points on the front mounting with the electrode always cover the rod with a clean cloth a splint...

Страница 44: ...he hydraulic lock by turning the release key fully in a clockwise direction 3 5 3 Electrical connection Make the electrical connection according to the wiring diagram D1 see paragraph System electrical connection Connect the supplied capacitor B4 pos 12 to the electric control unit according to the wiring diagram of the unit itself 3 5 4 Fitting the protection casing and removing the bleed screw F...

Страница 45: ...n the control valves clockwise to increase the pressure and counter clockwise to reduce it Adjust both opening silver E7 pos 2 and closing pressure gold E7 pos 1 Caution The opening thrust of the gate leaf should be set slightly higher than the closing thrust Aftermakingthesettings makeanothercheckwiththedynamometertoseeifthethrust force corresponds to the setting if it doesn t then the setting ne...

Страница 46: ...tor piston is not in the fully advanced position i e with the rod completely out Check the operator mounting as described in this manual Check the measure of the piston stroke and make a few opening and closing movements then re fit to the front mounting the same amperage 6 NOTES FOR THE INSTALLER 6 0 Maintenance Information Periodically check the proper functioning of the operator Do this check a...

Страница 47: ...1 4W ELECTRIC LOCK CLOSE OPEN COMMON CLOSE OPEN COMMON ANTENNA 433 MHz ANTENNA BRAIDING BLINKER 230Vac 40W LIMIT SWITCH OPEN M1 LIMIT SWITCH CLOSE M1 COMMON LIMIT SWITCH OPEN M2 LIMIT SWITCH CLOSE M2 COMMON COMMON COMMON COMMON PHOTOCELL 1 STOP EDGE 2 PHOTOCELL 2 EDGE 1 POWER SUPPLY 230Vac 50 Hz 700 W MAX 24Vdc 0 4A 15 24Vdc 0 4A 15 ...

Страница 48: ... M2 Closing limit switch M2 J14 COM A Common contacts Positive 24 Vdc STOP STOP impulse contact NC PHOT 1 Photocells contact 1 NC PHOT 2 Photocells contact 2 NC EDGE 1 Edge 1 contact NC EDGE 2 Edge 2 contact NC J15 COM A Common contacts Positive 24 Vdc B I O Contact NO dedicated to a clock PED Pedestrian opening contact NO START Single pulse contact NO CLOSE Closing impulse contact NO OPEN Opening...

Страница 49: ...contact by TRANSMITTER by performing the memorization procedure described in point H LED WARNING DL1 PROG programming activated red DL2 M1 gate opening green DL3 M1 gate closing red DL4 M2 gate opening green DL5 M2 gate closing red DL6 STOP command NC red DL7 PHOTO 1 contact NC red DL8 PHOTO 2 contact NC red DL9 EDGE 1 contact NC red DL10 EDGE 2 contact NC red DL11 TCA automatic closure time enabl...

Страница 50: ...Re set DIP 1 to OFF and DIP 2 to OFF 4 End of procedure G RADIO CODES PROGRAMMING PROCEDURE FOR PEDESTRIAN OPENING 1000 CODES MAX with radio module ACG8069 Programming can be done only when the gate is stationary 1 Set DIP 1 to ON and then DIP 3 to ON DL12 flashes green for 10 seconds 2 Press the transmitter button usually channel B within the allotted 10 seconds If the transmitter is properly mem...

Страница 51: ... ON The monitoring consists of a functional test of the photocell run before every movement The gate movement is therefore permitted only if the photocells have passed the functional test CAUTION MONITORING OF THE PHOTOCELLS INPUTS PHOTO 1 PHOTO 2 CAN BE ACTIVATED WITH DIP 7 ON OR DEACTIVATED WITH DIP 7 OFF WARNING If the AUTOTEST feature is enabled and only one photocell is connected a jumper mus...

Страница 52: ... used as clean contacts because the power supply is generated internally safe voltage in the card and it is set in a way to guarantee the use of the double insulation and reinforced in relation to parts with hazardous voltage Any external circuits connected to the outputs of the control board must be carried out to make sure the double or reinforced insulation is used in relation to parts with haz...

Страница 53: ...ff 500 ms Dip 2 1 ON pedestrian stroke programming Off Off Flashes on off 500 ms Programming sequence stopped due to intervention of a safety device 10 seconds tone with 2 seconds pause Off On steady EVENT BUZZER STATUS FLASHER STATUS DL12 LED STATUS No transmitter code entered Off Off Flashes intermittently red green Dip 1 2 transmitter code programming for full opening Off Off Flashes red for 10...

Страница 54: ...Bluetooth 4 2 transmission APP8060 Clock module for APP card to add access control features to the control panel APP8064 Wi Fi module for APP card to manage the control panel using the local Wi Fi network WLAN APP8066 RJ45 module for APP card to manage the control panel using the local network LAN RADIO MODULE 433MHz code ACG8069 SUN 2CH cod ACG6052 SUN 4CH cod ACG6054 SUN CLONE 2CH cod ACG6056 SU...

Страница 55: ...lmenge Öltyp 260W 310W IDRO C 27 1B 230 V 10 50 60Hz Hz 1 14A 1 44A 2000 N 2500 N 17 5 sec 21 5 sec 2 m 0 9 m Max Torgewicht 250 kg 20 70 C 1002 mm 5 270 mm 8 kg 0 6 lt RIB Oil HC13 Schutzart IP 55 Anzahl der Zyklen 30 17s 2s Zahl der vorgeschlagenen täglichen Zyklen 200 Service 60 Zahl der nachfolgenden Zyklen garantierte 50 90 97 5 274 1060 720 70 Abmessungen in mm A1 Im Fall von Flügel länger a...

Страница 56: ...soweit reduzieren als für die Erreichung des erwünschten Öffnungswinkels unbedingt erforderlich Dabei ist jedoch auf Maß Y zu achten damit Überschneidungen von Antrieb und Pfeilerkante vermieden werden Achtung Je größer B im Vergleich zu E desto höher die Festigkeit der hydraulischen Sperrung sofern vorhanden Erfolgt der Schließvorgang des Flügels mittels Elektroschloß so muß E kleiner oder gleich...

Страница 57: ...macht werden Die Verstärkungsplatte soll größenmäßig proportionell zum Pfosten ausgelegt sein Achtung Wenn es die Abmessungen des Pfostens zulassen die mitgelieferte Standardplatte von RIB verwenden 3 1 3 An gemauerten Pfeilern befestigter Antrieb Wenn die Trägerpfeiler der Torflügel gemauert sind muss auf jedem eine Metallplatte mit Verankerung angebracht werden an der der hintere Drehpunkt des A...

Страница 58: ...ung Falls die Platte vom Typ B verwendet wird Stiftschrauben C9 Pos 5 in die Schutzhüllen einbringen falls Platte vom Typ B verwendet wird Ankerplatte C9 Pos 7 in die Stiftschrauben einklemmen Wird dagegen die Platte vom Typ C verwendet Stiftschrauben C9 Pos 5 in eine der beiden Seiten der Nische einfügen Ankerplatte C9 Pos 7 in die Stiftschrauben einklemmen Die zwei restlichen Stiftschrauben C9 P...

Страница 59: ...sollte eine Rostschutzschicht aufgetragen werden 3 3 PROVISORISCHE INSTALLATION DES ANTRIEBS Der Antrieb muss vorläufig installiert werden um die genaue Befestigungsposition des vorderen Drehpunkts zu bestimmen Achtung Den Antrieb während der Montage vorsichtig behandeln Die zugehörige Gabel C13 Pos 1 in die Bodenscheibe des Antriebs einsetzen Die Gabel mit dem zugehörigen Zapfen C13 Pos 2 sichern...

Страница 60: ...n Drehpunkts herausnehmen Den Antrieb aus völlig aus den vorläufigen Drehpunkten entfernen Den Entrieglungsflansch mit dem entsprechenden Unterstopfen abschließen Den Schweißvorgang beenden und dabei den Bolzen C19b Pos 5 möglichst mit sauberem Tuch oder Klebeband vor Schlacken absichern Schlacken mit einer Metallbürste entfernen C19b pos 6 Achtung Beim Elektrodenschweißen des vorderen Drehpunkts ...

Страница 61: ... dieser Testkontrolle die hydraulische Sperrung mittels Durchdrehen des Entriegelungschlüssels im Uhrzeigersinn erneut einschalten 3 5 3 Elektroanschluss Den Elektroanschluss gemäß Verbindungsschema B1 in Paragraph Elektroanschluss des Systems herstellen Den mitgelieferten Kondensator gemäß Schaltplan an die Elektroniksteuerung anschließen 3 5 4 Montage der Schutzabdeckung und Entfernung der Entlü...

Страница 62: ...ch Drehen im und gegen den Uhrzeigersinn wird der Druck erhöht beziehungsweise vermindert Das Druckeinstellventil sowohl im Öffnungsvorgang Silber E7 Pos 2 als auch im Schließvorgang Gold E7 Pos 1 einstellen Vorsicht Den Öffnungsdruck des Flügels etwas höher als den Schließdruck kalibrieren Nach abgeschlossener Einstellung mit Dynamometer nachprüfen ob die Schubkraft dem vorgegebenen Wert entspric...

Страница 63: ...nschlag ausgefahren ist Überprüfen der Montage des Antriebs gemä Punkt C dieses Handbuchs Hublänge kontrollieren Ein paarmal öffnen und schlie en Dann den vorderen Drehpunkt wieder anschlie en ersetzen 6 HINWEISE FÜR DEN INSTALLATEUR 6 0 Wartung Informationen Es wird empfohlen turnusmäßig eine Prüfung durchzuführen um das einwandfreie Funktionieren des Antriebs festzustellen Die Intervalle sollten...

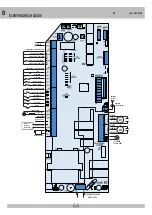
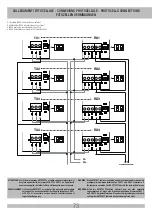
Страница 64: ...EN ÖFFNEN GEMEINSAMER ANTENNE 433 MHz ANTENNE ZOPFFLECHTEN BLINKER 230Vac 40W ENSCHALTER ÖFFNEN M1 ENSCHALTER SCHLIESSEN M1 GEMEINSAMER ERDUNGSKONTAKT GEMEINSAMER ERDUNGSKONTAKT GEMEINSAMER ERDUNGSKONTAKT GEMEINSAMER ENSCHALTER ÖFFNEN M2 ENSCHALTER SCHLIESSEN M2 GEMEINSAMER FOTOZELLEN 1 STOP KONTAKTLEISTE 2 FOTOZELLEN 2 KONTAKTLEISTE 1 STROMVERSORGUNG 230Vac 50 Hz 700 W MAX 24Vdc 0 4A 15 24Vdc 0 4...

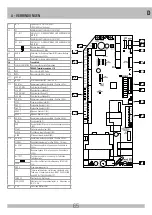
Страница 65: ...c STOP Stop Impuls Kontakt NS PHOT 1 Fotozellen Kontakt 1 NS PHOT 2 Fotozellen Kontakt 2 NS EDGE 1 Ripppen Kontakt 1 NS EDGE 2 Ripppen Kontakt 2 NS J15 COM A Gemeinsame erdungskontakte Positive 24 Vdc B I O Uhr Kontakt NO PED Kontakt Befehl Öffnung für den Fußgängerdurchgang NO START Einzel Impuls Kontakt NO CLOSE Schließung Impuls Kontakt NO OPEN Öffnungs Impuls Kontakt NO J16 COM A Gemeinsame er...

Страница 66: ...älfte eingestellt ist haben Sie nach der vollständigen Öffnung eine Pause von 1 Minute und nach dem Öffnen des Fußgängers eine Pause von 15 Sekunden bevor Sie das Tor automatisch schließen R AUX ZUSATZRELAISKONTAKT NO Standardmäßig ist dieses Relais als Hilfslicht max 700 W 3 A 230 VAC eingestellt um bei jedem Befehl 3 Minuten zu arbeiten wobei die Zeit bei jedem Befehl erneuert wird Sie können de...

Страница 67: ...Die LED DL12 hört auf zu blinken 4 Erneut DIP 1 und DIP 2 auf OFF stellen 5 Ende des Programmiervorgangs ALLE FUNKCODES FÜR GESAMTÖFFNUNG STORNIERUNGSVERFAHREN Stornierungen können nur bei stillstehendem Tor durchgeführt werden 1 DIP 1 auf ON und anschließend DIP 2 auf ON stellen 2 Die LED DL12 blinkt rote für 10 Sekunden 3 Die Taste PROG 5 Sekunden lang gedrückt halten Die Speicherlöschung wird d...

Страница 68: ...che Verriegelung während der Öffnung zu aktivieren IMPULS UM DAS ELEKTROSPERR ZU ÖFFNEN DIP 9 auf ON stellen um die Freigabe der elektrischen Verriegelung während der Öffnung zu aktivieren dabei muss DIP 8 auf ON stehen Wird bei geschlossenem Tor ein Öffnungsbefehl gegeben so führt das Tor für 0 5s eine Schließbewegung aus und gleichzeitig wird die elektrische Verriegelung aktiviert gefolgt von ei...

Страница 69: ...ht mehr blinkt um dann den Schließbefehl zu erteilen Dieser Vorgang dient zur Ausrichtung des Tores Bleiben während des Stromausfalles die Motoren blockiert und werden von ihrer normalen Schließposition entfernt muss nach Wiederherstellung der Stromversorgung ein kompletter Bewegungszyklus ausgeführt werden Wenn der Stromausfall tritt während der Bewegung oder mit geöffnet Tor und der erste Befehl...

Страница 70: ...50 ms ein aus DIP 2 ON laufprogrammierung ganz Abgeschaltet Abgeschaltet Blinkt 500 ms ein aus DIP 2 1 ON laufprogrammierung fussgänger Abgeschaltet Abgeschaltet Blinkt 500 ms ein aus programmierverahren unterbrochen wegen auslösung einer sicherheitsvorrichtung 10 Sekunden Ton mit 2 Sekunden Pause Abgeschaltet Fix aufleuchtend EREIGNIS STATUS BUZZER STATUS BLINKLEUCHTE STATUS LED DL12 Kein funkcod...

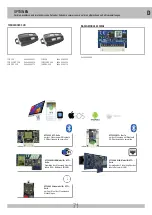
Страница 71: ...ooth 4 2 Übertragung zu verwalten APP8060 Uhrenmodul für APP Karte um Zugriff auf das Steuerungen hinzuzufügen APP8064 WLAN Modul für APP Karte Verwalten des Steuerung über das lokale Wi Fi Netzwerk WLAN APP8066 RJ45 Modul für APP Karte Verwalten der Steuerung über das lokale Netzwerk LAN SUN 2CH Kode ACG6052 SUN 4CH Kode ACG6054 SUN CLONE 2CH Kode ACG6056 SUN CLONE 4CH Kode ACG6058 SUN PRO 2CH Ko...

Страница 72: ...s FIT SLIM FIT SYNCRO avec autotest 2 photocells FIT SLIM FIT SYNCRO with self test 2 Fotozellen FIT SLIM FIT SYNCRO mit Selbstkontrolle 2 fotocellule F97P F97I con autotest 2 photocellules F97P F97I avec autotest 2 photocells F97P F97I with self test 2 Fotozellen F97P F97I mit Selbstkontrolle 2 fotocellule FIT METAL con autotest 2 photocellules FIT METAL avec autotest 2 photocells FIT METAL with ...

Страница 73: ...llisce ed il cancello non si muoverà AVERTISSEMENT si la fonction AUTOTEST est activée et qu une seule photocellule est connectée un cavalier doit être créé entre les bornes PHOT 1 et PHOT 2 Si le cavalier n est pas exécuté l autotest échoue et le portail ne bouge pas WARNING If the AUTOTEST feature is enabled and only one photocell is connected a jumper must be made between the PHOT 1 and PHOT 2 ...

Страница 74: ...74 ...
Страница 75: ...A 5 IDA1021 MOTORE 6 IDA1016 TAPPO SERBATOIO 7 IDA1037 TIRANTE POSTERIORE 8 IDA1028 DISTRIBUTORE 9 IDA1013 1 CONF ATTACCO ANTERIORE 10 IDA1029 FLANGIA ANTERIORE 11 IDA1034 GUARN TENUTA CANNA 12 IDA1032 GUARN SERBATOIO 13 IDA1025 PISTONE 14 IDA1033 CANNA 15 IDA1018 CAVO ALIMENTAZIONE 1m 16 IDA1036 FLANGIA DISTRIBUTORE 17 IDA1023 PROFILO COPRI MOTORE 18 IDA1022 PROFILO COPRI STELO 19 IDA1011 TAPPO F...

Страница 76: ...rectives may be applicable to the products falling within the scope of this Declaration Die folgenden grundlegenden Anforderungen der Maschinenrichtlinie 2006 42 CE angewendet werden und erfüllt Die technischen Unterlagen gemäß Teil B des Anhangs VII zusammengestellt Unterlagen oder Teile davon werden per Post oder auf elektronischem Wege übermittelt werden in Reaktion auf einen begründeten Antrag...

Отзывы: