background image

_  4

Products Specifications/Components

● 

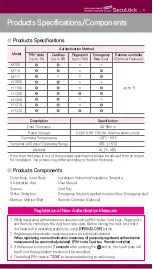
Products Specifications

Registration of New Authentication Measures

1. 

While registering authentication measures such as PIN-codes, Card keys, Fingerprints
and Remote controllers, the door has to be open. Before closing the door, test first if
the Dead bolt is operating properly by using 

[OPEN/CLOSE] 

button.

2. 

Registered authentication measures cannot be individually deleted.

When registering new authentication measures, all previously registered authentication
measures will be automatically deleted. (PIN-code, Card key, Remote controller)

3. 

If there were no inputs for 

7 seconds 

 after pressing the      button, the touch plate will

be off and the registration process will be cancelled.

4. 

The default PIN-code is 

“1234”

 to be operated during its initial setup.

Description

Specification

Door Thickness

40~50mm

Rated Voltage

DC6V (LR6 1.5V AA Alkaline battery only)

Operating Temperature

-20℃~ 50℃

Temperature Sensor Operating Range

60℃ (±5℃)

Material

Al, Zn, ABS

ㆍIf the door thickness is out of the standard specification, please be advised from an expert

for installation. The screws may differ according to the door thickness. 

● 

Products Components 

ㆍOuter body, Inner Body
ㆍAA batteries 4ea
ㆍScrews
ㆍStrike, Strike box
ㆍMortise, Mortise Shaft

ㆍInstallation Instruction/Installation Template
ㆍUser Manual
ㆍCard Key
ㆍEmergency Key (only applied model with an Emergency key)
ㆍRemote Controller (Optional)

Authentication Method

PIN-code

(up to 10)

Card key

(up to 30)

Fingerprint

(up to 100)

Emergency

Key 

(2ea)

Remote controller

(Optional Features)

Model

M710
M711
H1000
H1100
H1200
H1300
H1310
H1320

M700

up to 5

Содержание ND-H1000

Страница 1: ...300 H1310 H1320 User Manual If it is a key door lock keep the key with in your reach in case of emergency Retain this user manual for future reference after reading it thoroughly A non key door lock m...

Страница 2: ...eactivation 8 Fingerprints Activation Deactivation 9 Double Authorization Mode 10 Pre Authentication Mode 11 Opening Door Opening the Door from Outside 12 Opening the Door from Inside 13 Locking Door...

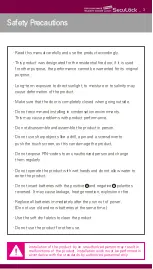
Страница 3: ...going outside Do not recommend installing in condensation environments This may cause problems with product performance Do not disassemble and assemble the product in person Do not use sharp objects l...

Страница 4: ...ll be cancelled 4 The default PIN code is 1234 to be operated during its initial setup Description Specification Door Thickness 40 50mm Rated Voltage DC6V LR6 1 5V AA Alkaline battery only Operating T...

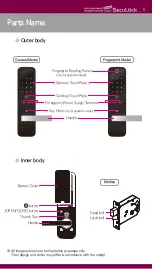
Страница 5: ...rs may differ in accordance with the model General Model Outer body Mortise Battery Cover button OPEN CLOSE button Thumb Turn Handle Fingerprint Reading Panel only for applied models Numeric Touch Pla...

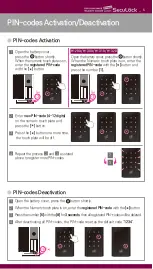
Страница 6: ...default code 1234 Repeat the process and as stated above to register more PIN codes 4 2 3 2 3 Enter new PIN code 4 12 digits on the numeric touch plate and press the button Press the button one more t...

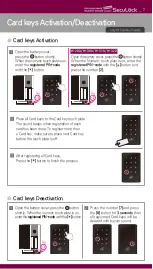
Страница 7: ...ake sure to place next Card key before the touch plate is off Card keys Deactivation Card keys Activation 1 Open the battery cover press the button shortly When the numeric touch plate is on enter the...

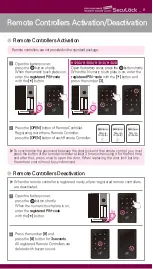
Страница 8: ...Remote Controller press the OPEN button of each Remote Controller To synchronize the password between the door lock and the remote control you must press the button of the remote controller at least...

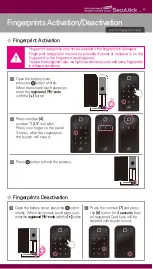
Страница 9: ...r moisture is on the fingerprint or the fingerprint reading panel To raise the recognition rate we highly recommend you to add same fingerprints in different conditions Fingerprints Deactivation 1 Ope...

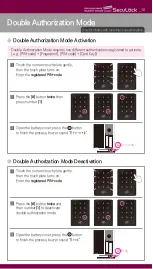
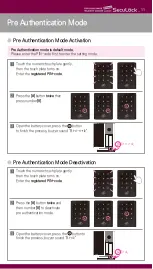
Страница 10: ...er sound Bi rik 3 1 Touch the numeric touch plate gently then the touch plate turns on Enter the registered PIN code 2 Press the button twice and then number 1 to deactivate double authorization mode...

Страница 11: ...h the numeric touch plate gently then the touch plate turns on Enter the registered PIN code 2 Press the button twice then press number 8 3 Open the battery cover press the button to finish the proces...

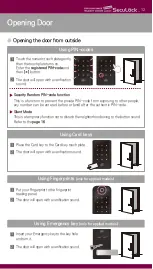
Страница 12: ...en button The door will open with a verification sound This is a temporary function not to disturb the neighborhood owing to the button sound Refer to the page 16 1 2 Using Card keys Place the Card ke...

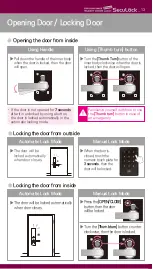
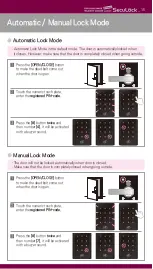
Страница 13: ...thedoorislocked Turn the Thumb Turn button of the inner body clockwise when the door is locked then the door will open Automatic Lock Mode Using Handle Manual Lock Mode Using Thumb turn button Locking...

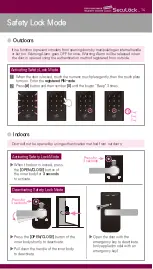
Страница 14: ...on Enter the registered PIN code Press button and then number 0 until the buzzer Beep 3 times Beep Beep Beep Indoors Door will not be opened by using authentication method from outdoors Activating Saf...

Страница 15: ...Lock Mode Touch the numeric touch plate enter the registered PIN code Press the button twice and then number 4 it will be activated with a buzzer sound The door will not be locked automatically when d...

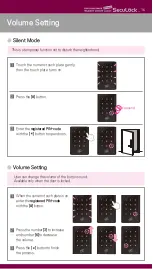
Страница 16: ...he button to open doors User can change the volume of the button sound Available only when the door is locked 1 When the numeric touch plate is on enter the registered PIN code with the button 2 Press...

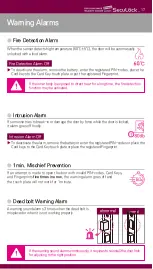
Страница 17: ...long time the fire detection function may be activated When the sensor detects high temperature 60 5 the door will be automatically unlocked with a loud alarm To deactivate the alarm remove the batter...

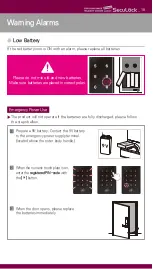
Страница 18: ...ed please follow the steps bellow 1 Prepare a 9V battery Contact the 9V battery to the emergency power supply terminal located above the outer body handle 3 When the door opens please replace the batt...

Страница 19: ...poles If the batteries are completely discharged replace all batteries with new ones LR6 1 5V AA Alkaline batteries only Register PIN codes again refer to the user s manual page 6 Register Card keys a...

Страница 20: ...NE v 2 2 NeurosysCo Ltd madeinKorea www seculock co kr en Scantoplayvideo Operation Guide Lever Handle Lock channel...

Отзывы: