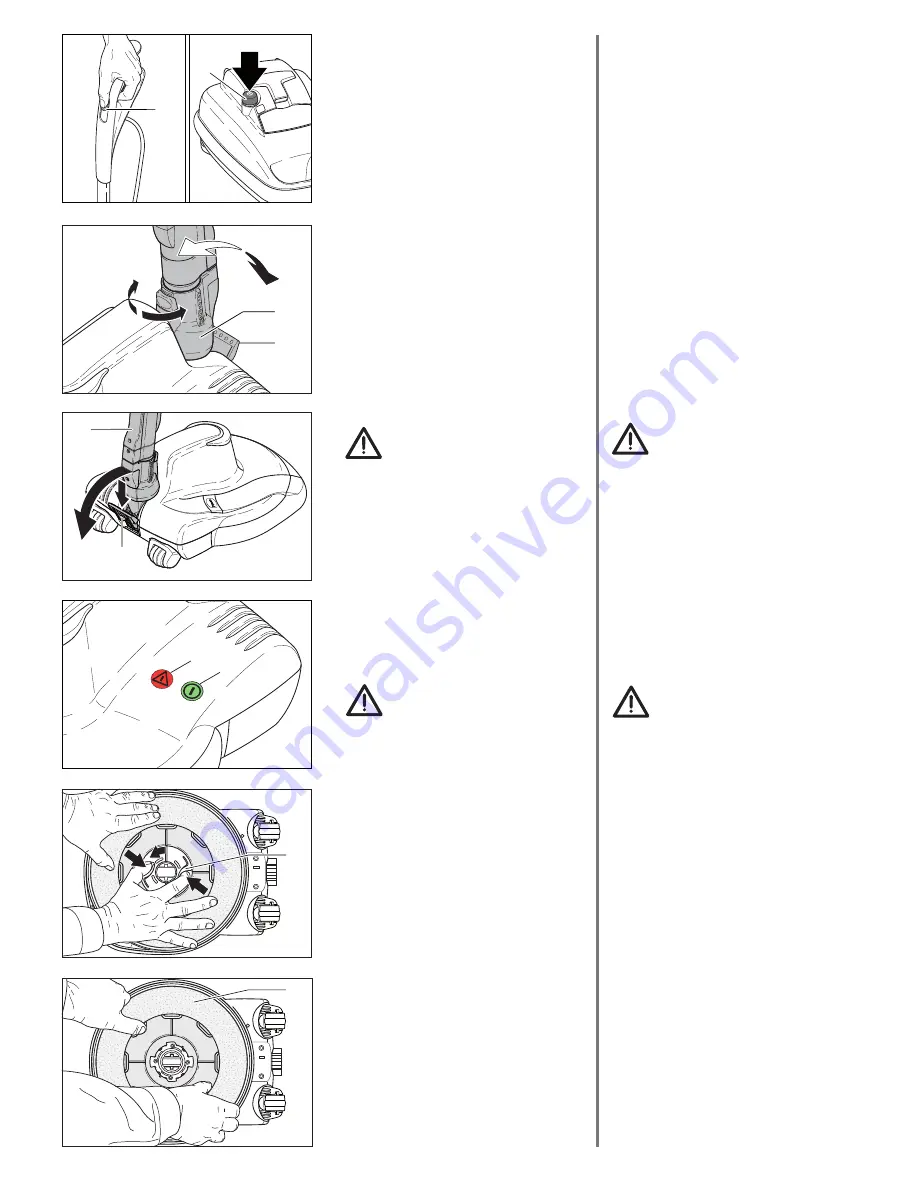
Stellen Sie sicher, dass der Netzschalter
am
SEBO FELIX / DART
(16) bzw. am
SEBO
Bodenstaubsauger
(17) ausgeschaltet ist.
Danach die Anschlussleitung des
SEBO
Staubsaugers
vollständig abwickeln und
den Netzstecker einstecken. Schalten Sie
nun den Staubsauger ein.
Zum Arbeiten mit dem Saugbohner das
Rastpedal (4) betätigen und das Saugrohr
(15) bzw. den Staubsauger nach hinten
kippen.
Ihr
SEBO DISCO /
UHS Bohner
läuft sanft
an. Ein Abkippen ohne Betätigen des
Rastpedals (4) führt auf Dauer zur
Beschädigung des Saugbohners.
Das Rastpedal (4) arretiert das Gelenk (5)
in senkrechter Ruhestellung.
In dieser Stellung schaltet der
SEBO
DISCO / UHS Bohner
automatisch ab und
kann durch die interne Verrastung in
Mittelposition gehalten werden, um
ungewollte
Drehbewegungen
zu
vermeiden.
Nach getaner Arbeit muss der SEBO
Staubsauger so lange festgehalten
werden, bis das Pflegepad still steht.
LED-Anzeigen
Die grüne LED Leuchte (1) signalisiert die
Betriebsbereitschaft des Saugbohners.
Leuchtet die rote Anzeige (2) hat das Ge-
rät aus Sicherheitsgründen abgeschaltet,
weil es überlastet oder blockiert ist (siehe
Abschnitt Verstopfungen beseitigen).
5. Wartung und Pflege
Zur Gewährleistung der Sicherheit
und richtigen Funktion, nur origi-
nal
SEBO Pflegepads
verwenden.
Das
SEBO Pflegepad
muss regelmäßig auf
scharfe und abrasive Stoffe (z.B.
Sandkörner) überprüft werden und ggf.
ausgetauscht werden, da sonst Ober-
flächenschäden entstehen können.
Wechsel des Pflegepads
Zum Wechseln des
SEBO Pflegepads
(11)
das Pflegepad mit einer Hand festhalten
und mit der anderen Hand die Hebelarme
(24) des Schnellwechselbajonetts zusam-
mendrücken. Das Bajonett gegen den Uhr-
zeigersinn drehend lösen und abnehmen.
Das Pflegepad (11) löst sich selbst von der
Padaufnahme und kann nun ausge-
tauscht werden. Der Padraum sollte re-
gelmäßig gereinigt werden.
Achtung
Die neuen Pflegepads passen auf alle bisher
ausgelieferten Geräte. Die Pflegepads der
älteren Variante (blau, flexible Trägerschei-
be) dürfen aus Sicherheitsgründen nicht mit
der neuen Padaufnahme betrieben werden.
Please ensure that the on / off switch (16)
of your
SEBO FELIX / DART
or respectively
of your
SEBO vacuum cleaner
(17) is in
the off position. Release the vacuum
cleaner cable completely and plug it into
the wall mains outlet. Now you can start
the machine by pressing the on / off
switch.
The
SEBO DISCO / UHS Polisher
has a
soft-start system so there may be a slight
delay before it operates.
To start, push the foot pedal (4) of the floor
polisher and lower the telescopic tube or
respectively the vacuum cleaner. Failure
to use the foot pedal will cause lasting
damage to the machine.
The food pedal locks the swivel neck (5) in
an upright position. In this position the
SEBO DISCO / UHS
Polisher automatically
turns off. The swivel neck has an internal
lock which will hold the machine in the
central position to avoid unwanted rotation.
After using the polisher please
hold your SEBO vacuum cleaner
until the Floor Pad stops rotating.
LED-Display
The green LED light (1) indicates that the
floor polisher is operational.
The red LED light (2) comes on if the
machine has shut down for safety reasons
e.g. overload or clogging (refer to remo-
ving blockages).
5. Maintenance and servicing
Use only genuine SEBO replace-
ment floor pads to ensure perfor-
mance, longevity and safety.
Please check the
SEBO Floor Pad
regu-
larly for sharp and abrasive materials e.g.
grains of sand. If necessary please change
the pad, otherwise floor damage can
occur.
Changing the Floor Pad
To change the
SEBO Floor Pad
, hold the
floor pad with one hand and squeeze the
lever arms (24) of the Quick-release disc
together. Turn the Quick-release disc
anti-clockwise and remove it. The floor
pad (11) will release from the pad retainer
(12) and can be removed.
Please note: The underside of the
machine should be cleaned regularly.
Additional advice
New design Floor Pads fit all models,
however olds design Floor Pads will not fit
the new quick-release system.
15
4
16
17
4
5
2
1
4
11
24


