background image

EN


Care and cleaning of Optics: 

 
WARNING: Improper cleaning of optical components may void the warranty! 
Optical  components  of  a  telescope  will  over  time  get  dirty.  The  amount  of  dirt  and  or  dust  collected  onto  a 
lens  or  mirror  should  only  be  removed  with  the  utmost  care  and  this  is  at  times  best  left  to  people  with 
experience  in this procedure.  A considerable amount  of dirt  or dust must be  present on the optical surface 
before one will notice the effect visually.  
 
1. Keeping the dust caps during storage of the telescope will reduce the amount of dust collected.  
 
2. After using the telescope there might be dew condensation on the optical surfaces. When the telesecope 
is  brought  inside  remove  the  dust  caps  und  allow  the  moisture  to  evaporate  naturally.  Point  the  telescope 
downwards so as to minimize the collection of airborne dust.  
 
3. Once the moisture is gone then replace the dust caps.  
 
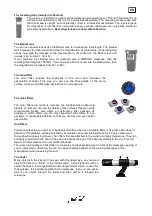
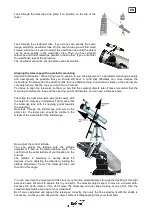
4.  If  you  wish  to  remove  dust  from  the  lenses  or  mirrors  you  first  should  try  using  a  can  of  filtered 
compressed air. Remove the dust cap and the dew shield in the case of the refractor style of telescope, or 
take  the  mirror  cell  out  of  the  reflecting  type.  Once  you  are  able  to  freely  blow  across  the  surface  of  the 
optics then begin by first pointing the can away from the piece and gently expel some air. This will remove 
any  condensate  in  the  air  can  lines  and  clear  off  dust  that  may  have  accumulated  on  the  discharge  tube. 
Next using short quick bursts of air carefully remove the dust particles.  
 
DO NOT HOLD THE TRIGGER OF THE COMPRESSED AIR FOR TOO LONG AS CONDENSATE MIGHT 
BE BLOWN OUT ACROSS THE OPTICAL SURFACE. 
 
The optics of your telescope should last a long time before they generally require major cleaning. By keeping 
the  dust  caps  on  and  avoiding  the  temptation  to  handel  the  lenses  or  mirrors  you  will  find  that  very  little  is 
need in the way of optical maintenance. 
 

Common problems with telescopes 

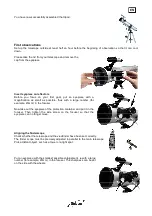
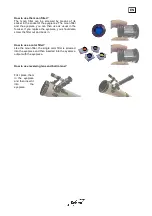
Did you remove the lid and put an ocular in? Did you not only remove the small, but also the big lid 
completely? With the lid on and without the ocular, too little light gets into the telescope and all you 
see is black. Remove the lid and put the ocular in.  

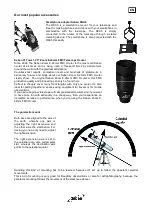
Did you adjust the finder in parallel to the telescope? If this isn’t the case, then you might target an 
object with the finder, but you won’t see it through the telescope. Adjust the finder.  

Did you start with a magnification that is too high? This can be the reason for a black image. It’s best 
to  start  with  a  small  magnification,  adjust  the  image  so  that  it’s  sharp  and  then  slowly  increase  the 
magnification. You’re making the image sharp by moving the focuser in or out through the wheels on 
the side.  

Didn’t  you  make  the  object  sharp  enough  through  the  focuser?  You’re  making  the  image  sharp  by 
moving the focuser in or out through the wheels on the side.  

Is the telescope adjusted? The mirrors can move, because of the transport. If they’re too much out of 
alignment, then the telescope will show a worse image on higher magnifications. A laser collimator 
can help in this case to adjust the telescope.  

Did  you  let  the  telescope  cool  down  enough  outside?  Otherwise  the  instrument  can’t  display  an 
image properly.  


Содержание 900-76 EQ2

Страница 1: ...can download instructions here http www seben com manuals Vous pouvez t l charger la notice en fran ais sur http www seben com manuals Per il download delle istruzioni in italiano cliccate qui http w...

Страница 2: ...rvation results and also derive a lot of joy from this hobby by using a book Children should watch together with someone else who is already experienced with a telescope if possible Not every location...

Страница 3: ...for telescopes Please note that this is a general information and that the mentioned accessories are not included in the delivery of the telescope that you bought The ocular A telescope is a tube wit...

Страница 4: ...he color filters are made to increase the contrast when observing planets so that you can see the details of the surfaces that are hardly recognizable Seben also offers an astronomy filter package as...

Страница 5: ...e found here Perfect to cheaply cover many focal lengths with only one ocular It s also ideal for putting together a space saving equipment for travels or for mobile observations If you own a beginner...

Страница 6: ...and to not lose the small screws For the erection of the tripod we need the following parts 3 tripod legs tripod mount ocular shell 3 screws with female screw 3 screws with butterfly nut maybe 3 screw...

Страница 7: ...ripod mount are firmly connected and the mounting for the ocular shell is pointing inwards Repeat these steps for the mounting of the tripod leg and mount the second and third leg the same way All mou...

Страница 8: ...ting is set up absolutely horizontal A water level is very helpful in this case Put the mounting on the tripod mount and screw it together from below Rotate the declination axis of the mounting upward...

Страница 9: ...low Put the tube into the telescope tube ring and close the telescope tube ring at the side Make sure that the declination shaft is pointing towards the ocular Loosen and remove the screw heads on the...

Страница 10: ...s positioned won t tip over sideways due to the unilateral overload Think of a seesaw if one side has more load on it then it will sink downwards On the one hand this affects the tube which has to be...

Страница 11: ...s axis will now always be level independent from the position the telescope is in Now we just have to balance the second axis This affects the tube We need the declination clamp to do this It ensures...

Страница 12: ...rge number for example 20mm in the focuser Now take out the eyepiece of the protection container and put it in the focuser Then tighten the side screw on the focuser so that the eyepiece can no longer...

Страница 13: ...ints northwards You can use a compass here First align the right ascension axis polar axis with the help of a compass northwards That means that the telescope tube with it s opening points towards the...

Страница 14: ...sual in the focuser If you replace the eyepiece you should also screw the filter out and back in How to use a color filter Like the moon filter the single color filter is screwed into the eyepiece and...

Страница 15: ...st learn to orientate and this is easier in the beginning with simple and bright objects The disappointment here isn t big as well because astronomical objects don t look like we know them from books...

Страница 16: ...rticles DO NOT HOLD THE TRIGGER OF THE COMPRESSED AIR FOR TOO LONG AS CONDENSATE MIGHT BE BLOWN OUT ACROSS THE OPTICAL SURFACE The optics of your telescope should last a long time before they generall...

Отзывы: