


9
TECHNICAL DATA:
- Work frequency
: see model
- Power supply
: 230VAC
- Max. consumption
: 5W
- Op. transmitters
: Fixed code 12-18-32 Bit
Rolling Code 66 Bit
- TX codes that can be memorised (CH1 + CH2) : 250 Max
- Control relay
: 230VAC 5A
- Working temperature
: -10÷55°C
- Board dimensions
: 99x50x28mm
- Container
: ABS V-0
- Protection rating
: IP 44 for internal use
D
UAL
C
HANNEL
R
ECEIVER
RXX 2322 230V
The miniature RXX 2322 230V dual channel radio receiver al-
lows remote control activation of electric and electronic devices
when coupled with one or more transmitters.
-
RES 2322 230V
: Narrow band ( up to 66 Bit )
433,92 MHz
-
RXH 2322 230V
: Narrow band ( up to 66 Bit )
868,30 MHz
I
MPORTANT
FOR
THE
USER
- The device can be used by children over 8 years of
age and persons with reduced physical or psychologic-
al abilities or with little knowledge and experience only
if supervised or educated in its operation and safe use,
in order to also understand the dangers involved in its
use.
- these instructions are also available at the website
www.seav.it
- Do not allow children to play with the device and keep
the remote controls out of their reach.
- Frequently examine the system to detect any signs of
damage. Do not use the device if it is in need of repair
work.
-Always remember to disconnect the power supply be-
fore carrying out any cleaning or maintenance.
- Cleaning and maintenance must not be carried out by
unsupervised children
- ATTENTION: keep this instruction manual safe and
observe the important safety requirements contained
herein. Failure to comply with the requirements may
cause damage and serious accidents.
I
MPORTANT
FOR
THE
INSTALLER
1)Check that the location where the installation is
located enables compliance with operating temperature
limits specified for the device.
2)Once installation is finished, it is recommended that
all necessary checks be performed (appropriate
programming of the control panel and correct
installation of safety devices) to ensure that compliant
installation has been performed.
3)Fix the receiver to a wall, using the relevant support
which is fitted to the casing, in such a way as to leave
said support facing downwards and insert the fixing
screws in the special holes.
4)The receiver does not have any type of isolating
device for the 230 Vac line. It is therefore the
responsibility of the installer to set up an isolating
device inside the system. It is necessary to install an
omnipolar switch, surge category III. It must be
positioned to provide protection from accidental
closing, pursuant to point 5.2.9 of EN 12453.
1)For proper functioning of the radio receiver, if using
one or more receivers, the installation at a minimum
distance of at least 3 metres one from the other is
recommended.
13) Furthermore, care is required when drilling holes in
the outside casing where connecting and power supply
cables will pass, and when assembling the cable
glands, so that everything is installed so as to maintain
the panel's IP protection characteristics.
Radio Receivers
RES 2322 230V – RXH 2322 230V
comply with the specifications of the Directives:
RED 2014/53/EU, EMC 2014/30/EU, LVD 2014/35/EU.
The full text regarding the EU Declaration of Conformity
is available from the following Internet address:
http://www.seav.it
T
ECHNICAL
D
ATA
- Work frequency:
see model
- Power supply:
230VAC
- Max. consumption:
5W
- Op. transmitters:
Fixed code 12-18-32 Bit
Rolling Code 66 Bit
- TX codes that can be memorised (CH1 + CH2) :
250 Max
- Control relay:
230VAC 5A
- Working temperature:
-10÷55°C
- Board dimensions
: 99x50x28mm
- Container
: ABS V-0
- Protection rating
: IP 44 for internal use
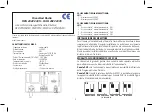
CN1 T
ERMINAL
B
OARD
C
ONNECTIONS
1: Power supply 230 VAC
2: Power supply 230 VAC
CN2 T
ERMINAL
B
OARD
C
ONNECTIONS
1: “Normally open” contact output CH1
2: “Normally open” contact output CH1
3: “Normally open” contact output CH2
4: “Normally open” contact output CH2
1
Rev. 1.0 13/02/2018
GB
TERMINAL BOARD CONNECTIONS:
CN1:
1 : Power supply 230 VAC
2 : Power supply 230 VAC
TERMINAL BOARD CONNECTIONS:
CN2:
1 : “Normally open” contact output ” CH1
2 : “Normally open” contact output ” CH1
3 : “Normally open” contact output ” CH2
4 : “Normally open” contact output ” CH2
INSTALLATION OF THE RECEIVER
It is very important to choose the place of installation carefully in order for
the transmitter and the receiver to function well. Capacity is not only condi-
tioned by the technical features of the device, but also varies depending on
the radio-electric conditions of the site. The receiver has a tuned antenna.
There must be a distance of at least 5 metres between the two receivers if
installation is to be successful.
CH1 AND CH2 FUNCTIONING METHOD
The receiver can manage the two channels separately and also allows to
have different functioning modes:
Channel CH1
: monostable functioning only with possibility of activation of
Long Distance Programming
Channel CH2:
by selecting Switch SW1, it is possible to select the follow-
ing functioning modes for channel CH2 (in long distance functioning mode
it is monostable).
I
NSTALLATION
OF
THE
R
ECEIVER
It is very important to choose the place of installation carefully in
order for the transmitter and the receiver to function well. Capa-
city is not only conditioned by the technical features of the
device, but also varies depending on the radio-electric condi-
tions of the site. The receiver has a tuned antenna.
There must be a distance of at least 5 metres between the two
receivers if installation is to be successful.
CH1
AND
CH2
FUNCTIONING
METHOD
The receiver can manage the two channels separately and also
allows to have different functioning modes:
Channel CH1
: monostable
functioning only with possibility of
activation of Long Distance Programming.
Channel CH2
: by selecting Switch SW1, it is possible to
select the following functioning modes for channel CH2
(in long distance functioning mode it is monostable).
M
ONOSTABLE
L
ONG
DISTANCE
PGM
T
EMP
. 120 S
EC
B
ISTABLE
( CH1
AND
CH2)
P
ROGRAMMING
M
ODE
Programming of the Radio-controls to be associated is the Self-
learning type and is performed with the
antenna not connec-
ted
in the following way: press SEL once, the CODE CH1 LED
will start to flash and at the same time sends the pre-selected
code with the radio control to a distance of a few metres. When
the LED remains on, programming in the CH1 channel will be
completed. To memorise a radio control code in channel CH2,
perform the same procedure described above and pressing the
SEL key twice.
The memorisation procedure can be repeated up to a max. of
500 codes. When the memory is full by repeating the program-
ming operation, the CODE CH1 AND CODE CH2 LEDs will
start to flash very quickly, indicating that no more memorisa-
tions can take place.
L
ONG
D
ISTANCE
P
ROGRAMMING
M
ETHOD
The long distance programming of radio controls is obtained by
selecting Dip Switch SW1 in long distance [Pgm mode. In this
way the receiver allows programming of the transmission code,
without intervening directly on the SEL key.
The remote transmission code can be programmed as follows:
continuously send a radio control code, which was previously
memorised in a channel, for more than 10 seconds. At this
point, the receiver switches to programming mode, as de-
scribed below, for both channels.
R
ULE
FOR
THE
FIRST
R
ADIO
C
ONTROL
M
EMORISED
The following rule applies when programming radio controls: if
the first radio control to be memorised is a Rolling Code type of
radio control, the receiver will then only accept Rolling Code ra-
dio controls, thus assuring increased intrusion detection safety.
If, however, the first radio control to be memorised is a radio
control with a fixed code, the receiver will then accept both ra-
dio controls with a fixed code and radio controls with a Rolling
Code.
R
ESET
If the receiver must be restored to factory configuration (i.e. no
code memorised), press the SEL key continuously for 5
seconds. The CODE CH1 and CODE CH2 LEDs will flash three
times quickly and then switch-off.
1
Rev. 1.0 13/02/2018
PROGRAMMING MODE
Programming of the Radio-controls to be associated is the Self-learning type
and is performed with the
antenna not connected
in the following way:
press SEL once, the CODE CH1 LED will start to flash and at the same time
sends the pre-selected code with the radio control to a distance of a few
metres. When the LED remains on, programming in the CH1 channel will be


