Страница 1: ...ojection Television Record in the space provided below the Model No and the Serial No as found on the label located on the back of your Projection Television Model No Serial No Retain this information...
Страница 2: ...in the operation and adjustment of feature control settings such as channel time programming etc Audio Video jackpanel for direct connections with accessorie s such as VCRs or Videodisc Players for pl...
Страница 3: ...or _button o so oct liiil I Press vo _or __u ton o li_i_ _esI od oha_ool oumbor liiI adjust volume li_ Only channels In the CHANNEL liii_i SCAN memory will be selected I i i when the CH or _ buttons a...
Страница 4: ...onnectonly one antenna twin lead tn to this adapter REAR OF TV UHF VHF 75_ ANT CABLE COAXIAL LEAD IN FROM EITHER A VHFt UHF COMBINATION ANTENNA OR CABLE TV SERVICE For cATV Cable follow the 75 ohm Coa...
Страница 5: ...e use of a 75 to 300 ohm adapter may be necessary 75 300 ohm adapter Part 704427 6 avail able from your nearest Sears Repair Dept OptionaI Combiner accessory Part 705109 1 available from your nearest...
Страница 6: ...en after an adjustment Press the STATUS button again to display the current _ r channel and other control settings I L z 12 WXYZ 2 1 AUDIO 2 VIDEO 3 INPUT 4 FEATURES Q Q MAIN MENU 1 AUDIO 2 VIDEO 3 IN...
Страница 7: ...ceives the sound from a broadcast stereo program The sound is then passed to an amplifier and twin speaker system in the set to be played as right and left channel audio Indicator lights on the front...
Страница 8: ...ote 2 Press or button to place TV in EXPAND mode _d EXPANDED appears in yellow to confirm set ting PRESS _ SELECT O TO _ I 1 NORMAL BASS I_EXPANDED_ EXPAND 2 TREBLE 3 BALANCE 4 STEREO S EXPAND PRESS o...
Страница 9: ...re mote _d White Vertical and Horizontal crossed lines ap pear on screen 2 Press the number for the color RED or BLUE and direction HORZ or VERT in need of adjust ment _1 HORZ moves the Red or Blue c...
Страница 10: ...lable in your area or on your CATV system Only channels added into FAVORITE STATION memory will be selected when the CH A and 7 buttons are pressed NOTE If you wish to add a channel number greater tha...
Страница 11: ...VCRs etc SELECT _h _ PICTURE I 3 PICTURE SOURCE ZI AUX2 Additional Audio Video Input Jacks _ SOURCE for the same type A V connections PRESS OR TO as AUX1 Inputs TrEE E S VIDEO S VIDEO INPUT plug for...
Страница 12: ...on the TV can be used to record TV programs on VCRs equipped with AUDIO VIDEO INPUT jacks To record TV programs using direct Audio Video jack panel connections 1 Connect the VIDEO OUT jack on the TV...
Страница 13: ...th FEATURES Menu displayed press 2 on the remote Three DISPLAY OPTIONS appear 2 Press or button to select desired time display To adjust CHANNEL DISPLAY OPTIONS 1 With OPTIONS displayed select CHANNEL...
Страница 14: ...code is entered on the remote control to unlock the channel for viewing To set Parental Control PC Code 1 Select PARENTAL CONTROL on screen display With FEATURES Menu displayed press 4 on the remote...
Страница 15: ...irm setting Correct PC Code number will now have to be entered before the jackpanel inputs can be selected for use INPUT PICTURE SOURCE Menu PRESSr_q TO SELECT _ CENSOR s PLACE SIGNAL INPUT CENSOR 1 I...
Страница 16: ...__ 1 CAPTION 1 MOTHE_ R 1 To use PERSONAL PREFERENCE LEVEL 1 1 Press P PREF button on the remote _ PERSONAL PREFERENCES list with CAP TION appears on screen 2 Press 1 on the remote to select P PREF LE...
Страница 17: ...H _ Press to return the set to specific picture and sound settings you have placed in the TV s memory If no settings have been stored under P PREF press to return the TV to factory set control adjustm...
Страница 18: ...een Channel Guide is available to quickly show and select CAPTIONED channel numbers See CAPTIONS section for details on how to write call letters for CAPTIONED channels To display and select channels...
Страница 19: ...t remote toward VCR and press the POWER button 3 Does the remote turn the VCR ON If YES the remote is ready to operate the VCR and no further steps are needed If NO continue to the Identify section RE...
Страница 20: ...VCRs The identify process has been changed where the VCR will be put into the PLAY mode rather than the Channel Number scan when it has been identified Be sure to insert a tape into the Multi Tech VCR...
Страница 21: ...rward I_llp or reverse _HI direction in the Playback mode Otl some VCR models you may have to hold the button down while viewing Rewind Button Press to rewind tapes For some VCRs you may need to press...
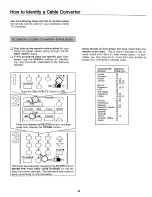
Страница 22: ...CH GUIDE 2 3 5 6 CH 8 9 A CH Within ten seconds after releasing the POWER button ENTER THE TWO DIGIT CODE NUMBER for the de sired Converter see list The remote is now ready to send commands to the Co...
Страница 23: ...e remote is ready to operate the Converter Identifying Cable Converter Search Tips Be Patient I_1 A minute or two can seem a lot longer when waiting for something to happen but the code should be iden...
Страница 24: ...ttery Replace with 9 volt size battery if necessary Clean the remote and the remote sensor window on the TV If attempting to operate accessory equipment VCR Cable Converter be sure accessory is correc...
Страница 25: ...NOTES 25...
Страница 26: ...26...
Страница 27: ...27...
Страница 28: ...xist for repair parts or service simply contact any Sears Service Center Depart ment Warranty FULL TWO YEAR WARRANTY For two years from the date of purchase Sears will repair this television free of c...