background image

EN-1

FCC STATEMENT

This device complies with Part 15 of the FCC Rules. Operation is subject to the following two conditions:
(1) This device may not cause harmful interference, and
(2) This device must accept any interference received, including interference that may cause undesired

operation.

Note:

This equipment has been tested and found to comply with the limits for Class B digital devices, pursuant to
Part 15 of the FCC rules. These limits are designed to provide reasonable protection against harmful
interference in a residential installation. This equipment generates uses and can radiate radio frequency
energy and, if not installed and used in accordance with the instructions, may cause harmful interference to
radio communications. However, there is no guarantee that interference will not occur in a particular
installation. If this equipment does cause harmful interference to radio or television reception, which can be
determined by turning the equipment off and on, the user is encouraged to try to correct the interference by
one or more of the following measures:

Reorient or relocate the receiving antenna.
Increase the separation between the equipment and receiver.
Connect the equipment into an outlet on a circuit different from that to which the receiver is connected.
Consult the dealer or an experienced radio/TV technician for help.

Use of shielded cable is required to comply with Class B limits in Subpart B of Part 15 of the FCC rules.

Do not make any changes or modifications to the equipment unless otherwise specified in the manual. If
such changes or modifications should be made, you could be required to stop operation of the equipment.

Содержание DC500

Страница 1: ...ications However there is no guarantee that interference will not occur in a particular installation If this equipment does cause harmful interference to radio or television reception which can be determined by turning the equipment off and on the user is encouraged to try to correct the interference by one or more of the following measures Reorient or relocate the receiving antenna Increase the s...

Страница 2: ...still camera may be different from those described in this manual This is due to the fact that different retailers often specify slightly different product inclusions and accessories to suit their market requirements customer demographics and geographical preferences Products very often vary between retailers especially with accessories such as batteries chargers AC power adapters memory cards cab...

Страница 3: ...ck For repair or internal inspection ask the store of purchase Use the supplied AC adapter only with the indicated power supply voltage Use with any other power supply voltage might cause fire or electric shock Do not use the camera in areas near water unless sealed in its waterproof housing This might cause fire or electric shock Take special care during rain snow on the beach or near the shore D...

Страница 4: ...Do not drop it strike it or use excessive force when handling the camera This might cause damage to the camera Do not use the inner camera in humid steamy smoky or dusty places unless sealed inside the water proof housing This might cause fire or electric shock Do not remove the battery immediately after long period of continuous use The battery becomes hot during use Touching a hot battery might ...

Страница 5: ... using the new rechargeable battery or rechargeable battery that have not been used for an extended period of time batteries that pass the expiry date are exceptions might affect the number of pictures that can be taken Therefore to maximize their performance and lifetime we recommend that you fully charge the batteries and discharge them for at least one complete cycle before use The battery may ...

Страница 6: ... Card or Internal Memory 26 Setting Image Resolution and Quality 27 Using the LCD Monitor 28 CAMERA MODE 29 Shooting Images 29 Useful Scene Modes Land Sea Exposure Programs 30 Reviewing the Last Image 32 Using the Zoom Function 33 Using the Macro Close Up Mode on Land 34 Using Sea or Ext Flash 35 Using the Flash 36 Using Flash in Ext Flash Mode 37 Using the Self Timer 38 Adjusting the Exposure 39 ...

Страница 7: ...E INSTALLATION 71 Installing Photo Explorer 71 Installing Photo Express 72 USING THE DIGITAL STILL CAMERA AS A PC CAMERA 73 Step 1 Install the PC camera driver same as USB driver 73 Step 2 Connect the digital still camera to your computer 74 Step 3 Run your application software i e Windows NetMeeting 74 MENU OPTIONS 75 Camera Menu 75 Movie Menu 79 Play Menu 80 Setup Menu 82 CONNECTING YOUR CAMERA ...

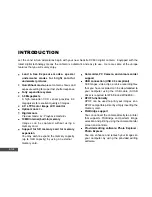
Страница 8: ...be captured without using a memory card Support for SD memory card for memory expansion You may wish to expand the memory capacity up to 1GB capacity by using an external memory card Camcorder PC Camera and voice recorder support USB connection USB 2 0 compliant Still images video clips or voice recording files that you have recorded can be downloaded to your computer using the USB cable A USB dri...

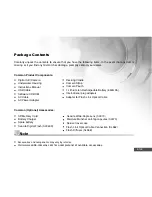
Страница 9: ...Adapter Common Optional Accessories SD Memory Card Battery Charger Spare battery SeaLife Digital Flash SL960D Accessories and components may vary by retailer Visit www sealife cameras com for a complete list of available accessories Docking Cradle Camera Strap Camera Pouch 1 Lithium ion Rechargeable Battery 650mAh International plug adapters Adapter for Flash Link Optical Cable SeaLife Wide Angle ...

Страница 10: ...ct the service center to obtain a return authorization before shipping product Include a letter describing the damage or defect your return address no PO Box daytime phone and a copy of the original purchase receipt or proof of purchase with the purchase date Excluded are any consequential damages cosmetic damages damages to products which show abuse non conformance with the instructions particula...

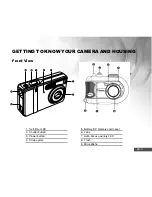
Страница 11: ...NG TO KNOW YOUR CAMERA AND HOUSING Front View 1 2 3 6 7 4 5 8 9 1 Self timer LED 2 Shutter button 3 Power button 4 Strap eyelet 5 Battery SD memory card cover 6 Lens 7 Auto Focus auxiliary LED 8 Flash 9 Microphone ...

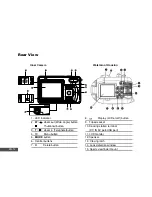
Страница 12: ...T Zoom in Telephoto button 4 Menu button 5 MODE button 6 Control buttons 7 Delete button 8 Display LCD on off button 9 Tripod socket 10 Docking station terminal DC IN 5V port USB port 11 LCD monitor 12 Speaker 13 Closing latch 14 Leak detection window 15 Sports viewfinder mount Inner Camera Waterproof Housing ...

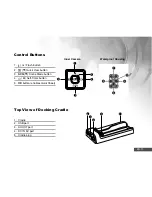
Страница 13: ...ash button 2 Quick View button 3 SCN Scene Mode button 4 Self Timer button 5 OK button enables QuickShoot Top View of Docking Cradle 1 Cradle 2 USB port 3 AV OUT port 4 DC IN 5V port 5 Cradle plug 1 2 3 4 5 Inner Camera Waterproof Housing ...

Страница 14: ...8 x 1536 M 1 2 1280 x 960 M 0 3 640 x 480 TIFF IMAGE 4 Possible number of shots 5 Memory card indicator 6 Remaining battery status Full battery power Medium battery power Low battery power No battery power 9 Self timer mode 3 sec delay 10 sec Delay Off 10 White balance AUTO Auto Daylight Cloudy Sunset Tungsten Fluorescent 11 Capture mode S Single Continuous A AEB 12 Time 13 Date 14 Focus area 15 Z...

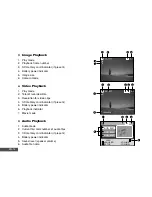
Страница 15: ...ttery power indicator 6 Time 7 Date 8 Zoom state 1 2 4 5 8 T W 6 7 VGA 3 Audio Mode 1 Audio mode 2 Current file total number of audio files 3 SD memory card indicator if present 4 Battery power indicator 5 Sound level speaker volume 6 Audio file name RECORD AUD_0001 AUD_0002 PLAY W VOLUME T VOLUME 1 3 4 5 6 SELECT FILE 1 13 2 AUD_0002 ...

Страница 16: ...deo clips 4 SD memory card indicator if present 5 Battery power indicator 6 Playback indicator 7 Movie mode Audio Playback 1 Audio mode 2 Current file total number of audio files 3 SD memory card indicator if present 4 Battery power indicator 5 Sound level speaker volume 6 Audio file name 1 2 3 6 4 5 1 2 4 7 5 00 00 12 6 VGA II SHUTTER 3 AUD_0001 AUD_0002 W VOLUME T VOLUME 1 2 3 5 6 AUD_0003 1 13 ...

Страница 17: ... The digital still camera is in the process of battery charge LED indicator Blinking red Processing image after capture LED indicator Solid green USB communication is in progress Solid green Camera in sleep mode Blinking green USB transfer is in progress Self timer indicator Blinking blue The self timer function is activated ...

Страница 18: ...e battery cover in the direction of the OPEN arrow 2 Insert the battery in the correct orientation as shown in the illustration 3 Close the battery cover To remove the batteries Hold the camera with the battery cover facing upward then open the battery cover and remove the batteries Be careful not to drop the batteries when opening or closing the battery cover ...

Страница 19: ...mages video clips or voice recording files output to a TV monitor or another recorder recording device for example on your desktop The cradle will facilitate the battery charge of the camera in conjunction with an AC power adapter 1 Position the camera on the cradle 2 Match the docking connectors and carefully insert the camera until it fits in place ...

Страница 20: ...ll outlet Charging time differs depending on the ambient temperature and the status of battery Use the appropriate international plug adapter included depending on the type of electrical outlet in your country The digital still camera must be used with the specified AC power adapter Damage caused by the use of an incorrect adapter is not covered under the warranty Always make sure that the digital...

Страница 21: ...e specified AC power adapter or the camera Damage caused by the use of an incorrect adapter is not covered under the warranty To prevent unexpected auto power off resulting from no battery power left during the process of transferring your images to the computer use the AC power adapter as a power supply Attaching the Camera Strap Attach the strap as shown in the illustration IMPORTANT Always remo...

Страница 22: ...in the correct orientation as shown in the illustration 3 Close the battery SD memory card cover To remove the SD memory card make sure the camera is turned off Press lightly on the edge of the memory card and it will eject Be sure to format an SD memory card with this digital still camera before using it Refer to section in the manual titled Formatting an SD Memory Card or Internal Memory for fur...

Страница 23: ...g the Main Menu After turning on the digital still camera the Main Menu screen appears Follow the steps below to select the desired mode 1 Press the button to turn on the power 2 Press the MODE button to access in Main Menu screen 3 Use t u or to choose the desired mode then press the OK button 4 For returning to Main Menu from each mode press the MODE button again ...

Страница 24: ...n SETUP mode with t u or then press the OK button 3 Press u to select the CUSTOM menu 4 Use t u or to select DATE SETUP then press the OK button 5 Press t or u to select the Year Month Day and Time fields To increase a value press the button To decrease a value press the button The time is displayed in 24 hours format 6 Press the OK button after all fields are set DATE SETUP SELECT ITEM SET 2004 0...

Страница 25: ...CH ITALIANO and 1 Press the button to turn on the camera 2 Press the MODE button to access in SETUP mode with t u or then press the OK button 3 Press u to select the CUSTOM menu 4 Use t u or to select LANGUAGE then press the OK button 5 Use or to select the language you want 6 Press the OK button to confirm SELECT ITEM BASIC CUSTOM SELECT PAGE LANGUAGE Y M D NTSC PAL ENTRY ENGLISH ESPAÑOL FRANÇAIS...

Страница 26: ...played 3 Use t or u to select FORMAT then press the OK button 4 Use or to select YES then press the OK button to confirm When you format an SD memory card be aware that all data of which will be permanently erased Protected images are also erased To format the internal memory do not insert a memory card into the camera Otherwise you will format the memory card Formatting is an irreversible action ...

Страница 27: ...ress the button to turn on the camera 2 Press the MODE button to access in CAMERA mode with t or u then press the OK button 3 Press the button The PICTURE menu is displayed 4 Use t or u to select SIZE then press the OK button 5 Use or to select the desired setting then press the OK button 6 Follow the step 4 and 5 above to set the QUALITY The possible number of shots and recording time depend on t...

Страница 28: ...ings 1 Press the button to turn on the camera 2 Compose your scene on the LCD monitor 3 Press the shutter button The LCD monitor darkens in strong sunlight or bright light This is not a malfunction To prevent your images from being blurred while pressing the shutter button always hold it carefully This is especially important when you are shooting under low lighting conditions which your camera ma...

Страница 29: ...wn half way to focus the image When you press the shutter button down half way the camera s Auto Focus feature automatically focuses the image and exposure 5 Press the shutter button the rest of the way down to capture the image The actual captured image appears to be larger than the one on LCD after image captured Pressing the button switches the LCD monitor display mode Each time you press the b...

Страница 30: ...and Sea Exposure Programs Your digital still camera offers you nine types of scene modes to capture images easily in a situation that is programmed to handle all adjustments for you by selecting the following shooting conditions ...

Страница 31: ... Flash mode will be set to Forced Flash automatically The Flash mode will be set to Flash Off In this mode the low limit of shutter speed is 1 125 The Flash mode will be set to Flash Off The camera will automatically adjust the focus and exposure depending on the settings of ISO sensitivity and White Balance A proprietary exposure program developed by divers for best quality underwater images when...

Страница 32: ...image captured 1 Press to display the last image captured The last image displays on the LCD monitor Press again to return to the normal shooting mode You can only view the last image with this function To view all your recorded images press the MODE button to access in PLAY mode to playback the still images Refer to the section in this manual titled PLAYBACK MODE THE BASICS for further details ...

Страница 33: ...eature as it is however the more the image is magnified the grainer the image may become To capture a zoomed image perform the following steps 1 Adjust the magnification ratio by using the T W button To access the optical zoom function press the T button as far as it can go Press it again to activate the digital zoom To exit the zoom photography press continuously the W button 2 Compose your scene...

Страница 34: ... on the camera 2 Press SCN to access in SCENE mode 3 Use t or u to choose MACRO then press the OK button The icon appears on the LCD monitor 4 Compose your scene and press the shutter button When not using MACRO mode at any time press SCN again to choose with t or u and then press the OK button After a macro shot is taken DO NOT FORGET to reset the lens to the normal position When the camera is se...

Страница 35: ...optional This proprietary exposure program synchronizes the camera s flash and exposure controls with SeaLife External Flash SL960 or Digital Flash SL960D It has taken over four years of underwater research For bright and colorful underwater pictures we highly recommend purchasing the optional SeaLife External Flash SL960 or Digital Flash SL960D The Sea or Ext Flash mode setting will be preserved ...

Страница 36: ...the distance to the subject is too far away for the flash to have any effect The flash fires automatically according to suit the photographic conditions The flash will always fire regardless of the surrounding brightness Select this mode for recording images with high contrast backlighting and deep shadows Using the Flash The flash is designed to function automatically when lighting conditions war...

Страница 37: ...sh modes NORMAL FLASH This is the default setting ideal for proper exposure from 1 yd 1m to 2 yd 2m MACRO FLASH This flash setting is ideal for shooting distances inside of 1 yd 1m FAR FLASH Select this flash mode for best exposure beyond 2 yds 2m shooting distance The above shooting distance may vary depending on water visibility and the reflectivity of the subject Experiment with different flash...

Страница 38: ...he desired self timer mode 4 Compose your scene and press the shutter button The self timer function is activated and the status of countdown will be displayed on the LCD monitor The photography is then taken after the preset time To cancel the self timer at any time press to disrupt the sequence After one shot is taken the self timer mode is turned off If you wish to take another image using the ...

Страница 39: ...o access in CAMERA mode with t or u then press the OK button 2 Press then use u to select the FUNCTION menu 3 Use t or u to select EXPOSURE then press the OK button 4 You can use or to set the range of EV compensation value from 2 0EV to 2 0EV then press the OK button To reactive auto exposure select 0EV in step 4 5 To exit from the menu press the button EXIT PICTURE FUNCTION AE AWB QUICK VIEW EV ...

Страница 40: ... u then press the OK button 2 Press then toggle u to select the AE AWB menu 3 Use to select WHITE BALANCE then press the OK button 4 Use or to select the desired setting 5 To exit from the menu press the button WHITE BALANCE BACK SET DAYLIGHT CLOUDY SUNSET 1 6 AUTO WHITE BALANCE BACK SET FLUORESCENT 5 6 TUNGSTEN EXIT PICTURE FUNCTION AE AWB WB ISO Manual WB SELECT ITEM SELECT PAGE WHITE BLANCE ENT...

Страница 41: ...very useful when taking pictures of fast moving objects For example you see a beautiful reef scene with a fish that won t keep still 1 Point the camera at the scene you want to photograph 2 Push the OK button while holding the camera steady at the scene 3 It will take about 1 second for the camera to evaluate and set the autofocus and exposure controls 4 When the shark icon appears on the LCD the ...

Страница 42: ...ss the OK button 5 To exit from the menu press the button The indicator is displayed on the monitor screen 6 Press the shutter button halfway to lock the focus 7 Press the shutter button all the way to shoot Shooting will stop when the shutter button is released Maximum number of continuous shots 10 In Continuous mode the flash mode will be set to OFF automatically This feature will not function w...

Страница 43: ...tton 2 Press then use u to select the FUNCTION menu 3 Use to select CAPTURE MODE then press the OK button 4 Use or to select AEB A then press the OK button 5 To exit from the menu press the button The A indicator is displayed on the monitor screen 6 Press the shutter button to shoot In AEB mode the flash mode will be set to OFF automatically This feature will not function when camera is set to Ext...

Страница 44: ... WB then press the OK button 4 Point the camera at an enclosed gray card for which you can set the white balance This starts the white balance adjustment procedure 5 Use or to select EXECUTE then press the OK button to confirm The procedure of manual white balance is complete If you with to cancel MANUAL WB setting press or to select CANCEL 6 To exit from the menu press the button 7 Press the shut...

Страница 45: ...on to instantly delete the last picture taken if you press the shutter button while DELETE message is displayed 1 Press the MODE button and select camera mode then press OK button 2 Press menu button 3 Press u to access FUNCTION settings 4 Use t or u the Quick option and press OK button 5 Use or to select ON to enable Quickview or OFF to disable Quickview ...

Страница 46: ...DE button to access in PLAY mode with t or u then press the OK button 3 In the PLAY mode use tor uto select the desired images To view the previous image press the t button To view the next image press the u button If there is no image stored in the internal memory or on the memory card NO PICTURE message will appear on the monitor Pressing switches the LCD monitor display mode Each time you press...

Страница 47: ...ss the t button To view the next image press the u button 3 Adjust the zoom ration by using the T W button To enlarge the selected image press the T button To return to the normal image press the W button The magnification factor is displayed on the LCD monitor 4 To view different portion of the images press t or u to adjust the display area The displayed image is enlarged you will see a white fra...

Страница 48: ...to select THUMBNAIL with the t or u button then press the OK button 3 Use or to choose the desired number of thumbnail images to be displayed then press the OK button Press the button to exit from the menu 4 In the PLAY mode press the W button Four or nine thumbnail images are displayed simultaneously 5 Use t or u to select the image to be displayed at regular size then press the OK button to disp...

Страница 49: ...k To stop slide show press the OK button Resizing an Image You can follow the steps below to an image to one of the four sizes You can change the image size of a captured image to one of the following sizes 2560x1920 pixel 2048x1536 pixel 1280x960 pixel and 640x480 pixel The original image is retained even after resizing 1 Press the MODE button to access in PLAY mode with t or u then press the OK ...

Страница 50: ...on 3 Press the shutter button to start recording 4 Press the shutter button again to stop recording The function of optical zoom 3x can be activated before you start to record video clips Pressing the button switches the LCD monitor display mode Each time you press the button the display changes in the following order Standard Display Simplified Display T W VGA ...

Страница 51: ...Press the shutter button to start playing back the video clips To pause or resume video playback press the shutter button To stop playback press the OK button Use to start fast reverse playback Use SCN to start fast forward playback The zoom function cannot be activated while playing the video clips back To playback the video clips on the computer we recommend you to use Windows Media Player 9 0 W...

Страница 52: ...l camera then turn all connected devices off 1 Position the camera on the cradle 2 Match the docking connectors and carefully insert the camera until it fits in place 3 Connect one end of the A V cable to the A V terminal of the cradle 4 Connect the other end to the A V input socket of the TV set 5 Turn the TV and digital still camera on 6 Playback the still images video clips The method of operat...

Страница 53: ...age 90 degree clockwise or counterclockwise 1 Press the MODE button to access in PLAY mode with t or u then press the OK button 2 In the PLAY mode use t or u to display the image you want to rotate 3 Press or to rotate the selected image 900 or 900 You cannot rotate video clips Rotated images can be magnified 90 Counterclockwise o 0 Original o 90 Clockwise o ...

Страница 54: ...age appears use t or u to select YES then press the OK button If you wish to cancel the deletion select NO To delete all images video clips at once 1 Press the MODE button to access in PLAY mode with t or u then press the OK button 2 In the PLAY mode press to select DELETE ALL with t or u then press the OK button 3 To confirm the deletion of all images use or to select YES then press the OK button...

Страница 55: ... t or u button then press the OK button 3 Use or to choose the desired setting then press the OK button ONE IMAGE Protect one image movie ALL IMAGES Protect all images movies at once EXIT Exit from this menu 4 Use or to select LOCK then press the OK button Press to return to the PLAY mode The indicator appears on the selected image If you wish to cancel the protect function select UNLOCK PROTECT B...

Страница 56: ...s The DPOF card compatible printer will read the embedded information on the memory card and print your images as specified To configure print settings for a single image SELECT ITEM EXIT ENTRY PLAY 8 8 LOGO DPOF DPOF EXIT DPOF SELECT IMAGE SET ONE IMAGE ALL IMAGES RESET EXIT Press the MODE button to access in PLAY mode then press the OK button In the PLAY mode press to select DPOF with t or u the...

Страница 57: ...confirm your setting which will be saved in the SD card Press the OK button to choose ENABLE or DISABLE with or Press to return to the image playback mode The is marked on the displayed image DPOF SELECT IMAGE SET ONE IMAGE ALL IMAGES RESET EXIT Use or to select ONE IMAGE then press the OK button ONE IMAGE To configure print settings for a single image ALL IMAGES To configure print settings for al...

Страница 58: ...ALL IMAGES then press the OK button ONE IMAGE To configure print settings for a single image ALL IMAGES To configure print settings for all images RESET Returns all basic settings to the digital still cameraís default settings EXIT To exit the mark function use or to select EXIT 1 2 4 Step Figure Procedure SELECT ITEM EXIT ENTRY PLAY 8 8 LOGO DPOF DPOF EXIT DPOF SELECT IMAGE SET ONE IMAGE ALL IMAG...

Страница 59: ...to select DATE and ENABLE then press the OK button to configure the settings DATE The date of recording can be printed directly on the images Press the OK button to choose SET or CANCEL with or ENABLE Allows you to confirm your setting which will be saved in the SD card Press the OK button to choose ENABLE or DISABLE with or Press to return to the image playback mode The is marked on all the displ...

Страница 60: ... 2 Use or to select PRINTER then press the OK button Printing images When the camera is properly connected to a PictBridge compliant printer the PRINT MODE SELECT screen is displayed on the monitor Use or to select the print mode In PRINT Mode Lets you print the specified image with PictBridge Step Procedure PRINT MODE SELECT SELECT ITEM ENTRY PRINT PRINT ORDER Figure PRINT PAPER GO SIZE BORDERLES...

Страница 61: ...n to confirm QUANTITY Specifies the number of prints You can select the number up to 10 DATE If you select WITH images are printed with the date FILE NAME If you select WITH images are printed with the file name EXIT To cancel the print settings use or to select EXIT After the step 4 finished you can still use t or u to change the image to print by your preference Then press the OK button to print...

Страница 62: ...the OK button during print data transfer displays the screen for selecting whether to CONTINUE or CANCEL printing 7 In PRINT ORDER Mode This function only lets you print the specified image based on the previous DPOF settings Step PRINT MODE SELECT SELECT ITEM ENTRY PRINT PRINT ORDER Figure Procedure Use or to select the PRINT ORDER mode then press the OK button The PRINT PAPER screen is displayed...

Страница 63: ...e of printer being used BORDERLESS You may select the desired item depending on the type of printer being used Use or to select PRINT then press the OK button to confirm The TRANSFERRING screen is displayed This starts printing and displays the message TRANSFERRING on the monitor screen The message will disappear after the printing finished To cancel printing Pressing the OK button during print da...

Страница 64: ...In the PLAY mode press to access in PLAY menu 3 Use t or u to select CHANGE LOGO then press the OK button 4 Use or to select EXECUTE then press the OK button to confirm The new logo will be activated on the next time you turn on the camera CHANGE LOGO SELECT IMAGE SET EXECUTE CANCEL SELECT ITEM EXIT ENTRY PLAY CHANGE LOGO EXECUTE 7 8 LOGO DPOF To return startup logo to the original image reset the...

Страница 65: ... press the shutter button again STOP AUD_0001 AUD_0002 W VOLUME T VOLUME RECORD 1 13 AUD_0003 Playing Back a Voice Recording File 1 Press the MODE button to access in AUDIO mode with t or u then press the OK button Voice playlist appears on the screen 2 In the AUDIO mode use or to select the voice recording file you want to play 3 Press the OK button to start playback of the voice recording file t...

Страница 66: ...e recording button Choose previous next voice Use or to choose previous or next voice recording file voice recording filerecording file and then press the OK button to play Start stop playback of a voice OK Press the OK button to start or stop playback of a voice recording file recording file Adjust audio volume T W Press T or W to increase or decrease audio volume Pause playback of a voice record...

Страница 67: ...before you begin to install the software you need to check your system according to the table as shown below System Requirements System Requirements Windows Macintosh CPU Pentium 166 MHz processor or higher PowerPC G3 G4 OS Windows 98 98SE ME 2000 XP OS 9 0 or higher Memory 32MB 32MB 64MB RAM recommended 64MB RAM recommended Free Space on Hard Disk 128MB hard disk space 128MB hard disk space Requi...

Страница 68: ...river 1 Insert the enclosed CD ROM into your CD ROM drive 2 When the welcome screen appears click Install USB PC Cam driver Follow the on screen instructions to complete the installation 3 After the USB driver has been installed restart your computer Installation on MAC OS 9 0 For Mac OS 9 0 or higher the computer will automatically recognize the digital still camera and load its own USB drivers ...

Страница 69: ...r to select PC then press the OK button 6 There will be a new Removable Disk icon detected in My Computer in which contains your recorded images video clips audio files For Mac users double click untitled or unlabeled disk drive icon on our desktop When connecting to the computer it is necessary to install the battery into the digital still camera While transferring images to your computer the oth...

Страница 70: ...images are inside these folder s Select the desired still images video clips audio files and then choose Copy from the Edit menu Open the destination location folder and choose Paste from the Edit menu You may also drag and drop image files from the digital still camera to a desired location Macintosh Open the untitled disk icon and the destination location on your hard disk Drag and drop from the...

Страница 71: ... in one tool for owners of digital cameras WebCams DV camcorders scanners or anyone who strives to effectively organize a large collection of digital media 1 Insert the enclosed CD ROM into your CD ROM drive 2 When the welcome screen appears click Install Ulead Photo Explorer Follow the on screen instructions to complete the installation For more information about the operation of Photo Explorer a...

Страница 72: ...s photographic filters and special effects Embellish projects by adding creative design elements such as frames callouts and stamp objects Share results with family and friends via e mail and multiple print options 1 Insert the enclosed CD ROM into your CD ROM drive 2 When the welcome screen appears click Install Ulead Photo Express Follow the on screen instructions to complete the installation Fo...

Страница 73: ...his mode is not supported for Mac Step 1 Install the PC camera driver same as USB driver The PC camera driver included in the CD ROM is exclusively for Windows The PC camera function is not supported for Mac platforms 1 Insert the enclosed CD ROM into your CD ROM drive 2 When the welcome screen appears click Install USB PC Cam driver Follow the on screen instructions to complete the installation 3...

Страница 74: ...a Step 3 Run your application software i e Windows NetMeeting To use Windows NetMeeting for videoconferencing 1 Go to Start Programs Accessories Communications NetMeeting to launch the NetMeeting program 2 Click the Start Video button to view live video 3 Click the Place Call button 4 Type the e mail address or the network address of the computer that you are calling 5 Click Call The person that y...

Страница 75: ...red option item in PICTURE FUNCTION AE AWB menu then press the OK button 4 To exit from the menu press the button SELECT ITEM EXIT PICTURE FUNCTION AE AWB Q R G B SELECT PAGE SELECT MODE SELECT ITEM EXIT PICTURE FUNCTION AE AWB SELECT PAGE SELECT MODE QUICK VIEW EV SELECT ITEM EXIT PICTURE FUNCTION AE AWB SELECT PAGE SELECT MODE WB ISO Manual WB This menu is for the basic settings to be used when ...

Страница 76: ...M 2560 x 1920 3M 2048 x 1536 M 1 2 1280 x 960 M 0 3 640 x 480 TIFF IMAGE QUALITY Sets the quality compression rate at which the image is captured SUPER FINE FINE NORMAL SHARPNESS Sets the level of image sharpness HIGH NORMAL LOW COLOR Sets the color of the image that will be captured NORMAL B W SEPIA Q R G B ...

Страница 77: ...phy The adjustment range is from 5 to 5 DIGITAL ZOOM Sets whether or not to use digital zoom at the time of photography ON OFF QUICK VIEW Sets to display a captured image on LCD monitor immediately after you have taken the shot ON OFF EXPOSURE Sets to obtain the correct exposure when the subject is much brighter or darker than the background The EV compensation value can be set in the range from 2...

Страница 78: ...ts the sensitivity for taking pictures When the sensitivity is raised and the ISO figure is increased photography will become possible even in dark locations but the more pixilated grainer the image will appear AUTO 100 200 MANUAL WB Manually sets the white balance and stores it Use of this is convenient when the white balance does not offer a good match Before select EXECUTE determine the subject...

Страница 79: ... setting then press the OK button 4 To exit from the menu press the button Item Functional Description SIZE Sets the size of the image that will be recorded 640X480 320X240 COLOR Refer to Camera Menu PICTURE Settings in LIST OF MENU OPTIONS LCD BRIGHT Refer to Camera Menu FUNCTION settings in LIST OF MENU OPTIONS EXPOSURE Refer to Camera Menu FUNCTION settings in LIST OF MENU OPTIONS SELECT ITEM E...

Страница 80: ...n is useful for checking your images or for presentations etc Refer to section in this manual titled ìSlideshow Displayî for further details 3SEC 5SEC 7SEC 9SEC PROTECT Set the data to read only to prevent images from being erased by mistake Refer to section in this manual titled Protecting Images Video Clips for further details DELETE ALL Delete all files YES NO SELECT ITEM EXIT ENTRY PLAY SLIDE ...

Страница 81: ...nges the size of a recorded image 2560 x 1920 2048 x 1536 1280 x 960 640 x 480 EXIT CHANGE LOGO Allows you to specify one of your recorded images as your setup screen image which will be displayed on the monitor whenever you press the button to turn on the camera EXECUTE CANCEL DPOF Allows you to select the desired pictures to be printed and set the number of prints and date displayed in DPOF form...

Страница 82: ...CUSTOM menu 3 Use t or u to select the desired option item then press the OK button 4 Press the MODE button to return to Main Menu and select the desired mode SELECT ITEM BASIC CUSTOM SELECT PAGE SELECT MODE FORMAT AUTO DATE AUTO D SELECT ITEM BASIC CUSTOM SELECT PAGE SELECT MODE Y M D DATE NTSC PAL You can select your preferences on the camera settings in the mode ...

Страница 83: ...peration performed for a specific period of time the status of LCD monitor will turn into idle mode also known as power save mode and the LCD monitor will turn off You can press any button to resume the operation OFF 30SEC 1MIN 2MIN RESET Returns all basic settings to the digital still camera s default settings The time setting will not be reset YES NO POWER OFF If no operation is performed for a ...

Страница 84: ...is manual titled Setting the Date and Time for further details LANGUAGE Sets the language that is displayed on the LCD monitor Refer to section in this manual titled Choosing the Screen Language for further details ENGLISH VIDEO OUT Sets video output system of the video equipment that you are going to connect to the camera PAL NTSC VERSION Displays the firmware version of the camera Y M D DATE NTS...

Страница 85: ...EN 85 CONNECTING YOUR CAMERA TO OTHER DEVICES ...

Страница 86: ...2 8 Tele 4 9 Focal length 5 4mm 16 2mm Focus range Normal 0 5m infinity Wide 0 06m 0 4m Tele 0 35m 0 5m LCD monitor 2 0 LTPS color LCD Self timer 3 sec delay 10sec delay Exposure compensation 2 0EV 2 0EV in 0 5EV increments White balance Auto Daylight Cloudy Sunset Tungsten Fluoresent ISO Auto 100 200 Interface DC IN jack USB connector A V terminal Power Lithium ion rechargeable battery 650mAh One...

Страница 87: ...esired files to your computer and then delete unnecessary files or use a different memory card Select a different flash mode Select SINGLE in the capture mode of CAMERA menu Insert a new SD memory card Check all connections Install the USB driver on your computer Turn on the camera The battery has run out The battery is not oriented correctly The battery cover is not closed properly The AC power a...

Страница 88: ... 16 2048 x 1536 pixels Super fine 1 8 Fine 1 12 Normal 1 16 1280 x 960 pixels Super fine 1 8 Fine 1 12 Normal 1 16 640 x 480 pixels Super fine 1 8 Fine 1 12 Normal 1 16 TIFF IMAGE The above data shows the standard testing results The actual capacity varies according to the shooting conditions and settings 5M 3M M 1 2 M 0 3 64MB 19 39 59 30 61 91 78 153 226 295 549 769 4 128MB 40 79 120 62 123 185 ...

Страница 89: ... time depending on the capacity of the SD memory card Image size SD memory card 8MB 16MB 32MB 64MB 128MB 256MB 512MB 640 x 480 0 18 0 47 1 46 3 42 7 36 15 14 30 48 320 x 240 1 13 3 08 6 58 14 38 29 58 1 00 05 2 01 25 The values for the recording time may vary depending on the shooting conditions and settings ...

Страница 90: ...armored for water and shock protection Soft rubber grips Fully multi coated optical glass lens port for high light transmission Accessory mount for adding one or two external flash es Snap on lens port to quickly attach SeaLife Wide Angle Lens Leak check window let s you see if housing leaks while underwater Advanced control buttons to access all camera settings DC500 Front view of underwater hous...

Страница 91: ...w O ring removal and installation instructions contained in this manual Replace O ring every year to ensure proper seal Only use approved SeaLife O ring designed for the DC500 Soak and rinse waterproof housing in fresh water after each use Use clean soft cloth to dry housing Store camera and housing only after careful cleaning and when totally dry 4 Carefully close lid to seal housing Make sure O ...

Страница 92: ... and inspect O ring and O ring contact surfaces before each underwater use in accordance with instructions provided in this manual If O ring needs to be replaced contact your local authorized SeaLife dealer or the SeaLife Service Center at 856 866 9191 or email service sealife cameras com IMPORTANT Do NOT lubricate O ring ...

Страница 93: ...rviced if the O ring or O ring contact surfaces are damaged Do not use underwater housing if O ring or O ring contact surfaces are damaged Replacement O rings are available at your local authorized SeaLife dealer Inspect and replace O ring if damaged A Cut B Tear C Dent 1 Carefully inspect and clean O ring and O ring contact surfaces for sand hair and other debris before every use Clean o ring and...

Страница 94: ...rvice 4 Replace O ring every year to ensure proper seal Only use approved SeaLife O ring designed for the DC500 Replacement O rings are available at your local authorized SeaLife dealer 5 After each use underwater a Soak sealed housing in fresh water for about 15 minutes Most dive boats offer special fresh water buckets specifically for underwater photo equipment DO NOT put camera housing in fresh...

Страница 95: ...e installing O ring Step 2 Push O ring into groove as shown being careful not to twist or roll O ring Step 3 Use two fingers to push last part of O ring into groove Step 4 Carefully close housing to firmly seat O ring and open housing again to inspect that O ring is completely seated into groove Do NOT grease the O ring ...

Страница 96: ...EN 96 To Remove O ring Step 1 Push O ring along groove until it lifts Step 2 Gently lift and remove O ring from its groove ...

Страница 97: ... TO OPEN AND CLOSE WATERPROOF HOUSING Step 1 Push in locking tab to open latch Step 2 Open latch all the way to lift and release latch from housing Step 3 Open Housing as shown so inner camera does not fall out ...

Страница 98: ...EN 98 Step 4 Close housing and push down on latch as shown to firmly seat latch into housing Step 5 Push down latch until locking tab clicks into place ...

Страница 99: ...al Flash item SL960D optional accessory It is strongly recommended to purchase the Flash Link optical cable accessory if you are using a SeaLife external Flash to ensure it fires all the time Step 1 Insert end of Flash Link optical cable into one of the adapter holes as shown Push cable in all the way until it stops Step 2 Use small wrench provided to tighten set screw until you feel some resistan...

Страница 100: ...EN 100 Step 3 Attach adapter around housing lens port so that it is seated into the flash window recess If using two Flash Links attach other cable in second hole and follow above instructions ...

Страница 101: ...mall locking tab and lift latch up Do not extend housing lid beyond its stop point or damage may occur to the hinge area 2 Carefully inspect O ring for damage and make sure O ring is firmly seated in its groove If O ring is damaged and requires replacement contact your local authorized SeaLife dealer or SeaLife Service Center 3 Clean the housing glass lens port using clean dry cotton cloth It is r...

Страница 102: ... 1 Press the small power button on the top of the housing to turn camera power on 2 Press the large shutter button on the outside of the housing to take a test picture 3 The power or shutter button should have a smooth action and return to its original resting position after pressing It is normal to feel some resistance when pressing the power and shutter button 4 Press and hold power button to tu...

Страница 103: ...h clean soft towel after removing from fresh water tank 3 Do not expose camera and housing to direct sunlight keep in a shaded area or under a dry towel 4 It is not recommended to remove camera from housing while on the dive boat Allowing humid air to enter the housing may cause fogging 5 If you must open the housing while on the dive boat make sure you and the housing are perfectly dry before ope...

Страница 104: ...water pictures Remember the human eye can see more detail than a camera In other words your eyes see the water as being clearer than it actually is Floating particles like algae and silt cause low visibility Avoid stirring up the sandy bottom with your fins These floating particles cause small spots to appear in your picture known as backscatter Always remember to limit your shooting distance to 1...

Страница 105: ...amatic pictures The SeaLife Wide Angle lens allow you to get close to your subject for images full of colors and razor sharp details With the 24mm wide angle lens you fit a close group of 4 dive buddies or a 6 foot 180 cm shark at a shooting distance of 6 feet 180 cm Normally you would have to be 10 feet away too far for a sharp picture 6 Use the SeaLife Flash Accessories to enhance color and brig...

Страница 106: ...articular underwater scene When the QuickShoot mode is enabled the camera s shutter lag shutter response time is less than 1 second so you don t miss the fish Inn SeaMode shutter lag is 0 68 seconds when QuickShoot is enabled In External Flash mode shitter lag is 0 17 seconds when QuickShoot is enabled Visit the SeaLife website for more tips on underwater photography www sealife cameras com ...

Страница 107: ... Contact service center Camera gets hot Constant use of camera This is normal No PC connection USB cable not connected to USB port Inspect connection ports Slow PC connection time Allow a few minutes for some PC s to establish connection Camera driver not installed Install camera driver CD for Windows 98 only No Video Connection Improper connection to TV Connect video cable to video IN jack of TV ...

Страница 108: ...to PC Insert empty CF card Pictures out of focus Dirty lens Clean lens with clean cotton cloth Fogged housing lens Insert camera in dry air condi tioned room Use anti fog desiccant inside housing Do not let water drops get inside housing Low water visibility Shooting distance not to exceed 1 10 of visibility Auto focus not set Camera did not establish correct focus setting Grainy picture Dark ligh...

Страница 109: ...ndow Grip camera correctly not blocking flash Improper operating mode Check for proper operating mode Land or Sea Lost images Defective SD card Use only approved quality SD cards Reformat SD card will delete pictures Defective internal memory Reformat memory this will delete pictures in memory Using camera with low battery power Recharge batteries Housing leaks water O ring not clean or is damaged...

Страница 110: ...20 tripod threads to adapt accessories Lanyard Padded lanyard with swiveled attachment clip Hardware 316 Stainless Steel metal hardware Material Rubber overmolded polycarbonate housing Weight 333 grams 11 7 ounces Housing only without inner camera 472 grams 16 6 ounces Housing and inner camera Size 3 5 H x 5 5 W x 3 4 D inches 8 9cm x 14cm x 8 6cm Operating Temp 33 degrees F to 110 degrees F Stora...

Отзывы: