PC220
Motor
. . . .
230V 1100W
Bin
. . . . . . . .
20ltr
Air Flow
. . . . . .
210m
3
/h
Weight
. . . . . .
7kg
PC230
Motor
. . . .
230V 1100W
Bin
. . . . . . . .
30ltr
Air Flow
. . . . . .
210m
3
/h
Weight
. . . . . .
7kg
PC250
Motor
. . . .
230V 1200W
Bin
. . . . . . . .
50ltr
Air Flow
. . . . . .
175m
3
/h
Weight
. . . . .
12kg
3.
Assembly
3.1.1. PC220/230 - Push fit bin to base, aligning inlet on bin with triangular mark on top edge of base. PC250 - Pull outwards
catch at rear of base, place bin on base (seam to the rear) and release catch.
3.1.2. PC250 only - Slide handle through the four brackets on the bin and tighten clamping screws. The cleaner is now ready for
dry
vacuum cleaning. Note that PC250 has a two speed switch (1 & 2) as well as an On/Off switch (0 & 1) on top of the motor head.
Note: The filter cartridge is reusable.
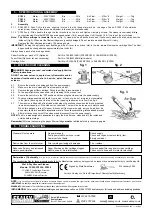
Remove (fig. 1), clean with a soft bristle brush and, if necessary, wash with a fine spray, from the
inside out (fig. 2). When wet the filter cartridge is very easily damaged. Do not replace washed filter until it is dry.
Replace the filter after approximately 100 working hours.
IMPORTANT!
If using the optional paper dust bags, which fit over the suction inlet in the bin,
do not
remove the cartridge filter. The Dust
bags should be changed when approximately two thirds full.
Always keep a pack of spare bags handy.
Paper Dust Bags - pack of 10 (Optional) . . . . . .Part No. 186/83015BOI (PC220/PC230), 186/83015B5I (PC250)
Foam Filter (Optional, for wet vacuuming) . . . . . . .Part No. 186/83035BHB (all models)
Cartridge Filter . . . . . . . . . . . . . . . . . . . . . . . . . . .Part No. VAC/92/DL (PC220/PC230), VAC92/250/DL (PC250)
4.1.
Ensure the machine is unplugged from the power supply.
4.2.
Make sure the bin is clean and free from dust and dirt.
4.3.
Remove the paper filter cartridge. Fitting foam filter is recommended.
4.4.
To the same flexible hose as used in dry cleaning fit the crevice tool.
4.5.
Ensure the
s
witch is in the Off position and then plug the cleaner into the power supply.
4.6.
To vacuum large quantities of liquid, from a sink, or tank, etc., do not immerse tool completely
in the liquid, leave a gap at the top of the tool opening to allow an air inflow. See fig. 3.
4.7.
The machine is fitted with a float valve which stops the suction action when the bin has reached
its maximum capacity or if the cleaner is overturned. There will be an increase in motor speed.
When this happens, turn off cleaner, disconnect from power supply, remove head from bin
and empty liquid into a suitable receptacle or drain. To continue vacuuming, refit head and proceed.
4.8.
After wet vacuuming, turn off the cleaner and disconnect from the power supply.
NOTE:
The bin is
not
designed to
store
liquid, empty the bin after use, clean and dry the inside and
outside before storage.
Remember!
After wet vacuuming the paper filter cartridge
must
be refitted before dry vacuuming again.
p
p
WARNING!
Ensure you read, understand and apply Section
1 Safety Instructions.
DO NOT vacuum solvents, explosives, inflammable and/or
hazardous liquids such as petrol, oil, spirits, paint, thinners,
acids etc.
fig. 2
fig. 3
fig. 1
5. TROUBLESHOOTING
Cleaner will not operate.
Dust comes from the motor cover.
Reduced efficiency and increased
motor speed/vibration.
No power supply.
Faulty power cable, switch or motor.
Container full of liquid.
Filter cartridge missing or damaged.
Paper filter bag and/or cartridge clogged.
Nozzle, hose or bin inlet blocked.
Check supply.
Check and repair or replace faulty item.
Empty container.
Fit or replace.
Replace paper filter bag and/or clean cartridge.
Check nozzle, hose and bin inlet for blockage.
NOTE:
It is our policy to continually improve products and as such we reserve the right to alter data, specifications and component parts without prior notice.
IMPORTANT:
No liability is accepted for incorrect use of this equipment.
WARRANTY:
Guarantee is 12 months from purchase date, proof of which will be required for any claim.
INFORMATION:
For a copy of our latest catalogue and promotions call us on 01284 757525 and leave your full name and address, including postcode.
4. WET VACUUM CLEANING
Declaration of Conformity
We, the sole UK importer, declare that the product listed below is in conformity with the following standards and directives.
The construction files for these products are held by the Manufacturer and may be inspected, on request by a national authority to Jack Sealey Ltd.
For Jack Sealey Ltd. Sole UK importer of Sealey Qaulity Machinery.
Signed by Mark Sweetman
5th January 2004
Wet & Dry Vacuum Cleaner
Models: PC220,PC230 & PC250
73/23/EEC Low Voltage Directive
89/336/EEC EMC Directive
93/68/EEC Marking Directive
PC220,PC230 & PC250 - 1 - 050104
01284 757500
01284 703534
www.sealey.co.uk
Sole UK Distributor,
Sealey Group,
Bury St. Edmunds, Suffolk.
Web
3. SPECIFICATIONS & ASSEMBLY


