-
4. MAINTENANCE
4.1
BULB CHANGING
WARNING! Disconnect the lamp from the power supply and allow to cool before
attempting to touch the unit.
4.1.1 remove the four screws around the lamp rim carefully pull out and remove the rim and reflector
assembly ensuring not to break the bulb.
4.1.2 unscrew the old bulb and dispose of correctly. Hold the new bulb (Ml36B) in a clean cloth and
screw it into the bulb holder.
4.1.3 carefully replace the reflector assembly over the bulb and secure with four screws.
4.2
Keep the lamp clean.
4.3
check cable for any signs of wear. If the plug and/or cable are worn/broken, remove the lamp
from service immediately and have it repaired by a qualified electrician.
NOTE:
It is our policy to continually improve products and as such we reserve the right to alter data, specifications and component parts without prior notice.
IMPORTANT:
no liability is accepted for incorrect use of this product.
WARRANTY:
Guarantee is 12 months from purchase date, proof of which will be required for any claim.
INFORMATION:
for a copy of our latest catalogue and promotions call us on 01284 757525 and leave your full name and address, including postcode.
01284 757500
01284 703534
Sole UK Distributor, Sealey Group,
Kempson Way, suffolk Business Park
,
Bury st. edmunds, suffolk,
IP32 7Ar
www.sealey.co.uk
Web
Original Language Version
Ml36, Ml36t, Ml36t Issue: 1 - 20/05/10
3. OPERATION
WARNING! Ensure the lamp is disconnected from the mains power supply before
attempting any assembly.
3.1
WALL MOUNTING (ML36 ONLY)
3.1.1
IMPORTANT!
ensure that mounting surface is capable of supporting the weight of the lamp.
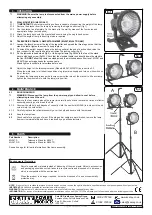
3.1.2 remove the bracket from the lamp by removing the single hand screw (fig.1).
3.1.3 use the bracket as a template, fix the bracket to the wall by means of the four holes and
appropriate fixings (not supplied).
3.1.4 Attach the lamp back onto the bracket and secure using the single hand screw.
3.1.5 Adjust the angle of lamp to direct light where required.
3.2
TELESCOPIC STANDS / LAMP ATTACHMENT (ML36T, ML36TD ONLY)
3.2.1 loosen the thumb screw at the top of the leg collar and spread the three legs out so that the
stand is stable, tighten the screw to keep in place.
3.2.2
to extend the upright support, loosen the locking collar at the end of each section, raise the
inner support to the required height and tighten the locking collar (fig.3).
3.2.3
fix the removable head stand (fig.2) or the singular lamp (fig.3B) onto the top of the stand,
secure with hand screw (fig3A). check that the electrical cable runs directly down the stand to
the floor.
DO NOT
allow the cable to extend across the workshop above floor level. Ml36t and
Ml36td have storage hooks for excess cable.
stand light on a suitable, level surface before use
.
3.3
Adjust the height of the telescopic stands (Models Ml36t, Ml36td) as in section 3.2.
When the work lamp is in its desires position plug into mains supply and turn on with switch on
top of lamp(s).
3.4
to adjust the lamps angle loosen the thumb screws either side of the bracket to tilt each lamp,
tighten the thumb screws to hold the lamp(s) in position.
fig.2
fig.1
A
B
fig.3
Environmental Protection.
recycle unwanted materials instead of disposing of them as waste. All tools, accessories
and packaging should be sorted, taken to a recycle centre and disposed of in a manner
which is compatible with the environment.
When the product is no longer required, it must be disposed of in an environmentally
protective way.
5. PARTS
Part Number
Description
Ml36t.s
telescopic stand for Ml36t
Ml36td.s
telescopic stand for Ml36td
see parts page for full parts information of the lamp assembly.


