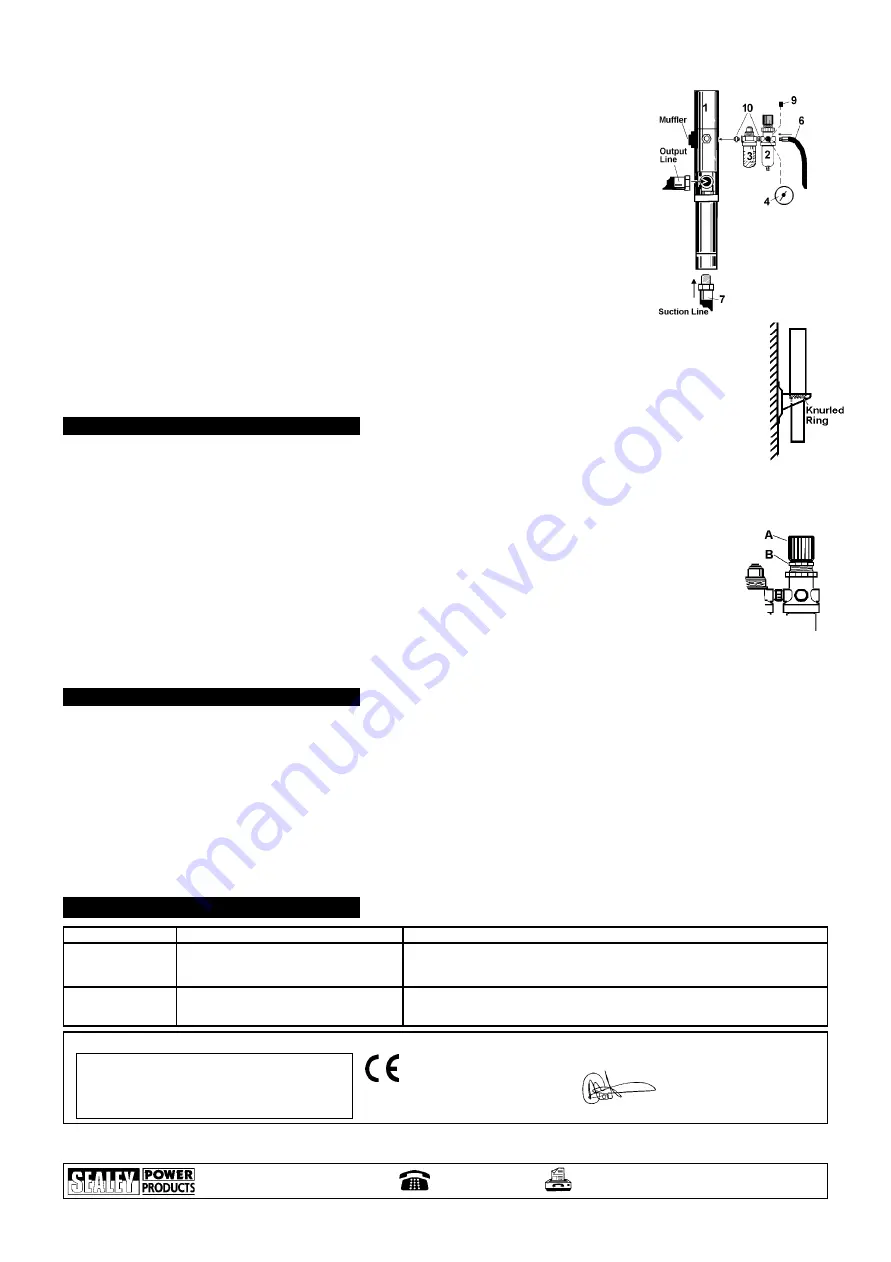
4.2.2. Connect filter-regulator to lubricator using one of the fittings (10). Note the air flow direction arrows on
each unit and that lubricator must be between pump and filter-regulator. Using the second fitting (10)
connect the lubricator outlet to the pump air inlet.
4.2.3. Screw gauge (4) into filter-regulator port, choosing the port which will provide easiest gauge visibility
in final installed position. Plug the remaining gauge port with plug (9).
Screw air hose (6) into filter-regulator inlet port. Secure all connections (but do not over tighten).
4.3.
Installation.
Wall mounting.
DO NOT install the unit where it may be damaged by moving apparatus, or may endanger personal safety.
4.3.1. Secure wall mounting bracket (fig.1.8) to wall, as shown in fig.3, ensuring wall and attaching
screws are adequate to take the weight of the pump and the pull of the suction and output hoses.
Remove the knurled mounting ring from the pump body and pass the pump unit through the mounting
bracket and secure with the knurled ring.
4.3.2. Attach suction hose (fig.2.7) to inlet at base of pump unit. Attach output line (¾ bore - not supplied, see
fig.2) to the pump output port.
4.3.3. The bowl of the filter-regulator (fig.2.2) is fitted with an automatic drain valve the outlet of which
may be piped away using suitably sized flexible tube.
4.3.4. Remove lubricator (fig.2.3) oil filler plug and fill with good quality air tool oil (Sealey ATO/500 500ml size or
ATO/1000 1L size) checking the maximum level marked on the side of the unit.
Note:
The installation of a wall bracket next to the pump, to support the suction hose when not in use, is recommended.
4.3.5. Use PTFE tape or similar on all connections to ensure leak-free joints.
5.1.
Air regulator
The regulator should be set at 6 bar/90psi. It is important to maintain the correct operating pressure to ensure that the control valves
and connectors are not damaged and to prevent leakage in the delivery lines.
5.1.1. Connect the suction hose (fig.2.7) to the oil drain unit and ensure the outlet hose will dispose of the waste in accordance with local authority
regulations.
DO NOT pollute the environment by the uncontrolled discharge of waste products.
p
p
p
WARNING! Do not operate pump dry - suction line must be connected to drainer before turning on.
5.1.2. Before turning on air supply for the first time ensure that pressure regulator knob (fig.4.A) is unwound (anticlockwise) so
that there is no load on the regulator spring. Turn on air supply. Regulator output gauge (fig.2.4) should show zero. Turn
regulator knob clockwise, slowly, until gauge shows 6 bar (90psi) - pump will start at approx. 2 bar. Lock knob with
locking ring (fig.4.B) to prevent accidental movement.
Note: When resetting the regulated pressure always start from below the new required pressure and adjust up.
5.1.3. Check that there are no leaks from any of the hoses or fittings.
5.1.4. When pumping is complete turn the air line off. Disconnect suction hose from drain unit and store. Wipe up any spillage.
Note:
Waste oil will not pump if its viscosity is too high.
5. OPERATING INSTRUCTIONS
p
p
WARNING!
Ensure that the pump is disconnected from the air line and that there is no pressure in the output line before attempting
any service or maintenance.
Note: It is essential that dirt and moisture are kept out of the air supply to the pump. Drain air supply system and clean filters regularly.
6.1.
Air line lubricator and water trap
(fig.2.3)
This unit is designed to automatically lubricate the pump via the air supply. The unit must be kept topped up with good quality air tool
oil (Sealey reference: ATO/500 - 500ml size or ATO/1000 - 1L size). To adjust the oil flow turn the oil regulator on the top of the unit.
Turn screw anticlockwise to increase the flow and clockwise to decrease flow - set to minimum flow for this application. At regular intervals
check that water is draining from filter-regulator, since it is essential that water does not enter the pump.
6.2.
Cleaning.
Clean pump and air units with clean damp cloth. Mild detergents may be used to remove oil.
DO NOT use solvents or abrasives and do not get the pump or air units wet.
6. MAINTENANCE
fig. 2
fig. 3
fig. 4
AK450DP - 0444 - (2) - 190899
THE PROBLEM
THE CAUSE
THE SOLUTION
7. TROUBLESHOOTING
1. Air motor does
not operate.
2. Poor performance
1.1. Air pressure is too low.
1.2. Muffler is blocked.
1.3. Internal defect
2.1. Muffler is blocked.
2.2. Waste fluid to be pumped is below 15
0
C.
2.3. Viscosity too high for pump.
1.1. Adjust air pressure to above 2 bar/30psi. (5.1).
1.2. Contact service agent.
1.3. Contact service agent.
2.1. Contact service agent.
2.2. Increase oil temperature by moving drain unit to warmer area.
2.3. Check viscosity of waste oil.
Sole UK Distributor, Sealey Group,
Bury St. Edmunds, Suffolk.
NOTE:
It is our policy to continually improve products and as such we reserve the right to alter data, specifications and component parts without prior notice.
IMPORTANT:
No liability is accepted for incorrect use of this equipment.
WARRANTY:
Guarantee is 12 months from purchase date, proof of which will be required for any claim.
INFORMATION:
For a copy of our latest catalogue call us on 01284 757525 and leave your full name and address, including postcode.
E-mail:
01284 703534
01284 757500
Declaration of Conformity
We, the UK distributor, declare that the product listed below is in conformity with the following standards and directives
The construction file for this product is held by the Manufacturer and may be inspected on
request by contacting Jack Sealey Ltd.
For Jack Sealey Ltd. Sole distributor of Sealey Power Products.
AIR OPERATED OIL PUMP
Model AK450DP
98/37/EC Machinery Directive
Signed by Mark Sweetman
1st October 1999


