18
5.3
Calibrate the paper sensor with the printer diagnostic tool
5.3.1
Auto correction
1. Make sure the paper is installed correctly and the print head is closed.
Note: The paper sensor of this model is adjustable. Please make sure that the gap or black mark of
the paper will pass through the triangle symbol of the gap sensor
(
gap sensor position
)
or the
black mark sensor
Gap sensor
Black mark sensor
2. Turn on the printer.
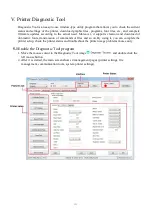
3. Start the Diagnostic Tool and set the transmission interface (the default is USB).
The default communication interface of
this printer diagnostic tool program is
USB, so if the computer is connected
through USB cable for transmission, no
changes need to be made to the settings
4. Click on "Sensor Calibration".
5. Select the paper type and click on "Calibration". The printer will automatically feed the paper
to calibrate the sensor.
Gap sensor
Gap sensor
Mark sensor
Mark sensor


