


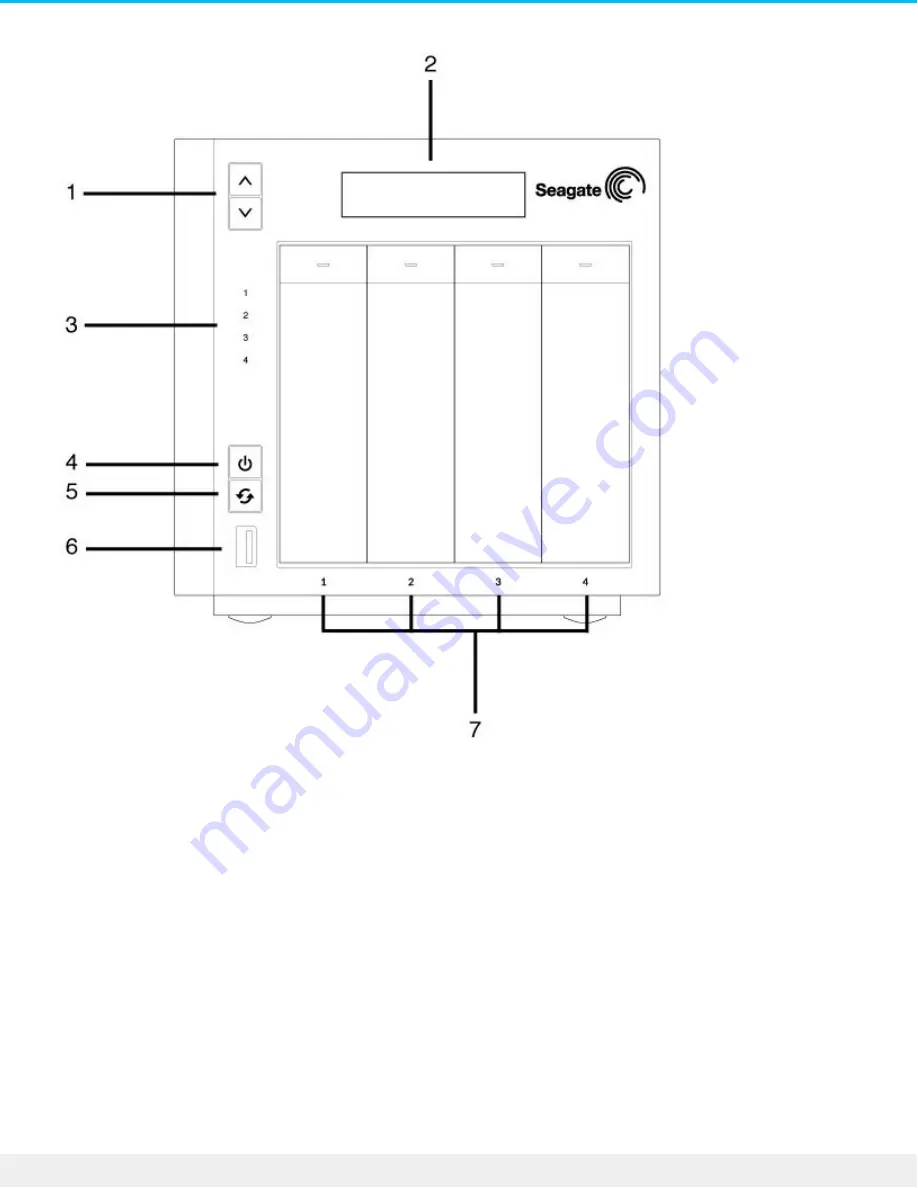
1. LCD up/down buttons: Push the up/down buttons to navigate the LCD menu.
2. LCD menu: Review the NAS Pro’s settings (see
LCD Menu (NAS Pro 4-Bay and 6-Bay)
).
3. Hard drive LEDs: Activity LEDs for the hard drives.
4. Power button and status LED: Turn the NAS on and off (see
Operation
). A LED will turn on once the
button is pushed.
5. One-touch backup button: Push the button to initiate a backup. The one-touch button must be
configured using the NAS OS Backup Manager.
6. SuperSpeed USB 3.0 Port: Connect a compatible USB storage device to the port.
7. Hard drive bays: Bays for the hard drives.
For details on LED behavior, see
System LEDs
.
NAS Pro 6-Bay
25
Seagate NAS Pro 2-Bay | 4-Bay | 6-Bay
4/28/15
Содержание NAS Pro 2-Bay
Страница 16: ...16 Seagate NAS Pro 2 Bay 4 Bay 6 Bay 4 28 15 ...
Страница 17: ...NAS Pro 4 Bay 17 Seagate NAS Pro 2 Bay 4 Bay 6 Bay 4 28 15 ...
Страница 18: ...18 Seagate NAS Pro 2 Bay 4 Bay 6 Bay 4 28 15 ...
Страница 19: ...NAS Pro 6 Bay 19 Seagate NAS Pro 2 Bay 4 Bay 6 Bay 4 28 15 ...
Страница 20: ...20 Seagate NAS Pro 2 Bay 4 Bay 6 Bay 4 28 15 ...
Страница 30: ...30 Seagate NAS Pro 2 Bay 4 Bay 6 Bay 4 28 15 ...
Страница 32: ...1 Hard drives 2 Status power button NAS Pro 6 Bay LEDs 32 Seagate NAS Pro 2 Bay 4 Bay 6 Bay 4 28 15 ...
Страница 39: ...Step 3 First login 39 Seagate NAS Pro 2 Bay 4 Bay 6 Bay 4 28 15 ...
Страница 47: ...3 Follow the on screen instructions to complete the installation 47 Seagate NAS Pro 2 Bay 4 Bay 6 Bay 4 28 15 ...
Страница 52: ...52 Seagate NAS Pro 2 Bay 4 Bay 6 Bay 4 28 15 ...
Страница 61: ...6 Insert the hard drive tray into the empty slot 61 Seagate NAS Pro 2 Bay 4 Bay 6 Bay 4 28 15 ...
Страница 67: ...5 Wait for the LED to turn solid 67 Seagate NAS Pro 2 Bay 4 Bay 6 Bay 4 28 15 ...


