background image

SD-MA-029 

21 


7.13


QR Code


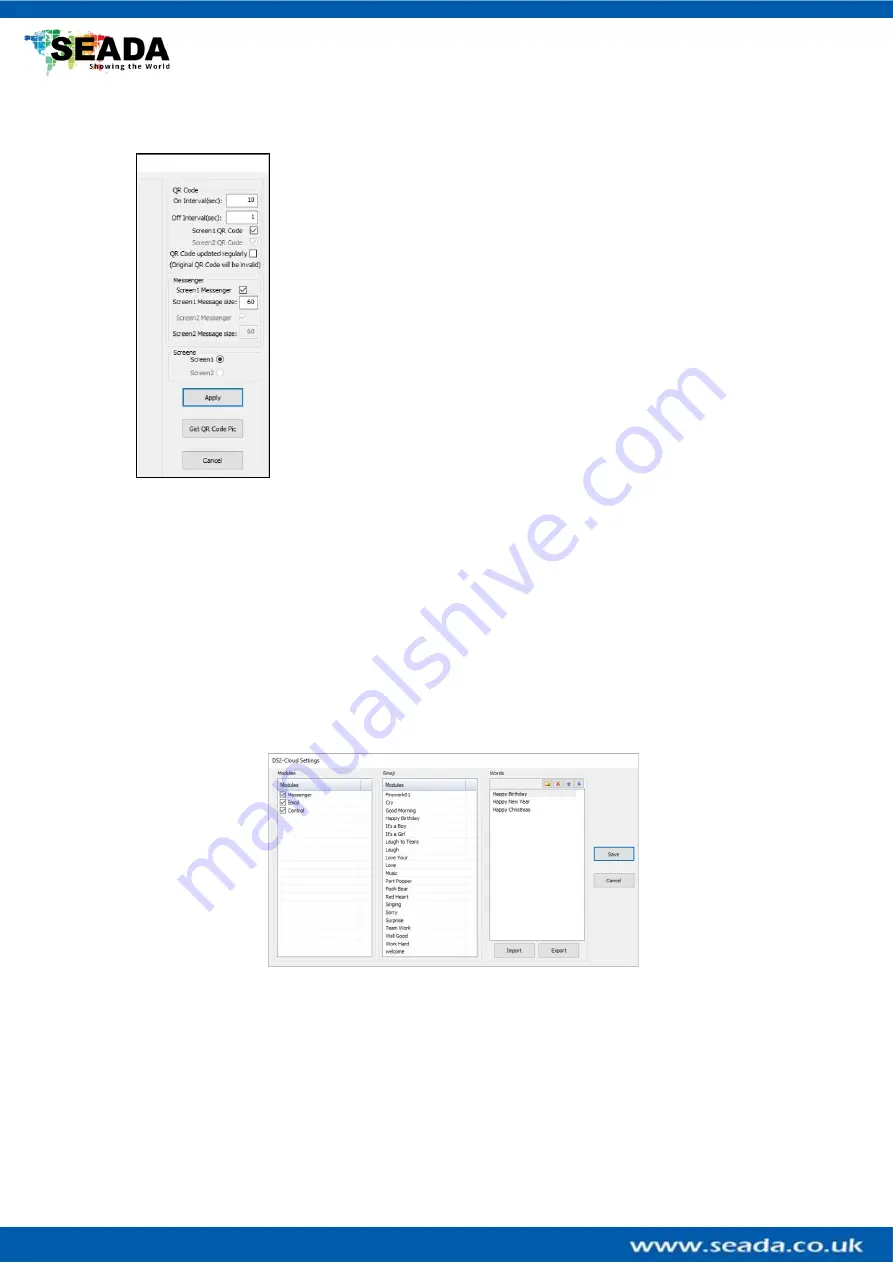
To set up the QR code  which enables the features of sending images, 
message, greetings, and emoji from smart phone via Cloud and control 
the DS2 using phone within local network. This feature is option.


Please press 

‘Apply’

 to enable the changes.


1)


QR Code


i.


On Interval: 


QR code display on projection screen period 


ii.


Off Interval:


QR code off projection screen period


iii.


Screen1 QR Code: 


Enable the QR code on screen 1


iv.


Screen 2 QR Code:


Enable the QR code on screen 2


v.


QR Code Updated Regularly:


QR code will change every 24 hours or when 

unit being power off/on 


2)


Messenger


It enables/disables the message and greeting ability on Cloud management.


3)


Screens


Choose which projection screen the QR is on


4)


Get QR Code Pic


To get the QR code picture. If users want to keep the Cloud management feature from the 
pubic,  they  can  disable  the  QR  code  shown  on  projection  screen  and  keep  the  QR  code 
picture by themselves.


7.14


Cloud Settings


Users  can  enable  or  disable  the  Messenger,  Emoji  and  Control  feature  from  the  Cloud 
management and manage the greetings on the cloud. 


7.15


Layout Lock


It will lock the current layout away from any movement.


8

Help


Shows the software version detail.


Содержание DS2

Страница 1: ...de This user guide provides basic instructions for setting up SEADA DS2 Edge Blending Controller and how to create eye catching video projection screen using its management software Document No SD MA 029 Document Version 02 ...

Страница 2: ...CONFIGURATION 2 III UI 3 IV OPERATION 4 1 LAYOUT 4 2 EDIT 5 3 CONNECTION SETTINGS 5 4 CONFIGURATION 6 4 1 Output Resolution Setting 6 4 2 System Setup 7 4 2 1 Parameter Settings edge blending Step 1 7 4 2 2 Geometry Correction edge blending Step 2 9 4 2 3 Gamma Correction edge blending Step 3 12 5 VIDEO 14 6 PICTURE 16 7 OTHER COMMANDS 19 8 HELP 21 V CONTROL ASSISTANT TOOLS 22 1 OSD 22 2 VIDEO CON...

Страница 3: ...Connect the control PC to powered up DS2 with network port Ensure the LAN port on DS2 is connected not the RS232 port since both of them use RJ45 connetion 3 Open the DS2 software and click Player Connection Settings or P button on toolbar to open the connection dialog box In this dialog box all the DS2 units connecting to this control PC will be shown in the list Highlight DS2 to be connected and...

Страница 4: ...the overlap width using the equation is 𝑊 L P T W Edge blending overlap width L Length of the projection screen T total pixels of the projection P edge blending area total pixels b So the right edge of projector A is L 2 W 2 and the left edge of projector B is L 2 W 2 c Example i L is 300cm ii Project A and B output resolution is 1920 x 1080 iii Edge blending area pixels is 240 pixels iv So T 1920...

Страница 5: ...reen surface by applying a pre compensating inverse distortion to that image in the digital domain Therefore projection can be applied onto any non flat surfaces such as curve shape corner walls and so on Step3 Gamma Correction see detail in chapter 4 2 3 Because the edge blending overlapping zone will have a brighter than normal image Gamma Correction is performed on the edges to allow seamless m...

Страница 6: ...ge the DS units with the commands on the toolbar 2 Video Input List It lists all the different shapes of the windows Users can drag and drop onto projection screen for video input 1 and 2 3 Projection Display Area It shows the layout of current windows on projection screen and users can manage the inputs windows here via mouse 4 DS2 Onboard Layout List It shows the preset layouts on DS2 Users can ...

Страница 7: ...Layout Create a new blank layout 1 2 Open Layout Open an existing layout from the control PC 1 3 Save Layout Save the changes to the current layout onto control PC 1 4 Save As Save the current layout to as different layout onto control PC 1 5 Exit Exit the software 1 6 Import Layouts onto DS2 Uses can load the layouts from control PC onto DS2 or delete the layouts from DS2 in this section Right cl...

Страница 8: ...the Projection Display Area 2 5 Close All Close all video input windows on the Projection Display Area 3 Connection Settings 3 1 Player Connection Settings All DS2 units connecting to this control PC will be shown in the list Highlight DS to be connected and then press Connect button to connect A connected message will be shown once the connection is established ...

Страница 9: ...e being pressed control PC will reconnect to the DS2 automatically 4 Configuration 4 1 Output Resolution Setting Users can set up the output resolution to match the projectors to be used in the edge blending 1024X768 60Hz 1280X768 60Hz 1280X800 60Hz 1280X1024 60Hz 1920X1080 60Hz users are also able to customize the output resolution in this section ...

Страница 10: ...tually to get projectors to form a uniform display image wall 4 2 1 Parameter Settings edge blending Step 1 Users set up the layout and parameters of edge blending zone 1 set up how many outputs and also the layout of the projectors e g 1 x 2 users can set up the layouts rotation and edge blending overlap width here projector box ...

Страница 11: ...n double clicking the projector box see image above to open the Edge Blending Width Adjustment dialog box c Users can always come back to change the width of edge blending overlap 3 Choose how many channels here for the edge blending and then press Next to go to Geometry Correction Step a Users are able to define the colour of backgound and grid here b Go to Gamma Correction here is the option for...

Страница 12: ...User hotkeys below to help the adjustment Hotkeys Ctrl mouse left click multi adjusting points selection point by point Ctrl allow keys multi adjusting points selection point by point Shift mouse left drag multi adjusting points selection in group Shift allow keys to switch to next adjusting point Zoom out the adjusting grid of current Channel Zoom in the adjusting grid of current Channel Zoom out...

Страница 13: ...and each grid s width length are at the same size on projection screen Grids on software Corresponding grids on projection screen If the projection screen is flat all the lines and grids should not need large adjustment if the surface is curve and uneven surface users need to adjust each line to make sure the lines are straight grid sizes are same See the unadjusted projection on the curve screen ...

Страница 14: ...ys of and for current channel channel 2 and Hotkeys for previous channel channel 1 Each step both channels are at the same resolution users need to move the points lines of the 2nd channels in edge blending zone onto top of the channel 1 s points and lines to precisely match each other If needed the rest of points and lines need to be adjusted as well to ensure the straight lines and same size of ...

Страница 15: ...Users can set up the sync of both channels so when channel 1 right is adjusted channel2 left will be adjusted automatically see image below 1 Adjustment Modes DS2 has two adjustment modes Gamma Line and Custom Line a Gamma Line Gamma line is the optimized linear adjustment method from SEADA Users can easily do the gamma correction by adjust the value of linear gamma line b Custom Line Custom line ...

Страница 16: ...op bottom and the other lines all need to be set up at 256 otherwise users will see the black stripe on display wall 2 Luminance Coefficient If the two projectors have brightness difference DS can change the whole projector output brightness by using different Luminance Coefficient Once the gamma correction is done press the cancel to save and exist the edge blending set up Now the edge blending p...

Страница 17: ...built in media player from the control PC Note the single file size needs to be smaller than 2GB 3 Send Video Folder Users can delete the unwanted video from DS device by highlighting the file in the File List and pressing the Delete Video File button 4 Play Video on Screen DS has ability to create two separated edge blending walls on one unit e g users can create two 1x2 edge blending walls on a ...

Страница 18: ...ew Folder Highlight the file in the File List and press this button to rename the video name in the list to the new name users entered in Video File Name 8 Volume Control Highlight the file in the File List and press this button to rename the video name in the list to the new name users entered in Video File Name 9 Play Time Control Highlight the file in the File List and press this button to rena...

Страница 19: ...he onboard storage and how many pictures in each folder All the pictures will be viewed in icon mode in display area 2 New Folder Type in the name and press this button to create a new empty folder 3 Del Folder Highlight an existing folder and press this button to delete this folder and all the pictures in the folder 4 Add Pic Add new pictures into the highlighted folder 5 Add Pic Folder Add the f...

Страница 20: ...t side of display area Direction Picture moving direction in display area AreaTop Top position of the picture display area Control Device pictures source Local Disk Phone or USB stick AreaBottom Bottom position of the display area Phone Loop Times Picture from smart phone loop times ImageHeight Picture height in picture display area Device and U disk Loop Time Picture from local disk and USB stick...

Страница 21: ...imes Picture from smart phone loop times AreaBottom Bottom position of the picture display area Device and U disk Loop Time Picture from local disk and USB stick loop times ShowTime Picture PPT on interval U disk Folder Selection Choose which folder to play from USB stick Folder name on USB must be named as image1 to image10 3 Picture Type To choose the pictures of which folder will be played in t...

Страница 22: ...on Display Area in software UI 7 4 Get Temperature Check CPU temperature 7 5 Get USART Commands Display the RS232 commands sent by 3rd controller to DS2 via serial port live 7 6 Scan for Devices Scan and find all the DS2 devices on the same network 7 7 Parameter Import and Export Import the previous saved parameters to DS2 or export the current DS2 parameters out for future reference ...

Страница 23: ...sion 7 10 Cascading Settings 1 Independent unit is used as stand alone 2 Master unit is set up as master unit in the system 3 Slave unit is set up as slave unit in the system to follow master unit 7 11 Reboot the Player User can remotely reboot the DS unit in this section 7 12 Power User can remotely power on off directly or schedule a power on off ...

Страница 24: ... Updated Regularly QR code will change every 24 hours or when unit being power off on 2 Messenger It enables disables the message and greeting ability on Cloud management 3 Screens Choose which projection screen the QR is on 4 Get QR Code Pic To get the QR code picture If users want to keep the Cloud management feature from the pubic they can disable the QR code shown on projection screen and keep...

Страница 25: ...rial Port Settings 1 OSD Users can set up the scrolling text in this section BgColor Background colour TextColor Text font colour DisplayTime Scrolling text display period Left Left position of display area Top Top position of display area Width Display area width Height Text height Text Text up to 140 characters Transparent Background transparency Enable Ture is enabled False is disabled ...

Страница 26: ... will play videos in that folder 2 2 Video Tick the Video and click on folder video area will show all the videos in this folder and users can choose which video to player 2 2 Layout Users can change the preset layouts by clicking the preset layout button 2 2 Mode Users can manage Playing the Video in this section ...

Страница 27: ... video folder parameter needs to be setup The folders name here needs to be identical to the video folder name in Video Source Setting see chapter 5 1 3 3 Layout If users want to use 3rd party controller to change the preset layouts layout parameter needs to be setup The layout name here needs to be identical to the preset layout name in DS2 Onboard Layout List see chapter III UI No 4 3 3 Projecto...

Страница 28: ...29 25 SEADA Technology Ltd Oak Tree Park Burnt Meadow Road Moons Moat North Industrial Estate Redditch Worcestershire B98 9NW United Kingdom Email sales seada co uk Phone 44 0 1527 584364 Fax 44 0 1527 962998 ...

Отзывы: