background image

5

|  P

age 29  |  SEABOB Operator's Manual  |


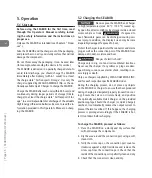
14. After the charger has been disconnected, the SEABOB 

performs a 5-second system check and then switches 
off to the Off mode if programmed to partial charging 
(see Chapter 5.3.5 "Off mode") or to the Sleep mode 
if programmed to full charging (see Chapter 5.3.6 
"Sleep mode / On mode").

Tip:

 If the temperature of the batteries exceeds 45 °C 

/ 113 °F, the battery management system temporarily 
stops the charging process of the SEABOB. The charging 
process will continue as soon as the temperature of the 
batteries falls below 40 °C / 104 °F.

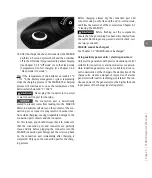
Never plug the connector into a moist 

or wet connection port for charging.

The connection port is hermetically 

sealed to prevent water from leaking into the SEABOB. 
Water, in particular salt water, on the contacts of the con-
nection port or connector may result in chemical reac-
tions while charging, causing irreparable damage to the 
connection port contacts and the connector.
For this reason, you should always check to make sure 
that the connection port and connector are perfectly 
clean and dry before plugging the connector into the 
SEABOB connection port. Always put the screw cap back 
on the connection port immediately after charging is 
completed. Only open the connection port for the charg-
ing process.

Before charging, always dry the connection port and 
connector using a soft, clean cloth and / or cotton swab, 
and blow the water out of the contacts (see Chapter 6.1 
"Cleaning the SEABOB").

Before flushing out the components, 

ensure that the power plug has been disconnected from 
the outlet. Not doing so may result in electric shock, seri-
ous injury or death!

SEABOB cannot be charged:

See Chapter 7.7 "SEABOB cannot be charged".

Using auxiliary power units / electric generators:

Only electric generators with precise closed-loop control 
suitable for connection to electronic devices are permis-
sible. Induction generators are not suitable and can re-
sult in destruction of the chargers. The destruction of the 
charger also creates a danger of injury. Use of electric 
generators with inverter technology is preferred. The con-
tinuous power of the generator must be higher than the 
input power of the charger (see rating plate). 

Содержание F5

Страница 1: ...English Operator s Manual Read this manual carefully and completely before operating the SEABOB ...

Страница 2: ......

Страница 3: ...t operating the SEABOB involves a hazardous situation that if not avoided could result in death or serious injury Risk of minor or moderate injury This symbol indicates that operating the SEABOB involves a haz ardous situation that if not avoided could result in minor or moderate injury Not heeding this information may result in damage to or destruction of the SEABOB or other property Tip Tips pro...

Страница 4: ...l Grip 25 5 Operation 26 5 1 Start up 26 5 2 Charging the SEABOB 26 5 3 Operating the SEABOB 30 5 3 1 Controls and display panel 30 5 3 2 Arrangement of the controls 31 5 3 3 Using the controls 31 5 3 4 Information Display 32 5 3 5 Off mode Air Transport Storage switching on off 34 5 3 6 Sleep mode On mode switching on off 35 5 3 7 Charge mode 36 5 3 8 Charge display 37 5 3 9 Displaying serial num...

Страница 5: ...ing the screw cap 55 7 Troubleshooting 56 7 1 SEABOB cannot be switched on 56 7 2 Motor does not run 57 7 3 Warning and error message on the Display 57 7 4 Impeller does not turn no thrust 58 7 5 Trigger does not function properly 58 7 6 Moisture present in connection port 59 7 7 SEABOB cannot be charged 59 8 Technical specifications 60 9 Disposal 64 10 Replacement parts 65 11 Service 66 12 Imprin...

Страница 6: ...SEABOB for the first time The information contained in the Operator s Manual will help you to operate the SEABOB safely protect yourself and others from hazards and prevent damage to the device and other property Keep this Operator s Manual in a safe and easily accessible place for reference whenever needed Do not discard Please also keep the original packaging It can be used again later to provid...

Страница 7: ...se in areas where there are other swimmers or divers Maintain a distance minimum 5 m 17 ft from other people and objects Do not use at a depth of less than 1 m 3 5 ft Always observe the battery level and return to the shore in time Do not store in sunlight or in a closed motor vehicle Special safety information for the Batteries Important Follow the directions in the Operator s Manual Do not allow...

Страница 8: ...Charger to cool before handling Never expose the SEABOB or Charger to high temperatures max 60 C 140 F including high temperatures caused by open fire direct sunlight or storage in a closed motor vehicle or trunk If exposed to heat flammable gases can be discharged causing serious injury or death In addition the Display screen may become irreparably damaged if exposed to heat Never transport a ful...

Страница 9: ...rea that could carry you away Use of the SEABOB by persons with pacemakers is not permit ted The strong magnetic fields created by the motor and current carrying cables may cause severe damage to pacemakers resulting in possible death Use of the SEABOB by pregnant women is not permitted During operation the SEABOB may press up against the abdomen of pregnant women and or the jet of water coming ou...

Страница 10: ...r death to the operator For better visibility wear secure diving goggles Attention Despite every precau tion taken it is still possible for diving goggles to come off during operation of the SEABOB and for contact lenses to be lost Water spraying against and over your body cannot only be strenuous but also takes away body heat We recommend wearing a wetsuit that provides adequate warmth ...

Страница 11: ...he SEABOB does not fall on you or other persons in the water or on land Should this occur there is a risk of injury When cleaning or storing the SEABOB never stand it upright on the front bumper or on the water outlet of the jet channel The SEABOB could tip over and be damaged or damage other objects This also can be dangerous for any people in close proximity When carrying in the SEABOB only use ...

Страница 12: ...ble for lifting the SEABOB Under no circumstances should the securing device be used to lift the SEABOB using a crane or any other lifting device The securing device could be pulled out of the SEABOB housing during lifting In this case the SEABOB could fall and be damaged or cause damage to other objects or injury or death to persons nearby Lifting the SEABOB with a crane or lifting device may cau...

Страница 13: ...r during a thunderstorm and get out of the water in due time Not doing so may result in serious injury or death Always be prepared for a sudden change in the weather Always check the weather forecast before you set out and pay close attention to local weather conditions Do not use the SEABOB in a heavy swells significant wave heights up to a maximum of 0 3 m 1 ft with occasional waves of a maximum...

Страница 14: ...ways maintain a safe distance minimum 5 m 17 ft to other swimmers watercraft or any objects that may be in the water A collision can result in serious injury or death to you or others In addition long hair or pieces of clothing of other people can get sucked into the jet channel Should this occur there is a risk of injury In addition the SEABOB may also be damaged considerably Always avoid routes ...

Страница 15: ...l indicate the start of the emergency reserve for the SEABOB In emergency mode the power is gradually reduced automatically until the motor comes to a complete stop Always take into account the limited power when timing your return to the shore or boat You must always be able to return to the shore or boat unassisted and without the aid of the SEABOB In most instances the general personal liabilit...

Страница 16: ...Never attempt to dive under other swimmers watercraft or through underwater objects Before resurfacing ensure that there are no swimmers watercraft or objects above you or approaching you Danger of collision Do not operate the craft in water that is less than 1 m 3 5 ft deep Doing so can cause injury to you or damage to the SEABOB as a result of hitting underwater objects Be very careful of rocky ...

Страница 17: ...you are able to resurface and return to the shore or boat by yourself without the assistance of the SEABOB Before diving always check to make sure that the depth sensor is working prop erly If the depth sensor is faulty the motor s safety cut off will not function at the set maximum diving depth default setting 2 5 m 8 ft The depth sensor reading on the display should be approx 0 0 m 0 ft when the...

Страница 18: ...mo tor s electronic control system reduces the maximum power incrementally Pow er Level 3 Power Level 2 etc This is done to prolong the life of the battery as the voltage decreases while ensuring that there is sufficient reserve capacity for emergency mode The two red bars on the battery symbol indicate the start of the emergency reserve for the SEABOB In the emergency mode the power is gradu ally...

Страница 19: ...tion there is a risk of flammable gases being discharged only if the batteries cells have been subjected to excessive mechanical stresses or heat When charging the SEABOB always follow the instructions contained in this Operator s Manual see Chapter 5 2 Charging the SEABOB Only use chargers supplied by CAYAGO AMERICAS INC and for each respec tive specific SEABOB model Chargers supplied by other ma...

Страница 20: ...is cool dry well ventilated and frost proof and ensure that the batteries are protected against irreparable total discharge Before transporting the device in particular before transporting by airplane be sure to read the safety information on the transport of the Lithium Ion batteries used in the SEABOB see Chapter 5 11 Air transport transport of the SEABOB When transporting Lithium Ion batteries ...

Страница 21: ... the water The craft is intended for use in water that is at least 1 m 3 5 ft deep The SEABOB is highly resistant to seawater and suitable for use in both fresh water and salt water The device is con structed solely of materials that are rust proof and highly resistant to corrosion The following regulations apply to operation of the SEABOB Users of the craft must be at least 16 years old and stron...

Страница 22: ...hibited by local laws community regula tions nature conservation laws or other provisions You are urged to observe all local laws and regulations For more information you should inquire at the appropriate local offices 2 1 Registration papers driver s license The present law in some countries does not require registration papers or a driver s license for operation of watercraft Some countries howe...

Страница 23: ...ease check that the serial number on the SEABOB matches the number shown on your SEABOB certificate To view the serial number use the menu provided on the display see Chapter 5 3 9 Displaying serial numbers The SEABOB is delivered in a partially charged state To avoid total discharge you should charge the SEABOB immediately after delivery within 1 week to at least the charge state Air Transport St...

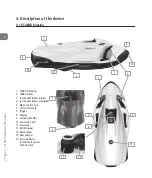
Страница 24: ...w 3 Jet channel water intake 4 Jet channel water discharge 5 Right Control Grip 6 Left Control Grip 7 Trigger 8 Display 9 Carrying handles 10 Connection port 11 Screw cap 12 Front bumper 13 Side bumper 14 Rear bumper 15 Securing device for pilot belt system with CE mark 1 2 3 8 9 9 12 13 14 4 7 5 6 15 3 4 10 11 ...

Страница 25: ...4 Page 25 SEABOB Operator s Manual 4 3 Left Control Grip 1 Red button 2 Blue button 4 2 Right Control Grip 1 Trigger 2 Green button 3 Silver button 2 1 1 3 2 ...

Страница 26: ...sed to heat flammable gases can be discharged causing seri ous injury In addition the Display Screen may become irreparably damaged if exposed to heat Protect the charger in particular the connector and mains plug as well as the connection port of the SEABOB from damage dirt dust moisture and heat Danger of electric shock Charge only in dry cool and well ventilated locations Never use the charger ...

Страница 27: ...ed charge symbol will appear with an arrow to indicate full charging charge 100 Tip When an active charger is connected programming is preset to full charging for operation 8 Charging is performed automatically The charging process of the SEABOB is shown by the battery symbol on the right side of the SEABOB display As the charg ing process increases more bars appear in the battery symbol The numer...

Страница 28: ...s itself off automatically 10 minutes after charging is completed complete By pressing any button the display can be switched on again for another 10 minutes 11 To complete the charging process first pull the power plug from the outlet Never attempt to remove the power plug from the outlet by twisting or pulling on the cable line Always hold on to the plug itself 12 Only after this has been done s...

Страница 29: ... that the connection port and connector are perfectly clean and dry before plugging the connector into the SEABOB connection port Always put the screw cap back on the connection port immediately after charging is completed Only open the connection port for the charg ing process Before charging always dry the connection port and connector using a soft clean cloth and or cotton swab and blow the wat...

Страница 30: ...er to cool the device thereby caus ing irreparable damage to the seals and motor shaft Danger of short circuit 5 3 1 Controls and Display panel 1 Green button plus button or scroll up 2 Red button minus button or scroll down 3 Silver button select button or move the cursor to the right 4 Blue button select button or move the cursor to the left 5 Trigger motor enable on off power control confirm bu...

Страница 31: ...e For this reason you only have to tap them lightly Re gardless of how long or hard you press the buttons they always react by emitting a single short pulse A pulse may also be emitted if the SEABOB falls hard to the ground or is struck hard by another object if the SEABOB is hit hard or the buttons are inadvertently touched For safety reasons you have to tap the blue button and push the Trigger w...

Страница 32: ...mation then disappears again In the event of a malfunction additional symbols may appear in the middle field Below is a list of these sym bols and their descriptions Warning symbol Motor temperature warning motor overheated Power is limited to Power Level 2 Battery temperature warning accumulator over heated Power is limited to Power Level 2 Warning Battery error accumulator error Emer gency opera...

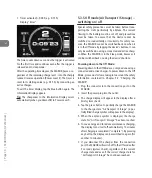
Страница 33: ...ted to the cur rent local time The operating time during the current day day shown on the display is reset daily at midnight In order to exit the time display tap the blue button again The Information Display appears on the SEABOB display Timer To call up the timer display set the power display to at least 25 power Power Level 1 Then type the key combination blue blue in rapid succession The timer...

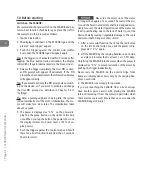
Страница 34: ...n using a connected and active charg er When the SEABOB is in the Sleep mode however it can be switched back on using the device s buttons Powering down to the Off Mode Powering down to the Off Mode can only be done using a connected and active charger To power down to the Off Mode proceed as follows taking into account the safety information contained in Chapter 5 2 Charging the SEABOB 1 Plug the...

Страница 35: ...evice or if you want to activate and change the User PIN proceed as described in Chapter 5 3 11 Settings For this reason you should follow the instruc tions given in Chapter 5 10 Storing the SEABOB and Chapter 5 11 Air transport transport of the SEABOB for correctly powering down the device to the Off mode for air transport and storage Tip If the battery charge state is too high prior to starting ...

Страница 36: ...tivated within 5 seconds the system will return to the last selected mode e g Infor mation Display in the On mode 5 3 7 Charge mode The charger is connected to the device and is supply ing the charging voltage Before charging begins a battery charge diagnostic check system check is performed Charging is activated once the diagnostic check has been completed successfully It is not possible to switc...

Страница 37: ...ton to select full charging of the SEABOB for operation A completely filled charge symbol will appear in the center of the display with an arrow to indicate full charging charge 100 Tip When an active charger is connected programming is preset to full charging for operation 6 If programmed to partial charging for Air Transport Storage an aircraft symbol will appear when the cor rect partial charge...

Страница 38: ...User PIN Owner PIN This PIN Personal Identification Number of the owner is used to change the settings in the menu or to switch on the device if PIN prompt has been activated User PIN This PIN Personal Identification Number of the user is used to switch on the device if PIN prompt has been activated Tip Please find your Owner PIN on the supplied certifi cate The PIN prompt when switching on the de...

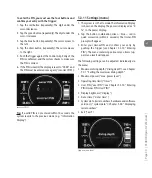
Страница 39: ...s mode e g Information Display 5 3 11 Settings menu 1 The system is in the On mode The Information Display is shown on the display The power is displayed as 0 in the power display 2 Tap the button combination silver blue red in quick succession within 2 seconds The Owner PIN prompt will appear 3 Enter your Owner PIN and confirm your entry by pushing the Trigger see Chapter 5 3 10 Entering PIN The ...

Страница 40: ... immediately after the operat ing time has elapsed regardless of the remaining battery charge state Exit upper menu level 4 Switch between the menu items upper menu level with the green or red button The active menu item is shown in white Select the desired menu item by pushing the Trigger 5 Depending on the menu item selected a select list or an Input Screen will appear Select the desired value o...

Страница 41: ...ip If the Trigger is not activated within 10 seconds while operation is interrupted the current Power Level defaults back to Power Level 2 for safety reasons 6 To stop hold on to both Control Grips securely and release the Trigger in your right hand The SEABOB stops When the battery is discharged to approx one third of its charge state the motor s electronic control system reduces the maximum powe...

Страница 42: ...Switch on the SEABOB We recommend that you switch on the SEABOB and per form a brief function check before you place the craft in the water To do this proceed as follows 1 Tap the blue button 2 The display is switched on The SEABOB logo and the prompt push trigger appear 3 Push the Trigger against the Control Grip within 5 seconds The SEABOB logo disappears again Tip If the Trigger is not activate...

Страница 43: ...s and when accompanied by others or under the constant supervi sion of another person who can provide immediate assistance in case of emergency Arrange to have a boat accompany you if you wish to operate the craft farther away from shore Do not operate the SEABOB in strong currents a heavy swell strong wind or impaired visibility Only operate the craft when it is light outside and the weather is g...

Страница 44: ...o at least the charge state Air Transport Storage to avoid irreparable total discharge of the Lithium Ion batteries Always start in the lowest gear and move off from a sta tionary position with a maximum power of Power Level 1 Gradually increase the power while operating the craft so that you can familiarize yourself with the handling of the SEABOB It is vital that you are in control of the SEABOB...

Страница 45: ...mes to a complete stop Always take into account the limited power of the craft when timing your return to the shore or boat 5 6 Diving to a depth of up to 2 5 m 8 ft In addition to the safety information and instruc tions relating to operation on the water surface be sure to observe the following safety information when diving Only skilled and experienced swimmers are allowed to usetheSEABOBfordiv...

Страница 46: ...scuba diving while observing the de compression times Always keep an eye on the remaining operating time and include reserves in your calculations Always en sure that you are able to resurface and return to the starting point by yourself without the assistance of the SEABOB 5 6 1 How to dive with your SEABOB 1 Increase the power to Power Level 2 2 Bend your arms while pulling yourself closer to th...

Страница 47: ...n repeatedly 7 Push the Trigger against the Control Grip to confirm the new setting and return to the upper menu level 8 To exit the upper menu level switch between the menu items with the green or red button until the menu item to exit the menu appears exit Push the Trigger to return to the Information Display For safety reasons the factory set depth limit of 2 5 m 8 ft can only be changed by fir...

Страница 48: ...ct sunlight Never expose the SEABOB and the charger to high temperatures max 60 C 140 F caused e g by open fire direct sunlight or by storage inside a closed motor vehicle or trunk If exposed to heat flammable gases can be discharged causing serious injury In addition the Display Screen may become irreparably damaged if ex posed to heat 5 7 2 Adjusting the buoyancy of the SEABOB The SEABOB has pos...

Страница 49: ...SEABOB 6 Charge the SEABOB after each use within 24 hours to at least the charge state Air Transport Storage to prevent total discharge of the SEABOB Be sure to read the information provided in this Operator s Manual on charging the SEABOB see Chapter 5 2 Charging the SEABOB 5 9 Switching off the SEABOB to the Sleep mode Manual switching off to the Sleep mode 1 The Information Display is shown in ...

Страница 50: ...orage over the winter we recommend keeping the activated charger connected continuously to the SEABOB trickle charge to maintain the required charge state and prevent total discharge Before doing this make sure that you activate the charge state Air Transport Storage in the menu see also Chapter 5 3 8 Charge display The charging 5 10 Storing the SEABOB If you do not plan to use the SEABOB for an e...

Страница 51: ...ould tip over and be dam aged or damage other objects Furthermore this could prove to be dangerous for any persons in close proximity 5 11 Air transport transport of the SEABOB When transporting Lithium Ion batteries always observe the applicable safety regulations and the specific regula tions of the carrier Be aware that safety regulations can change from time to time For up to date information ...

Страница 52: ...ge from time to time For up to date information please contact the manufacturer or your specialist dealer 5 Tap the green button to select partial charging of the SEABOB for air transport transport A partially filled charge symbol will appear in the center of the display with an arrow to indicate partial charging charge 50 6 When the airplane symbol appears in the center of the display charging is...

Страница 53: ...5 3 6 Sleep mode On mode Before completely switching off to Off mode make sure that the correct charge state for transport or the minimum charge state required for storage charge state Air Transport Storage is reached Therefore proceed as described in Chapter 5 10 Storing the SEABOB and Chapter 5 11 Air transport transport of the SEABOB If you disconnect the charger after partial charging to the c...

Страница 54: ...be dangerous for any persons in close proximity 1 Place the SEABOB on a sturdy and dry surface that will not damage the components Slightly tilt the SEABOB to ease the cleaning process 2 After using the device first remove salt deposits dirt or other foreign objects by rinsing the components with fresh water from a low pressure source such as a garden hose or watering can and or blowing them out w...

Страница 55: ...cts of the connection port Salt de posits inhibit the flow of electricity during charging and can cause electrical contacts to overheat resulting in ir reparable damage to the contacts or even fires affecting the contacts or cable 6 2 Changing the screw cap Even minute damage or dirt on the screw cap can reduce the effectiveness of the seal resulting in damage to the connection port as well as dam...

Страница 56: ...r alter or modify any part of the SEABOB or charger Doing so may result in severe injuries or death Tip Be aware that components such as batteries seals impeller and stator are wearing parts Signs of wear and use may also appear on the housing surface finish dis play screen etc 7 1 SEABOB cannot be switched on If you cannot switch on the SEABOB either the SEABOB is completely discharged run to emp...

Страница 57: ... is equipped with cutting edge electronic technology to monitor the functions of the watercraft These smart and software controlled electronics are set at a high level of sensitivity for safety reasons In the event of an error message appearing on the Information Display due to this sensitive control technology you are advised to reset the SEABOB in order to assess the message This is done by swit...

Страница 58: ...hed on Never reach in between the protective lamellas of the jet channel Rotating parts may cause injury 2 Always ensure that the SEABOB has been switched off completely Off mode to prevent inadvertent acti vation of the motor causing injury Tip An active and connected charger is required to switch the device to the Off mode 3 Remove foreign objects from the jet channel stator and impeller by rins...

Страница 59: ...y have already done so Danger of short circuit There is the danger of flammable gases being discharged causing serious injury Never open the batteries Danger of short circuit Beware of flammable gases that may be discharged causing serious injury 7 7 SEABOB cannot be charged If the charge indicator does not appear on the display and the SEABOB does not switch to charge mode de spite being connecte...

Страница 60: ...onic speed control 4 Power Levels in 25 increments Special motor sealing case Multiple stage sealing rings for redundant seal ef fect throughout the sealing system Special rotary shaft seals are mounted in mul tiple stages on a special hard coated stainless steel drive shaft for lasting and reliable protection against water ingress Long term testing has shown that the use of optimally matched mate...

Страница 61: ...rning power limited to Power Level 2 45 C 113 F maximum charging temperature charging is stopped 80 A maximum permissible momentary discharg ing current motor stops 15 A maximum charging current Charging time Approx 8 hours Using the optionally available Quick Charger reduces the charging time to only approx 1 5 hours charging time may be longer if outlet voltage is under 230 V Dimensions L x W x ...

Страница 62: ... scuba diving re set when switching on the SEABOB Care No special maintenance is required if the care instruc tions are adhered to cleaning of the device and pos sible replacement of wearing parts Recommended Have the SEABOB for example the motor sealing case checked by the manufacturer or specialist dealer after approx 3 000 hours of motor operation Impact on the environment Emission free and qui...

Страница 63: ...rüstung von Maschinen Teil 1 Allgemeine Anforderungen IEC 60204 1 2005 modifiziert Deutsche Fassung EN 60204 1 2006 Safety of machinery Electrical equipment of machines Part 1 General requirements IEC 60204 1 2005 modified German version EN 60204 1 2006 DIN EN 61000 6 1 2007 10 Elektromagnetische Verträglichkeit EMV Teil 6 1 Fachgrundnorm Störfestigkeit für Wohnbereich Geschäfts und Gewerbebereich...

Страница 64: ...to protect the environment and health Used batteries may only be disposed of and re cycled properly In particular they may not be disposed of together with household waste and are therefore marked with the crossed out dustbin symbol End users are obligated by law to re turn used batteries Devices with batteries which are faulty or no longer provide adequate power may be returned free of charge to ...

Страница 65: ...10 Page 65 SEABOB Operator s Manual 10 Replacement parts Screw cap for connection port ...

Страница 66: ... 00 a m to 6 00 p m CET except on public holidays or your specialist dealer Please have the following information ready Model name SEABOB serial number Batteries serial numbers Service error messages appearing on the display Exact description of the malfunction or damage A specialist will assist you in identifying the cause of the error and take further action if necessary ...

Страница 67: ...tates Phone 1 754 216 4600 info seabob us www seabob com As of 02 2019 2019 CAYAGO AMERICAS INC Copying transmitting storing or translating this Opera tor s Manual in any shape or form whether in part or whole is not permitted without the prior written consent of CAYAGO AMERICAS INC Technical tolerances and changes reserved ...

Страница 68: ...www seabob com ...

Отзывы: