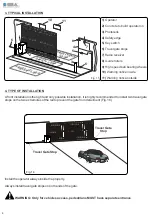
9
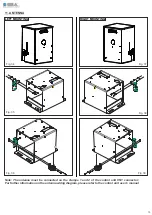
Fig. 17
Fig. 18
Fig. 19
5.1.
Arrange a little square of concrete with a perfect levelling on which the motor reducer will be fixed with the
special plugs
(sizes on Fig. 19)
5.2.
Make sure that in the center of the concrete pad has been forseen an exit for a sufficient number of pipes
(for all accessories like loop detectors, maglock, photobeam and others)
5.3.
Before piercing the concrete square for the fixation of the motor reducer, make sure that the distance
between the centre of the oblong and the gate is of
3”
(Fig. 19)
5.4.
All openings of a horizontal slide gate are guarded or screened from the bottom of the gate to a minimum
of
4 feet (1,22 m)
above the ground to prevent a
2-1/2 inch (57,2 mm)
diameter sphere from passing through
the openings anywhere in the gate, and in that portion of the adjacent fence that the gate covers in open
position
5.5.
Follow the local building code to determine the required depth of the concrete pad.
5.6.
SEA recommend the following pad measurements:
5. CONCRETE PADS
6. GATE OPERATOR ATTACHMENT
6.1.
Before starting the installation of the gate operator, make sure that the gate, the support wheels and the
guides are in optimal conditions, there is no impediments on the path of the gate and sufficient space
between the gate and the adjacent walls.
6.2.
The operator and the gate MUST be level and parallel.
6.3.
Attach the operator on the prepared pad using Red Head
½” x 3 ½”
Anchors (Fig. 18)
Red Head
Fastener
½” x 3 ½”
Fig. 20
Fig. 21
MECHANICAL INSTALLATION
3”
16”
27”
Concrete
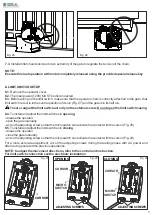
In Fig. 20 and Fig. 21 it is possible to see the correct installation with open and closed gate respectively;
notice the obliged run of the chain inside the pinion group which must not be modified.
Open position
Closed position
7. CHAIN INSTALLATION


