background image

Front Panel Description 


9


Front Panel Description 

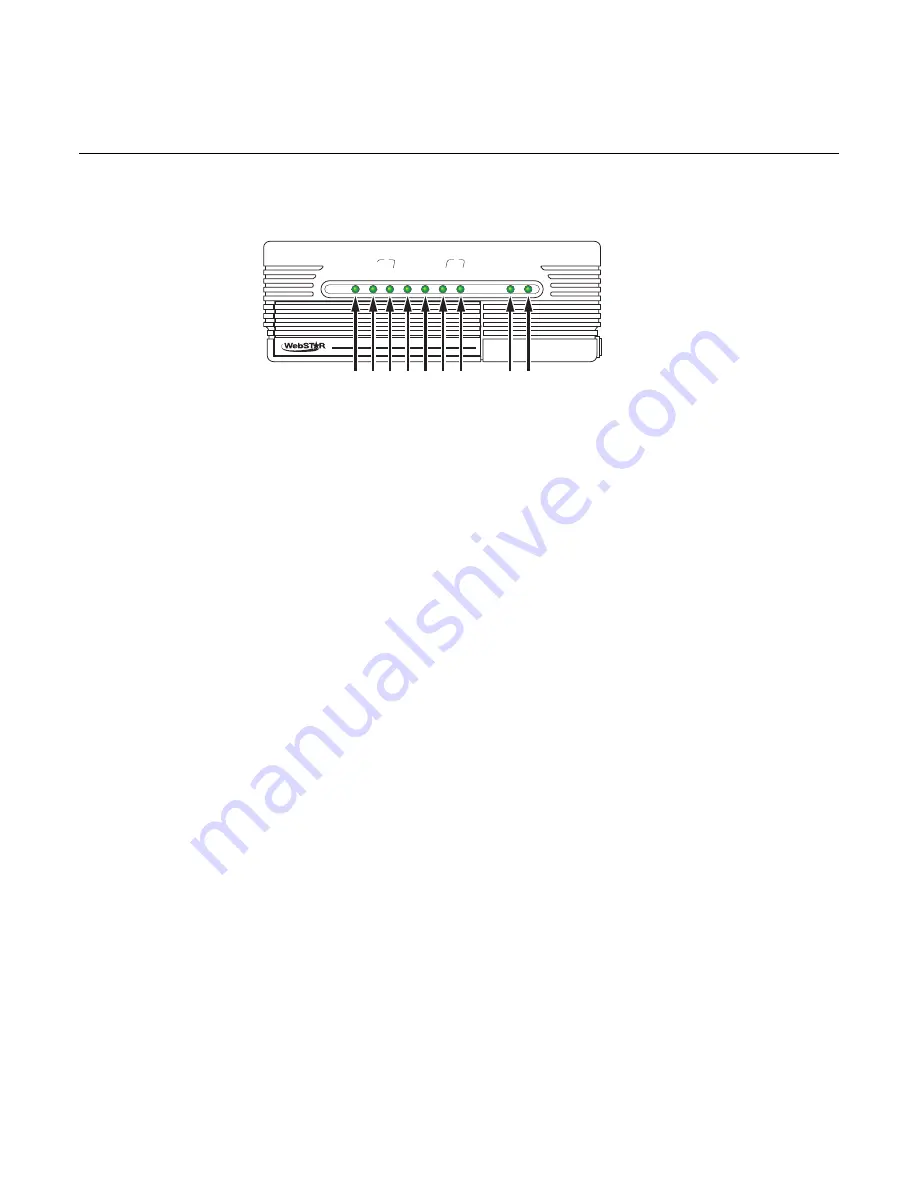
The front panel of your cable modem provides status LEDs that indicate how well and at what state your cable 
modem is operating. See 

Front Panel LED Status Indicator Functions

, later in this guide, for more information 

on front panel LED status indicator functions. 
 

POW

ER

R

ECEIVE

DA

T

A

SEND

CABLE

PC

LINE 1

TELEPHONE

LINE 2

BA

TTER

Y

LOW

REPLACEBA

TTER

Y

by Scientific-Atlanta, Inc.

2

1

3 4 5 6 7

8 9

T11671


1 POWER

—Illuminates solid green to indicate that AC power is being applied to 

the cable modem. AC power must be available to recharge the battery. 

2 RECEIVE 

DATA

—Blinks to indicate that the cable modem is receiving data from 

the cable network 

3 SEND 

DATA

— Blinks to indicate that the cable modem is sending data to the 

cable network 

4 CABLE

—Illuminates solid green when the cable modem is registered on the 

network and fully operational. This indicator blinks to indicate one of the following 
conditions: 

  The cable modem is booting up and not ready for data 

  The cable modem is scanning the network and attempting to register 

  The cable modem has lost registration on the network and will continue 

blinking until it registers again 

5 PC

—Illuminates solid green to indicate that an Ethernet/USB carrier is present 

and blinks to indicate that Ethernet/USB data is being transferred between the 
PC and the cable modem 

6 LINE 

1

—Illuminates solid green when telephone line 1 is in use 

7 LINE 

2

—Illuminates solid green when telephone line 2 is in use 

8 LOW 

BATTERY

—Illuminates to indicate that approximately 20 percent of charge 

is remaining in the battery. 

9 REPLACE 

BATTERY

—Illuminates to indicate that the battery could not be fully 

charged. While the battery may be able to provide some backup power, it should 
be replaced to restore maximum capacity.  

Notes

  After the cable modem is successfully registered on the network, the 

POWER


(LED 1) and 

CABLE

 (LED 4) LEDs illuminate continuously to indicate that the 

cable mode is active and fully operational. 

  LEDs may behave differently when the cable modem is running on battery power 

(without AC power). Most LEDs are disabled if the unit is operating on battery 
power. In this mode, the 

POWER

 and 

CABLE

 LEDs blink to indicate that the unit 

is operating under battery power but AC power has failed. 


Содержание DPX2203CTM

Страница 1: ...WebSTAR DPX2203C and EPX2203C VoIP Cable Modem User s Guide...

Страница 2: ...ures Features an embedded media terminal adapter EMTA supporting two line voice services Provides a high speed broadband Internet connection that energizes your online experience such as providing has...

Страница 3: ...WebSTAR DPX2203C and EPX2203C VoIP Cable Modem User s Guide 2 Notice for CATV Installers CATV Installers Notice If you are a CATV installer read the information in the box below...

Страница 4: ...1 How Do I Connect Ethernet Network Devices 22 What are the Requirements for USB Network Devices 24 How Do I Select and Place USB Network Devices 25 How Do I Connect USB Network Devices 26 Troubleshoo...

Страница 5: ...provider or your local power company Grounding This Product U S A and Canada Only If this product is equipped with either a three prong grounding pin safety plug or a two prong polarized safety plug...

Страница 6: ...f the following locations On a bed sofa rug or similar surface Near heat sources such as radiators heat registers stoves or other products including amplifiers that produce heat In an enclosure such a...

Страница 7: ...the Battery Pack This product contains a replaceable battery pack Heed the following warning and see the instructions later in this guide for handling replacing and disposing of the battery WARNING Av...

Страница 8: ...ain or water If this product does not operate normally by following the operating instructions If this product exhibits a distinct change in performance Checking Product Safety Upon completion of any...

Страница 9: ...taining the user s guide and the USB drivers Lithium Ion cartridge battery Optional If any of these items are missing or damaged please contact your cable service provider for assistance Notes You wil...

Страница 10: ...canning the network and attempting to register The cable modem has lost registration on the network and will continue blinking until it registers again 5 PC Illuminates solid green to indicate that an...

Страница 11: ...ts to the USB port on your PC 3 ETHERNET RJ 45 Ethernet port connects to the Ethernet port on your PC or your home network 4 LINE1 LINE2 RJ 11 telephone ports connect to home telephone wiring to conve...

Страница 12: ...ion that protects the cable modem from accidental disturbance or harm What are the System Requirements for Internet Service To ensure that your cable modem operates efficiently for high speed Internet...

Страница 13: ...Media Access Control MAC address and the WLAN data MAC address of the cable modem These numbers appear on a label located on the side of the cable modem The serial number consists of a series of alpha...

Страница 14: ...rofessional installation may be available Contact your local cable service provider for further assistance To connect devices The following diagram illustrates one of the various connection options th...

Страница 15: ...r adapter into an AC power source 5 Plug in and power on your networked devices including your PC The cable modem will then begin an automatic search to locate and sign on to the broadband data networ...

Страница 16: ...l Ethernet adapter 4 Is TCP IP protocol listed in the installed network components list If yes go to step 7 If no click Add click Protocol click Add and then go to step 5 5 Click Microsoft in the Manu...

Страница 17: ...ty later in this guide If you still cannot access the Internet contact your cable service provider for further assistance To configure Windows XP systems 1 Click Start select Connect to and choose Sho...

Страница 18: ...r right corner of the TCP IP window is unchecked If there is a check mark in the option deselect the option and then click Info in the lower left corner 7 Is there a Hardware Address listed in this wi...

Страница 19: ...lt The Add New Hardware Wizard window opens 3 Click Next in the Add New Hardware Wizard window 4 Select Search for the best driver for your device Recommended in the Add New Hardware Wizard window and...

Страница 20: ...nd your USB devices are ready for use 10 Try to access the Internet If you cannot access the Internet go to Having Difficulty later in this guide If you still cannot access the Internet contact your c...

Страница 21: ...Requirements for Ethernet Networking A number of factors can impact the practical limit of the network Although the WebSTAR Cable Modem is designed to support several Ethernet network devices it is im...

Страница 22: ...ion for My Ethernet Network Devices You should work with your service provider to choose the best location for your Ethernet network devices Consider these recommendations Location of two way cable ou...

Страница 23: ...llowing diagram illustrates one of the various Ethernet network connection options that are available to you CABLE USB ETHERNET TELEPHONY LINE1 LINE2 15VDC POWER RESET CABLE USB ETHERNET TELEPHONY LIN...

Страница 24: ...ack of the cable modem and then plug the power adapter into an AC power source 6 The cable modem begins an automatic search to locate and sign on to the network In some unusual circumstances this proc...

Страница 25: ...in optimal network performance What are the Wiring Requirements Several factors can impact the practical limit of the network Use correct USB cables Contact your service provider or consult the docume...

Страница 26: ...vices Where is the Best Location for My USB Network Devices You should work with your service provider to choose the best location for your USB network devices Consider these recommendations Location...

Страница 27: ...lowing diagram illustrates one of the various USB connection options that are available to you CABLE USB ETHERNET TELEPHONY LINE1 LINE2 15VDC POWER RESET CABLE USB ETHERNET TELEPHONY LINE1 LINE2 15VDC...

Страница 28: ...a TV a DHCT or set top converter or a VCR 5 After all connections are complete insert the AC power adapter cord into the DC POWER connector on the back of the cable modem and then plug the power adap...

Страница 29: ...mber and MAC address of your cable modem If you are using a cable signal splitter so that you can connect the cable signal to other devices remove the splitter and reconnect the cable so that the cabl...

Страница 30: ...s installed on your PC The IP Configuration window displays the Ethernet adapter information 4 Click Release and then click Renew The IP Configuration window displays a new IP address 5 Click OK to cl...

Страница 31: ...r current cable telephony service provider In some areas you may be able to transfer your existing telephone numbers or your cable telephony service provider will assign a new telephone number for eac...

Страница 32: ...telephone equipment if you are using only one or two pieces of telephone equipment Note If you are using the cable modem to provide service to several telephones a professional installer can connect t...

Страница 33: ...e devices cannot be accurately calculated With telephone devices that are not labeled each device should be connected and the ring signal should be tested before adding additional devices If too many...

Страница 34: ...vice Note Professional installation may be available Contact your service provider for further assistance WARNING To avoid personal injury follow the installation instructions in the exact order shown...

Страница 35: ...provider The two center conductors pins 3 and 4 on the RJ 11 connector provide electrical connections to directly attached telephone devices or to a permanently installed in home telephone wiring net...

Страница 36: ...by lifting the receiver of each attached telephone to verify that the dial tone can be heard and that you can make and receive telephone calls Note This process may take several minutes The Line 1 or...

Страница 37: ...tant If you choose to operate your modem without a battery you risk losing your telephone service during a power outage Replacing the Battery Under normal circumstances the battery should last for sev...

Страница 38: ...ment cover on the front of the modem to open the cover and gain access to the battery compartment 2 Move the battery lock upward and to the right to the Unlocked position 3 Grasp the plastic strip on...

Страница 39: ...hout strain Leave sufficient clearance between the bottom of the cable modem and any flooring or shelving underneath to allow access to cabling In addition leave enough slack in all cables so that the...

Страница 40: ...on shows the wall mounting template Copy this page and use the measurements on the wall mounting template as a guide to mark the mounting screw locations Not Drawn To Scale DPX2203 Wall Mount Template...

Страница 41: ...e the anchor bolts into the wall and install the mounting screws into the anchor bolts leaving a gap of about 1 4 in between the screw head and the wall Then go to step 4 If yes go to step 3 3 Install...

Страница 42: ...modem A Telephone numbers are portable in some areas Contact your telephone service provider for more information about using an existing telephone number Q Do I automatically receive high speed Inte...

Страница 43: ...ng Verify that the phone company has removed the previous telephone service from your home telephone wiring Your telephone service may not be enabled from your cable telephony service provider Contact...

Страница 44: ...atus indicators See Front Panel LED Status Indicator Functions later in this guide for more detailed information on the front panel status indicator operation and function The modem does not register...

Страница 45: ...uminated Verify that all cables are properly connected and that you are using the correct cables Verify that your cable service is active and that it supports two way service Verify that your TCP IP i...

Страница 46: ...6 7 Front Panel Indicator Self Test Downstream Scan Downstream Signal Lock Ranging Requesting IP Address Registering Registration Completed 1 Power ON ON ON ON ON ON ON 2 Receive ON OFF OCCASIONAL BLI...

Страница 47: ...being sent to or from the modem BLINKS When only one Ethernet or USB device is connected and data is being transferred between the consumer premise equipment CPE and the cable modem OFF When no device...

Страница 48: ...us Indicators During Special Conditions Front Panel Indicator Network Access Denied 1 Power SLOW BLINKING 1 time per second 2 Receive SLOW BLINKING 1 time per second 3 Send SLOW BLINKING 1 time per se...

Страница 49: ...Printed in the United States of America Information in this document is subject to change without notice No part of this document may be reproduced in any form without the express written permission...

Страница 50: ...ld void the user s authority to operate the equipment The information shown in the FCC Declaration of Conformity paragraph below is a requirement of the FCC and is intended to supply you with informat...

Страница 51: ...nts The department does not guarantee the equipment will operate to the user s satisfaction Before installing this equipment users should ensure that it is permissible to be connected to the facilitie...

Страница 52: ...der Scientific Atlanta Inc 5030 Sugarloaf Parkway Box 565447 Lawrenceville GA 30042 770 236 5000 www scientificatlanta com Product and service availability subject to change without notice 2005 Scient...

Отзывы: