background image

• 7 •

CLAMPS REVERSED (red) LED flashing: The connections are reversed.

BAD BATTERY (red) LED lit: The charger has detected a problem with the battery.  

See Troubleshooting for more information.

NOTE: See Operating Instructions for a complete description of the charger modes.
RATE SELECTION BUTTON

Use this button to select one of the following:

• 6<>2A CHARGE – For charging small and large batteries. Not recommended for industrial applications.

• BOOST – For quickly adding energy to a severely discharged or large capacity battery prior to Engine Start. 

• ENGINE START – Provides additional amps for cranking an engine with a weak or run-down battery. 

Always use in combination with a battery.

START/STOP BUTTON

Press to immediately begin charging your properly connected battery. If the button is not pressed, 

charging should begin in 30 seconds.
BATTERY TYPE BUTTON 

Use this button to select the battery type.

• STANDARD – Used in cars, trucks and motorcycles, these batteries have vent caps and are often marked 

“low maintenance” or “maintenance-free”. This type of battery is designed to deliver quick bursts of energy 

(such as starting engines) and has a greater plate count. The plates are thinner and have somewhat 

different material composition. Regular batteries should not be used for deep-cycle applications.

• AGM – The Absorbed Glass Mat construction allows the electrolyte to be suspended in close proximity 

with the plate’s active material. In theory, this enhances both the discharge and recharge efficiency. The 

AGM batteries are a variant of Sealed VRLA (valve regulated lead-acid) batteries. Popular uses include 

high-performance engine starting, power sports, deep-cycle, solar and storage batteries.

• GEL – The electrolyte in a GEL cell has a silica additive that causes it to set up or stiffen. The recharge 

voltages on this type of cell are lower than those for other styles of lead-acid battery. This is probably the 

most sensitive cell in terms of adverse reactions to overvoltage charging. Gel batteries are best used in 

VERY DEEP cycle application and may last a bit longer in hot weather applications. If the wrong battery 

charger is used on a gel cell battery, poor performance and premature failure will result.

11.  OPERATING INSTRUCTIONS

WARNING: A SPARK NEAR THE BATTERY MAY CAUSE AN EXPLOSION. 
CHARGING A BATTERY IN THE VEHICLE

1.  Turn off all the vehicle’s accessories.

2.  Keep the hood open.

3.  Clean the battery terminals.

4.  Place the charger on a dry, non-flammable surface.

5.  Lay the AC/DC cables away from any fan blades, belts, pulleys and other moving parts.

6.  Connect the battery, following the precautions listed in sections 6 and 7. 

7.  Connect the charger to a live, grounded 120V AC outlet. 

8.  Select the battery type and charge rate.

9.  Press the START button to begin charging immediately. If not pressed within 30 seconds, charging 

will begin immediately. With the Charge rate selected, charging of the battery will automatically 

complete. Even with Charge rate selected, the charger will automatically use the Boost rate, during 

first 10 minutes, if needed, and then switch to the Charge rate to charge the battery efficiently.

10.  When charging is complete, or if you are done using Engine Start or Boost modes, press STOP button, 

disconnect the charger from the AC power, disconnect the clamp attached to vehicle’s chassis, and 

finally remove the clamp from battery terminal.

Содержание SC1281

Страница 1: ...ow these instructions and precautions carefully POR FAVOR CONSERVE ESTE MANUAL DEL USUARIO Y LEALO ANTES DE CADA USO En este manual le explica c mo utilizar el cargador de bater a de manera segura y c...

Страница 2: ...ION PRECAUTIONS 5 FOLLOW THESE STEPS WHEN BATTERY IS INSTALLED IN VEHICLE 5 FOLLOW THESE STEPS WHEN BATTERY IS OUTSIDE VEHICLE 5 GROUNDING AND AC POWER CORD CONNECTIONS 6 ASSEMBLY INSTRUCTIONS 6 CONTR...

Страница 3: ...C 15 SIGA ESTOS PASOS CUANDO LA BATER A EST COLOCADA EN EL VEH CULO 16 SIGA ESTOS PASOS CUANDO LA BATER A SE ENCUENTRE FUERA DEL VEH CULO 16 CONEXIONES A TIERRA Y ENERG A DE CA 16 INSTRUCCIONES DE MON...

Страница 4: ...YOU USE THE CHARGER b To reduce risk of battery explosion follow these instructions and those published by battery manufacturer and manufacturer of any equipment you intend to use in vicinity of batt...

Страница 5: ...ERY IS INSTALLED IN VEHICLE WARNING A SPARK NEAR THE BATTERY MAY CAUSE A BATTERY EXPLOSION TO REDUCE THE RISK OF A SPARK NEAR THE BATTERY 6 1 Position AC and DC cords to reduce risk of damage by hood...

Страница 6: ...ng of charger as specified Length of cord feet 25 50 100 150 AWG size of cord 16 14 14 12 AWG American Wire Gauge 9 ASSEMBLY INSTRUCTIONS 9 1 Remove all cord wraps and uncoil the cables prior to using...

Страница 7: ...r uses include high performance engine starting power sports deep cycle solar and storage batteries GEL The electrolyte in a GEL cell has a silica additive that causes it to set up or stiffen The rech...

Страница 8: ...AUTOMOTIVE 300 CCA 12 1000 CCA 30 MARINE 50Ah 15 105Ah 33 2 5 4 10 5 11 1 75 4 5 3 5 8 5 4 25 9 5 1 5 4 3 7 3 5 8 Times are based on a 50 discharged battery and may change depending on age and condit...

Страница 9: ...fails to start charge the battery for 5 more minutes before attempting to crank the engine again 6 After the engine starts unplug theAC power cord before disconnecting the battery clamps from the veh...

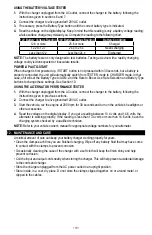
Страница 10: ...ction 10 USING THE ALTERNATOR PERFORMANCE TESTER 1 With the charger unplugged from the AC outlet connect the charger to the battery following the instructions given in previous sections 2 Connect the...

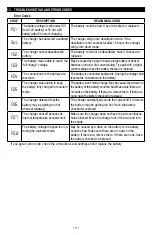
Страница 11: ...se the connections to the battery F05 The charger was unable to keep the battery fully charged in maintain mode The battery won t hold a charge May be caused by a drain on the battery or the battery c...

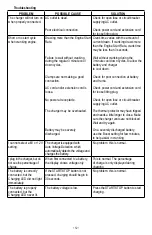
Страница 12: ...battery and frame Check power cord and extension cord for loose fitting plug Check for open fuse or circuit breaker supplying AC outlet The thermal protector may have tripped and needs a little longer...

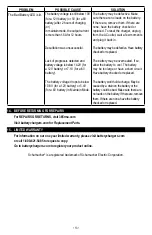
Страница 13: ...tlet wait a few moments and plug it back in The battery may be defective Have battery checked or replaced The battery may be overheated If so allow the battery to cool The battery may be too large or...

Страница 14: ...reparaciones cuando necesite servicio de mantenimiento o una reparaci n Volver a ensamblar el cargador en forma incorrecta puede provocar riesgo de incendio o descarga el ctrica 1 10 Para reducir el...

Страница 15: ...terminales de la bater a antes de cargar la bater a Durante la limpieza evite que la corrosi n producida por aire tenga contacto con sus ojos 3 4 Agregue agua destilada a cada pila hasta que el cido d...

Страница 16: ...er a 6 8 Vea Instrucciones de Operaci n para duraci n de la carga 7 SIGA ESTOS PASOS CUANDO LA BATER A SE ENCUENTRE FUERA DEL VEH CULO ADVERTENCIA UNA CHISPA PROVOCADA CERCA DE LA BATER A PUEDE CAUSAR...

Страница 17: ...la bater a cada 10 segundos Cuando la bater a est cargada por completo seg n indica el LED verde Cargada Mantenimiento encendido la pantalla y todos los dem s ledes se apagan para conservar la energ...

Страница 18: ...sta es probablemente la c lula m s sensible en t rminos de las reacciones adversas a la carga de sobretensi n Las bater as de gel son los m s utilizados en aplicaciones de ciclos MUY PROFUNDOS y puede...

Страница 19: ...9 5 1 5 4 3 7 3 5 8 Los tiempos est n basados en un 50 descargada bater a y pueden cambiar dependiendo de la edad y la condici n de la bater a MODO DE CARGA AUTOM TICA Cuando se realiza una carga aut...

Страница 20: ...a que se enfr en NOTA Bajo clima fr o extremo o si la bater a es inferior a 2 volts cargue la bater a por 5 minutos antes de poner en marcha el motor 5 Si el motor no arranca cargue la bater a por 5 m...

Страница 21: ...ese caso la unidad establecer el tipo de bater a en AGM y la Velocidad a Impulsar Use los botones Rate Selection y Battery Type para cambiar estos ajustes Vea la Secci n 10 UTILIZACI N DE UN PROBADOR...

Страница 22: ...haga la conexi n en forma correcta F05 El cargador no puede alimentar la bater a cargada el el modo de mantenimiento La bater a no mantiene la carga Podr a ser causado por un escape en la bater a o l...

Страница 23: ...el cargador se enfr en Verifique la posible presencia de una conexi n defectuosa en la bater a y en el bastidor Verifique la posible p rdida del enchufe perteneciente a los cables de alimentaci n o al...

Страница 24: ...empl ce la bater a Para reajustar el cargador desenchufe del contacto de la CA espere algunos minutos y vuelva a enchufar La bater a puede estar defectuosa Verif quela o reempl cela La bater a se pued...

Отзывы: