background image

© Allegion 2020

Printed in U.S.A.

47327849 Rev. 10/20-a

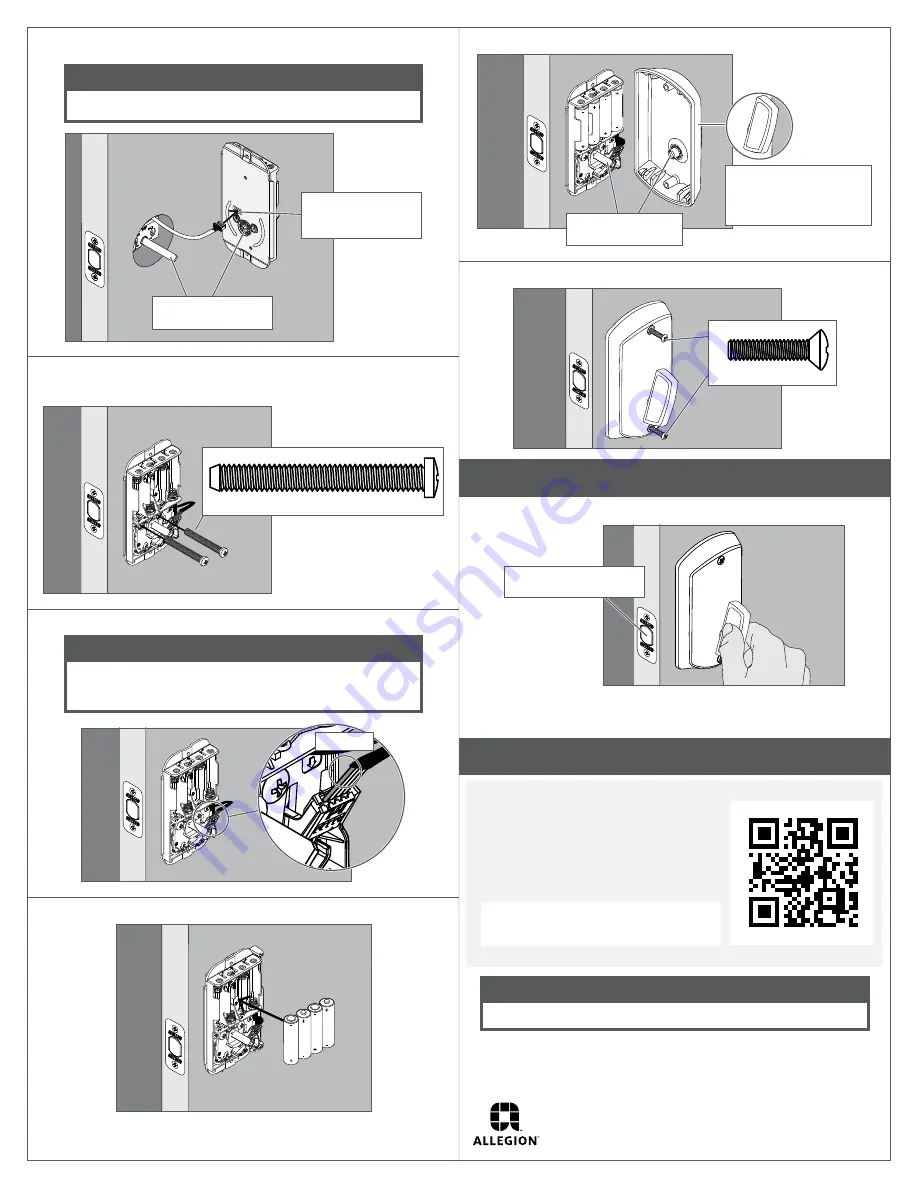
4b  Install the inside assembly on the inside of the door.

CAUTION

Bolt must remain retracted!

Route the cable 

through the hole in 

the inside assembly.

Guide the tailpiece 

into the slot.

4c  Secure the inside assembly with two screws.


L

If the screw holes are blocked by the cam, see step 4a.

Actual Size (2)

4d  Connect the cable to the inside assembly.

CAUTION

The connector fits only one way. 


DO NOT FORCE!

Red wire

4e  Install the batteries.

4f 

Install the inside cover.

Align the slot with 

the tailpiece.

Thumbturn should be 

pointed towards hinges, 

with longer side on top.

4g  Secure the inside cover with two screws.

Actual Size (2)

Test the Lock

Extend and then retract the bolt using the inside bolt throw.

Bolt should extend and 

retract smoothly.


L

Outside bolt throw should spin freely until a valid 
credential is presented.

Set up the lock.

Access online interactive 
instructions, user guide, 
warranty, and reference 
information.

alle.co/control

Customer Service

1-877-671-7011

www.allegion.com/us

Содержание BE467F

Страница 1: ...egionengage com to access your account online IMPORTANT NOTES Install and test lock with door open to avoid being locked in or out CAUTION Use provided bolt Do NOT use a power drill for installation C...

Страница 2: ...ze 2 Make sure the word TOP faces up when installing the bolt 2 Install the strike into the frame Drill pilot holes x 3 deep 2 places Optional OR Reinforcement strike Strike and reinforcement plate Ac...

Страница 3: ...fits only one way DO NOT FORCE Red wire 4e Install the batteries 4f Install the inside cover Align the slot with the tailpiece Thumbturn should be pointed towards hinges with longer side on top 4g Sec...

Страница 4: ...on inclus Unidad externa Assemblage externe Tornillos de montaje de cerradura Vis de montage du p ne dormant Tapa interna Couvercle int rieur Tornillos de tapa Vis du couvercle Unidad interna Assembla...

Страница 5: ...l essai en maintenant la porte ouverte pour viter de vous enfermer l ext rieur ou l int rieur MISE EN GARDE Utilisez le p ne fourni N utilisez PAS de perceuse lectrique pour l installation Verifique l...

Страница 6: ...t plaque de renforcement Tama o real Taille r elle 3 Instalar la unidad externa Installez l assemblage ext rieur PRECAUCI N Si el perno no se mantiene es retra do durante la instalaci n el bloqueo y d...

Страница 7: ...r la leva consulte el paso 4a L Si les trous pour les vis sont bloqu s par la came reportezvous l tape 4a Tama o real 2 Taille r elle 2 4d Conectar el cable fuera de la unidad interna Branchez le c bl...

Страница 8: ...e Le p ne devrait sortir et se r tracter en douceur L El pasador externo deber a girar libremente hasta que se presente una credencial v lida L La saillie externe devrait tourner librement jusqu ce qu...

Отзывы: