background image

Groups

57

3

Groups

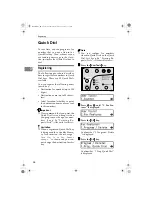
If you regularly broadcast documents
to the same set of destinations, you
can combine these numbers into a
group. Then just select the group and
each number will be dialed in se-
quence automatically. 
There are two ways of programming
Groups: 

Registering groups in Quick Dial keys

If you register a group in a Quick
Dial key, you can specify that
group by pressing a Quick Dial
key. However, if you use Quick
Dial keys to register groups, you
will be able to register fewer Quick
Dial keys . 

Note

You cannot register another
function (Quick Dials) in a
Quick Dial key already used for
a group.  Also, you cannot regis-
ter groups in a Quick Dial key
already used for another func-
tion. 

Assigning the Group Functions to the
Group key

To assign the Group Function to
the Group key, you must first as-
sign the Group function to a User
Function key. To send a fax, press
the Group key, and then enter the
group number (1 to 5). To select a
Group using a Group key, one
more step is required than when
using a Quick Dial key. However,
multiple Groups (a maximum of
five) can be stored in a Group key,
thus leaving the Quick Dial keys to
be used more effectively.

Registering 

You can register the following items
in a Group:
• Destination fax numbers
• Group name (up to 20 characters)
You can enter destination numbers
using Quick Dial keys, Speed Dials,
or the number keys.

Note

You can register up to 5 Groups.

The maximum number of destina-
tions you can register in a Group is
140.

The combined maximum number
of destinations you can register in
all Groups is 149. This 149 can be
composed of up to 30 Quick Dial
numbers, 50 Speed Dial numbers
and 69 numbers entered directly
with the number keys.

The number of destinations that
can be registered with the number
keys depends on how the machine
is used. In theory you can register
up to a combined maximum of 69
destinations with the number keys
for all groups.

If you register 69 destinations with
the number keys, Memory Trans-
mission using the number keys be-
com e s un ava ilable , an d on ly
Immediate Transmission is avail-
able.

StellaF1EN-3_FM.book  Page 57  Monday, November 12, 2001  11:38 AM

Содержание 3725

Страница 1: ... Pages in book Paper thickness 2 4 200000 mm Operating Instructions Basic Features For safety please read this manual carefully before you use this product and keep it handy for future reference Type for 3725 F9103 LF310 3310L Printed in China UE USA H555 8600 Getting Started Faxing Registering Troubleshooting 1 2 3 4 ...

Страница 2: ...uations Repairs to certified equipment should be coordinated by a representative designated by the supplier Any repairs or alterations made by the user to this equipment or equipment malfunctions may give the telecommunications company cause to request the user to disconnect the equipment User should ensure for their own protection that the electrical ground connections of the power utility teleph...

Страница 3: ... 8 Recycled Paper 9 How to Read this Manual 10 Symbols 10 Manuals for This Machine 11 Basic Features this manual 11 Advanced Features 11 1 Getting Started Guide to Components 13 Front View 13 Side View 14 Control Panel 15 Starting the Machine 17 Turning On the Power 17 Turning Off the Power 17 Reading the Display 18 Reading the Display and Using Keys 18 Standby Display 18 Communication Display 19 ...

Страница 4: ...ediate Transmission 31 Before the Start key is Pressed 31 After the Start key is Pressed 31 Scan Settings 32 Resolution 32 Original Type 33 Dialing 34 Entering Numbers Directly 34 Pause 35 Tone 35 Using Quick Dials 35 Using Speed Dials 36 Using Groups 37 When Specifying a Group with a Quick Dial 38 When Specifying a Group with the Group key 38 Reception Modes 39 Selecting the Reception Mode 39 3 R...

Страница 5: ...an entire group 65 Entering Characters 67 Available Characters 67 Keys 67 How to Enter Characters 68 4 Troubleshooting Loading Paper in the Main Paper Tray 69 Adjusting Volume 70 Clearing Original Jams 72 Clearing a Copy Fax or Print Jam 73 Inside the Machine 73 Error Messages 74 When the Receive File Indicator is Lit 76 Solving Problems 77 INDEX 78 StellaF1EN 3_FM book Page iii Monday November 12...

Страница 6: ...iv StellaF1EN 3_FM book Page iv Monday November 12 2001 11 38 AM ...

Страница 7: ...no guarantee that interference will not occur in a particular installation If this equipment does cause harmful interference to radio or television reception which can be deter mined by turning the equipment off and on the user is encouraged to try to cor rect the interference by one more of the following measures Reorient or relocate the receiving antenna Increase the separation between the equip...

Страница 8: ...t is sent and an identification of the business other entity or other individual sending the message and the telephone number of the sending machine or such business other entity or individual This information is transmitted with your document by the TTI Transmit Terminal Identification feature In order for you to meet the requirement your machine must be programmed by following the instruc tions ...

Страница 9: ...plug by pulling the plug not the cable if the power cable or plug becomes frayed or otherwise damaged To avoid hazardous electric shock or laser radiation exposure do not remove any covers or screws other than those specified in this manu al Turn off the power and disconnect the power plug by pulling the plug not the cable if any of the following occurs You spill something into the machine You sus...

Страница 10: ...e the machine Keep toner used or unused and toner cartridge out of the reach of children For environmental reasons do not dispose of the machine or expended supply waste at household waste collection points Disposal can take place at an authorized dealer The inside of the machine could be very hot Do not touch the parts with a label indicating the hot surface Otherwise an injury might occur Our pr...

Страница 11: ... a fire They may explode Check with local codes for pos sible special disposal instructions Save these instructions IMPORTANTES MESURES DE SÉCURITÉ Certalnes mesures de sécurité doivent être prises pendant l utilisation de matéri al téléphonique afin de réduire les risques d incendle de choc électrique et de blessures En voici quelquesunes Ne pas utiliser l appareil près de l eau p ex près d une b...

Страница 12: ...d hallmarks for RWARNING RCAUTION at the positions shown below For safety please follow the instructions and handle the machine as indicated The inside of the machine becomes very hot Do not touch the inside Doing so could result in a burn A StellaF1EN 3_FM book Page 6 Monday November 12 2001 11 38 AM ...

Страница 13: ...STAR Guidelines for energy efficiency The ENERGY STAR Guidelines intend to establish an international energy saving system for developing and introducing energy efficient office equipment to deal with environmental is sues such as global warming When a product meets the ENERGY STAR Guidelines for energy efficiency the Partner shall place the ENERGY STAR logo onto the machine model This product was...

Страница 14: ... mode on or off with User Parameter When the ma chine is shipped Energy Saving Standby is selected on The machine enters Energy Saving mode when Nobody uses the machine for about 5 minutes the machine automatically en ters Energy Saving mode The user holds down the Energy Saver key for about 2 seconds To exit Energy Saving mode In Energy Saving Standby mode press the Energy Saver key In FAX Standb...

Страница 15: ... Saving mode documents that have been stored in memory are still sent and the machine can still receive messages When a message is received in Energy Saving mode the machine prints it and returns to Energy Saving mode Limitation It is not possible to enter Energy Saving mode when an original is set Recycled Paper In accordance with the ENERGY STAR Program we recommend use of recycled paper which i...

Страница 16: ...tructions under this symbol Be sure to read the instructions all of which are described in the Safety Information section The statements above are notes for your safety Important If this instruction is not followed paper might be misfed originals might be damaged or data might be lost Be sure to read this Preparation This symbol indicates information or preparations required prior to operating Not...

Страница 17: ...ed in memory and checking the con tents of any files in memory Chapter 3 Other Transmission Features Explains about useful features for transmission You can find out about dial ing numbers easily Chapter 4 Reception Features Explains about reception features You can find out about screening out mes sage from anonymous senders Chapter 5 Copying Explains about copying operations and functions Chapte...

Страница 18: ...trays cleaning the scan ner and so on Chapter 10 Installation Explains about installation considerations connecting to a telephone line and connecting the power Chapter 11 Appendix You can check the specifications for this machine StellaF1EN 3_FM book Page 12 Monday November 12 2001 11 38 AM ...

Страница 19: ...ine using keys and watching the display on the Control Pan el 6 Front Cover Open this cover when changing the toner cassette and the photo conductor unit in side the machine 7 Main Paper Tray Load paper here 8 Paper Tray Unit Option You can load more paper here 9 Lower Right Cover Open this cover to remove jammed paper fed from the optional paper tray unit 10 Bypass Tray A fax message can be print...

Страница 20: ...iew 1 Output tray guide Pull out and raise the end fence to sup port large papers 2 Power Switch The power switch turns your machine on and off 3 Handset Option This permits voice communication 4 G3 Line Connector 5 External Telephone Connector 6 Memory Card Slot Insert an optional memory card here 7 Ventilation hole Prevents overheating Do not obstruct the ventilation hole by placing an object ne...

Страница 21: ...toner is about to runout and lights continuously when toner has run out 7 Load Paper indicator Lights when a paper tray is empty or the paper tray is not fully inserted 8 0 0 0 0 1 1 1 1 keys Press to move the cursor or select func tions 9 Receive File indicator Lights when a message has been received into memory 10 OK key Press to answer Yes to a question dis played on the display 11 Speed Dial k...

Страница 22: ...key when you want to print a help list 20 Resolution key Press to switch between Standard Auto Detail and Fine When the indicator is not lit Standard is selected 21 Halftone key Select halftone when faxing or copying photographs or illustrations with fine gradations Also can be used for color originals 22 Status Indicators These indicators keep you informed about the current status of the unit hAl...

Страница 23: ...urn off the power switch or you unplug the power cord Fax files programed in memory will be de leted 12 hours or more after you turn off the power switch or you unplug the power cord The stor age time might be shorter if the surrounding temperature is low or the machine has been on for less than a week Fax files programmed in memory will not be deleted while the op tional memory card is installed ...

Страница 24: ...unction on the LCD display or move the brackets to select another values Press the OK key to set a selected function or entered value and return to the previous display Press the Cancel key to cancel the selected function or entered value and return to the previous display Standby Display While the machine is in standby dis play immediately after it is turned on or after the Cancel key is pressed ...

Страница 25: ...s on the top of the LCD display Note Even when the machine is send ing or receiving a fax message from into memory you can still scan the next original into memory Immediate Transmission Display Prompts Depending on the situation the ma chine will show various prompts on the display Instructions and Requests Questions Selections Status StellaF1EN 3_FM book Page 19 Monday November 12 2001 11 38 AM ...

Страница 26: ...Getting Started 20 1 StellaF1EN 3_FM book Page 20 Monday November 12 2001 11 38 AM ...

Страница 27: ...nt when you would like to send a document immedi ately and would like to check whether you have successfully connected with the other party s fax machine A fax document is not stored in memory Important If there is a power failure the pow er switch is turned off or the plug is pulled out for a certain period of time all documents stored in memory are deleted As soon as power is restored the Power ...

Страница 28: ...ey is lit Memory Transmission is selected Note You can set whether the machine is in Memory Transmission mode or Immediate Transmission mode right after the power is turned on with the User Parameters Switch 00 Bit 6 See p 85 User Parame ters Advanced Features You can set whether the Transmis sion mode returns to the default mode after each transmission with the User Parameters Switch 01 Bit 7 See...

Страница 29: ...rection as that of the original the fax image size may be reduced on output trimmed at the both edges or di vided into two or more sheets When sending an important origi nal we recommend that you ask the receiver about the size and di rection of the paper used in their terminal Make sure that all ink correcting fluid etc has completely dried be fore setting your original If it is still wet the sca...

Страница 30: ...e p 127 Originals Advanced Features A A A A Adjust the document guide to match the size of your originals Align the edges of your originals and stack them in the Document Feeder face up Adjust the docu ment guide to match the size of the originals again Note Set the originals gently Reference For details about unsuitable originals see p 127 Originals unsuitable for the Document Feeder ADF Advanced...

Страница 31: ...y deleted files See p 103 Power Failure Report Advanced Fea tures Limitation If memory is full 0 appears on the display Memory Transmis sion is disabled Use Immediate Transmission instead Note Maximum number of Memory Transmission files 140 Maximum number of destinations per Memory Transmission 140 Combined total number of desti nations that can be stored 300 The theoretical maximum number of dest...

Страница 32: ...s the Clear Stop key and then enter the correct number again Note When specifying a destination using a Quick Dial the destina tion is added even if you did not press the OK key Reference p 34 Dialing E E E E Press the Start key The machine starts scanning the original The machine calls the destination The name or fax number which is programmed as the Own Name or Own Fax Number at the other end is...

Страница 33: ...sent During Transmission Use this procedure to cancel a trans mission after the original has been scanned Note If transmission finishes while you are carrying out this procedure it will not be canceled If you cancel a message while it is being sent transmission is halted as soon as you finish this proce dure However some pages of your message may have already been sent and will be received at the ...

Страница 34: ...sion The transmission may be sent before you can cancel it even if you start canceling the transmis sion before it is fully sent A A A A Press the Job Information key and confirm that 1 Cancel TX RX is displayed B B B B Press the OK key C C C C Display the file you want to de lete Enter the file number with the number keys or search using 0 or 1 If you are unable to find the file it has already be...

Страница 35: ... is turned on with the User Parameters The machine does not redial with immediate transmission A A A A Check that the Memory Trans mission indicator is not lit If it is lit press the Memory Trans key B B B B Set your original Reference p 23 Setting Originals C C C C Select any scan settings you re quire See p 32 Scan Settings D D D D Dial If you make a mistake press the Clear Stop key and then ent...

Страница 36: ...Faxing 30 2 Reference p 41 Own Name Fax Head er Own Fax Number After transmission the machine will return to standby display StellaF1EN 3_FM book Page 30 Monday November 12 2001 11 38 AM ...

Страница 37: ...you have already set the original you can also cancel the transmission by removing the original from the machine After the Start key is Pressed A A A A Press the Clear Stop key and then remove the original Note If the transmission finishes while you are carrying out this procedure it will not be can celed StellaF1EN 3_FM book Page 31 Monday November 12 2001 11 38 AM ...

Страница 38: ...ine as Standard Fine 8 15 4 lines mm 200 400dpi Select for originals with very fine details or when you require the best possible image clarity This resolution is four times as fine as Standard Auto 8 3 85 lines mm 200 100dpi and 8 7 7 lines mm 200 200dpi Select for originals containing nor mal size characters and small size characters The machine will choose either Standard or Detail for original...

Страница 39: ... or colored illustrations select Half tone to optimize image clarity Halftone Select Halftone to send an original containing a halftone image such as a photograph or a color original Note If you select Halftone resolution is automatically set to Detail Even if you do not select Halftone again the resolution will not return to Standard If you select Halftone the trans mission will take longer than ...

Страница 40: ...eys The digits appear on the display as you enter them Note If you make a mistake press the Clear Stop key and enter again If you wish to send this message to more than one destination press the OK key and then en ter the next destination D D D D Press the Start key Limitations when dialing with the number keys Fax numbers entered with the num ber keys are stored in internal memo ry separate from ...

Страница 41: ...use in numbers stored in Quick Dials and Speed Dials Tone This function allows a machine con nected to a pulse dialing line to send tone signals for example if you want to use a special service on a tone dial ing line When you press the p p p p key the machine dials the number us ing tone signals Note You cannot place a tone before the first digit of a fax number Some services may not be available...

Страница 42: ...9 You must store the destination s fax number in a Speed Dial beforehand Additionally you can store a name for the destination in Speed Dials Note To register edit or delete Speed Dial entries see p 52 Speed Dial To check the contents of all Speed Dials print the Speed Dial list See p 56 Printing Reports Lists Advanced Features You can use codes 00 49 for Speed Dials If a search letter is register...

Страница 43: ...s according to the way they were programmed When programmed in a Quick Di al Press the Quick Dial key When not programmed in a Quick Dial Use the User Function Key Group Dial is assigned to F4 as a default setting If this setting is changed program the Group func tion in a User Function key F1 to F5 When you want to speci fy a destination press the User Function key in which the Group Function is ...

Страница 44: ...Group key Make sure that the Memory Trans mission indicator is lit if not press the Memory Trans key to light it Note Group Dial is assigned to F4 as a default setting If this setting is changed you must program the Group function in a User Function key beforehand See p 53 User Function Keys Advanced Fea tures A A A A Make sure that the machine is in standby display B B B B Set your original and s...

Страница 45: ...e the machine rings a number of times You can answer the call while the machine is ring ing If you do not answer the call the machine automatically chang es to receive fax messages Note You can change the number of rings See p 61 Setting the Auto Ring Time Advanced Fea tures When the other party send a fax message the machine changes to receive the fax message auto matically You can connect a tele...

Страница 46: ...F Press 0 0 0 0 or 1 1 1 1 until 5 Reception Mode is displayed G G G G Press the OK key H H H H Press 0 0 0 0 or 1 1 1 1 to select the recep tion mode I I I I Press the OK key J J J J Press the User Tools key to re turn to the standby display StellaF1EN 3_FM book Page 40 Monday November 12 2001 11 38 AM ...

Страница 47: ...be up to 32 characters long and is printed on the header of ev ery page you send Own Fax Number Required by inter national law This is your fax machine s phone number that must include country and area codes using 20 characters or less During any communica tion your Own Fax Number ap pears on their display Conversely their Own Fax Number appears on your display Note In some areas the Own Fax Numbe...

Страница 48: ...F F F Press 0 0 0 0 or 1 1 1 1 until 6 Fax Infor mation is displayed G G G G Press the OK key Confirm that 1 Own Name is displayed H H H H Press the OK key I I I I Enter your Own Name Note If you want to erase a character in the name press the Clear Stop key Reference See p 67 Entering Charac ters for how to enter characters J J J J Press the OK key Your Own Name is programmed K K K K Press 0 0 0 ...

Страница 49: ...wn Fax Number Note The format of the number is normally as follows Interna tional Dial Prefix Your Country Code Your Area Code do not insert a pause after your Area Code followed by your tele phone number Check the Inter national Dialing Prefix and the Country Code with your local telecommunications operator Characters you can enter include numerals 0 9 plus symbols and spaces R R R R Press the OK...

Страница 50: ...Setup is displayed E E E E Press the OK key F F F F Press 0 0 0 0 or 1 1 1 1 until 6 Fax Infor mation is displayed G G G G Press the OK key H H H H Press 0 0 0 0 or 1 1 1 1 to select the item that you want to edit I I I I Press the OK key J J J J Press the Clear Stop key and then reenter the Number or Name K K K K Press the OK key L L L L Press the User Tools key to re turn to standby display Stel...

Страница 51: ...ss 0 0 0 0 or 1 1 1 1 until 3 Setup is displayed E E E E Press the OK key F F F F Press 0 0 0 0 or 1 1 1 1 until 6 Fax Infor mation is displayed G G G G Press the OK key H H H H Press 0 0 0 0 or 1 1 1 1 to select the item that you want to delete I I I I Press the OK key J J J J Press the Clear Stop key K K K K Press the OK key L L L L Press the User Tools key to re turn to standby display StellaF1...

Страница 52: ...d that you print the Quick Dial list and keep it when you program or change fax num bers See p 56 Printing Re ports Lists Advanced Features Limitation When a registered Quick Dial key is being used for a standby Memo ry Transmission the message This Dial is in Use Cannot Change is shown and you can not change the destination for this key Note You can confirm fax numbers stored in Quick Dials on th...

Страница 53: ...ess the User Function key that contains the Dial Op tion You can specify SUB or SEP SID and PWD See p 25 SEP Code Advanced Fea tures or p 26 SUB Code Advanced Features H H H H Press the OK key The fax number is programmed I I I I Enter the destination name Note Under rare circumstances gar bled characters may appear during name registration if you use the Pause Redial key to display the fax number...

Страница 54: ...want to edit Press a Quick Dial key or search using 0 or 1 G G G G Press the OK key H H H H Press the Clear Stop key and then reenter the fax number with the number keys Note If you make a mistake press the Clear Stop key and try again If you press the Pause Redial key the last 10 fax numbers di aled are displayed Press 0 or 1 to select the fax number you want to specify and then press the OK key ...

Страница 55: ...l to be printed on the fax when it is received at the other end See p 8 Label Inser tion Advanced Features M M M M Press the OK key If you want to store another Quick Dial go to step E N N N N Press the User Tools key to re turn to standby display Deleting The following procedure describes how to delete fax numbers registered in Quick Dial keys Limitation When a Quick Dial key is being used for a ...

Страница 56: ...ted If you want to delete another Quick Dial key go to step F I I I I Press the User Tools key to re turn to standby display Quick Dial Key Label Dial label You can print a template that can be used to make labels for Quick Dial keys The template will have destina tion or Group names programmed in Quick Dial keys Limitation Set the label paper to landscape in the Bypass Tray Portrait position will...

Страница 57: ...Quick Dial 51 3 Label paper AUG 21 2002 11 22AM StellaF1EN 3_FM book Page 51 Monday November 12 2001 11 38 AM ...

Страница 58: ...print the Speed Dial list and keep it when you register or change a destina tion Limitation When a registered Speed Dial is be ing used for a standby Memory Transmission the message This Dial is in Use Cannot Change is shown and you cannot change the destination for this Quick Dial Note You can specify codes 00 to 49 You can confirm the contents of Speed Dial numbers in the Speed Dial List See p 5...

Страница 59: ... then press the OK key I I I I Press the OK key The fax number is programmed J J J J Enter the Destination name Note If a destination name is already registered in the Speed Dial the name is shown on the display If you wish to change the destina tion name press the Clear Stop key and then enter another name K K K K Press the OK key The search letter is registered L L L L Press 0 0 0 0 or 1 1 1 1 t...

Страница 60: ... 49 Enter the Speed Dial number with the number keys or search using 0 or 1 H H H H Press the OK key I I I I Press the Clear Stop key and then reenter a fax number with the number keys Note If you make a mistake press the Clear Stop key and try again If you press the Pause Redial key the last 10 fax numbers di aled are displayed Press 0 or 1 to select the fax number you want to specify and then pr...

Страница 61: ... Tools key to re turn to standby display Deleting The following procedure describes how to delete fax numbers in Speed Dials Limitation If a registered Speed Dial is being used for a standby Memory Trans mission the message This Dial is in Use Cannot Delete is shown and you cannot delete the destination for this Speed Dial A A A A Press the User Tools key B B B B Press 0 0 0 0 or 1 1 1 1 until 2 F...

Страница 62: ...er the Speed Dial number with the number keys or search using 0 or 1 The Speed Dial number and the fax number or name are displayed H H H H Press the OK key The programmed data fax num ber and name is deleted If you want to delete another name go to step F I I I I Press the User Tools key to re turn to standby display StellaF1EN 3_FM book Page 56 Monday November 12 2001 11 38 AM ...

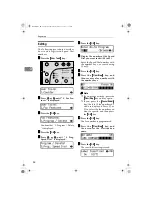
Страница 63: ...y one more step is required than when using a Quick Dial key However multiple Groups a maximum of five can be stored in a Group key thus leaving the Quick Dial keys to be used more effectively Registering You can register the following items in a Group Destination fax numbers Group name up to 20 characters You can enter destination numbers using Quick Dial keys Speed Dials or the number keys Note ...

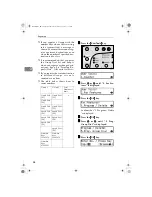
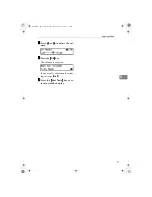
Страница 64: ...unted as one item The table below shows how to count numbers A A A A Press the User Tools key B B B B Press 0 0 0 0 or 1 1 1 1 until 2 Fax Fea tures is displayed C C C C Press the OK key Confirm that 1 Program Delete is displayed D D D D Press the OK key E E E E Press 0 0 0 0 or 1 1 1 1 until 5 Prog Group Dial is displayed F F F F Press the OK key Group1 Group2 Total Number of items Quick Dial 01 ...

Страница 65: ...nd then enter a Speed Dial number I I I I Press the OK key The destination is programmed J J J J Press the 0 0 0 0 or 1 1 1 1 to select Add or Exit K K K K Press the OK key If you selected Exit go to step M L L L L Repeat step G G G G to K K K K for all the des tinations you want to register in the Group M M M M Enter the Group name Note If the Group name is already registered it is shown on the d...

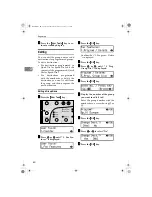
Страница 66: ... the new destination Editing a Group Name A A A A Press the User Tools key B B B B Press 0 0 0 0 or 1 1 1 1 until 2 Fax Fea tures is displayed C C C C Press the OK key Confirm that 1 Program Delete is displayed D D D D Press the OK key E E E E Press 0 0 0 0 or 1 1 1 1 until 5 Prog Group Dial is displayed F F F F Press the OK key G G G G Display the number of the group you want to edit 1 to 5 Enter...

Страница 67: ...o to step P Note If you want to edit a pro grammed Quick Dial key press the Quick Dial key and then the OK key O O O O Press the OK key If you want to program another group name go to step F P P P P Press the User Tools key to re turn to standby display Adding a Fax Number to a Group A A A A Press the User Tools key B B B B Press 0 0 0 0 or 1 1 1 1 until 2 Fax Fea tures is displayed C C C C Press ...

Страница 68: ...one of the following three methods Enter the fax number with the number keys Press a Quick Dial key Press the Speed Dial key and en ter a Speed Dial number Note If you specify a Quick Dial or Speed Dial that is not pro grammed This key is Not Programmed is displayed Re specify the destination N N N N Press the OK key The destination is added O O O O To add another destination re peat steps K K K K...

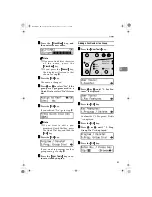
Страница 69: ...step F V V V V Press the User Tools key to re turn to standby display Deleting The following procedure describes how to delete a destination from a group When you delete a destination from a group programmed in a Quick Dial or a Speed Dial the contents of the Quick Dial or Speed Dial are not deleted To delete a destination from a group A A A A Press the User Tools key B B B B Press 0 0 0 0 or 1 1 ...

Страница 70: ...ey K K K K Press 0 0 0 0 or 1 1 1 1 to select Delete L L L L Press the OK key M M M M Press 0 0 0 0 or 1 1 1 1 to display the desti nation you want to delete N N N N Press the OK key To delete another destination re peat steps L to N O O O O If you are finished deleting desti nations press 0 0 0 0 or 1 1 1 1 to select Exit P P P P Press the OK key Q Q Q Q Press the OK key R R R R Press 0 0 0 0 or ...

Страница 71: ... Tools key B B B B Press 0 0 0 0 or 1 1 1 1 until 2 Fax Fea tures is displayed C C C C Press the OK key Confirm that 1 Program Delete is displayed D D D D Press the OK key E E E E Press 0 0 0 0 or 1 1 1 1 until 6 Del Group Dial is displayed F F F F Press the OK key G G G G Display the number of the group you want to delete 1 to 5 Enter the group number with the number keys or search using 0 or 1 H...

Страница 72: ...Dial E Press the OK key F Enter the group number 1 to 5 G Press the OK key H Press 0 or 1 to select No and then press the OK key I Press the OK key J If you want to change the Quick Dial key press Yes and if you want to delete the Quick Dial key press No K Press the OK key If you selected No in step J the Quick Dial key is deleted Go to step N L If you want to change the Quick Dial key press the n...

Страница 73: ...e letters printed on a Quick Dial key is displayed For ex ample when you press Quick Dial 01 the letter displayed changes in the order A B C A as you press the key Press 1 to move the cursor and enter the next character 2 Shift key Quick Dial 13 or 28 Use to switch between upper and lower case 3 Space key Quick Dial 14 or 29 Press to enter a space 4 Symbols key Quick Dial 15 or 30 Press to enter s...

Страница 74: ...acter right of the position you want to enter the character Now the inserted character is shown left of the cursor posi tion B B B B Press the OK key Wild Cards When you register other parties Own Name or Own Fax Numbers for multi ple destinations you can register a se quence of characters common to these identifications as a wild card instead of registering every identification If a destination h...

Страница 75: ... see p 128 Pa per Advanced Features If you want to change the paper size see p 62 Changing the Paper Size Setting Advanced Features A A A A Make sure that the main paper tray is not being used B B B B Pull out the main paper tray until it stops C C C C Push the metal plate down and then square the paper and load it in the tray Important Do not stack paper over the lim it mark If paper is left in t...

Страница 76: ...nds when keys on the Control panel are pressed Alarm The sound to signal something go ing amiss A A A A Press the User Tools key B B B B Press 0 0 0 0 or 1 1 1 1 until 2 Fax Fea tures is displayed C C C C Press the OK key Confirm that 1 Program Delete is displayed D D D D Press 0 0 0 0 or 1 1 1 1 until 3 Setup is displayed E E E E Press the OK key Confirm that 1 Monitor Volume is displayed F F F F...

Страница 77: ...1 1 to adjust the vol ume I I I I Press the OK key The volume is adjusted If you want to adjust another item repeat steps G to I J J J J Press the User Tools key to re turn to standby display StellaF1EN 3_FM book Page 71 Monday November 12 2001 11 38 AM ...
Страница 78: ...al S is dis played Perform the following procedure to clear the jammed original A A A A Open the ADF cover B B B B While pushing the release button lift the ADF unit C C C C Remove the original D D D D Close the ADF unit and ADF cov er making sure it clicks firmly into place StellaF1EN 3_FM book Page 72 Monday November 12 2001 11 38 AM ...
Страница 79: ...g unit and surrounding area inside the machine becomes hot during printing To avoid inju ry when removing paper jams do not touch any parts other than those specified in this manual Note If paper jams occur in the optional paper tray unit see p 102 Clear ing a Copy Fax or Print Jam Ad vanced Features Inside the Machine A A A A Open the right cover B B B B Open the blue cover C C C C Pull out the j...

Страница 80: ...ntain a Keystroke Pro gram This Speed Dial No is Not Pro grammed This Speed Dial number does not contain a number This Dest is Already Selected Either This number is already included in this Group The same destination was specified more than once Insert Pause After Area Code You must add a pause after your area code when you input your fax terminal s own telephone number Replace Toner The toner ca...

Страница 81: ...Check your document Reset Toner Correctly The toner cassette is not set correctly Toner is Almost Empty The toner cassette is nearly empty Copy Mode Locked Copy mode is disabled Enable it with the User Parameters Change ADF Maintenance Kit Replace the ADF Maintenance Kit Scanner Needs Cleaning Wipe the exposure glass and the white strip Message Problem Solution StellaF1EN 3_FM book Page 75 Monday ...

Страница 82: ...e ception to take place and their solutions WhySubstituteReception Occurred Indication Status Solution Paper has run out B is lit red Load paper See p 69 Loading Paper in the Main Paper Tray Toner is empty D is lit red Replace the toner cassette See Cp 117 Replacing the Toner Cassette Advanced Features Note Even if there is no toner left you can still send fax messages Paper is jammed h is lit red...

Страница 83: ...ing the Toner Cassette Ad vanced Features Message appears blank at the other end The original was set upside down Set it properly Reference See p 23 Setting Originals You want to cancel a Memory Trans mission If the original is being stored press the Clear Stop key Reference See p 27 Canceling a Memory Transmission If the original is being sent use Cancel TX RX in the Job Information menu Referenc...

Страница 84: ...roups 37 Using Quick Dials 35 Using Speed Dials 36 Dial label 50 Display 18 Document Feeder ADF 13 24 E Editing Fax Header 44 Groups 60 Own Fax Number 44 Own Name 44 Quick Dial 48 Speed Dial 54 Energy Saver Clear Modes key 16 Energy Saver key 16 Entering Characters 67 Error Messages 74 External Telephone Connector 14 F Fax Header 41 Editing 44 Registering 42 Faxing 21 Fine 32 Front Cover 13 Front ...

Страница 85: ...use Redial key 15 Power Switch 14 Q Quick Dial 46 Deleting 49 Dialing 35 Dial label 50 Editing 48 Registering 46 Quick Dial keys 16 R Receive File Indicator 15 76 Reception Mode Selecting 39 Reception Modes Auto Receive 39 Auto Select 39 Manual Receive 39 Registering Fax Header 41 Groups 57 Own Fax Number 41 Own Name 41 Quick Dial 46 Speed Dial 52 Release Button 13 Resolution 32 Resolution key 16 ...

Страница 86: ...n Modes 21 Trans Option key 15 Troubleshooting 69 Error Messages 74 TTI Fax Header 41 U User Function keys 15 User Tools key 16 V Ventilation hole 14 Volume 70 W Wild Cards 68 StellaF1EN 3_FM book Page 80 Monday November 12 2001 11 38 AM ...

Отзывы: