background image

Sauter GmbH


Ziegelei 1 
D-72336 Balingen 
E-Mail: [email protected]


Tel:  +49-[0]7433- 9933-199 
Fax: +49-[0]7433-9933-149 
Internet: www.kern-sohn.com 


Instruction Manual 

HN-D 


HN-D-BA-e-1213 


4


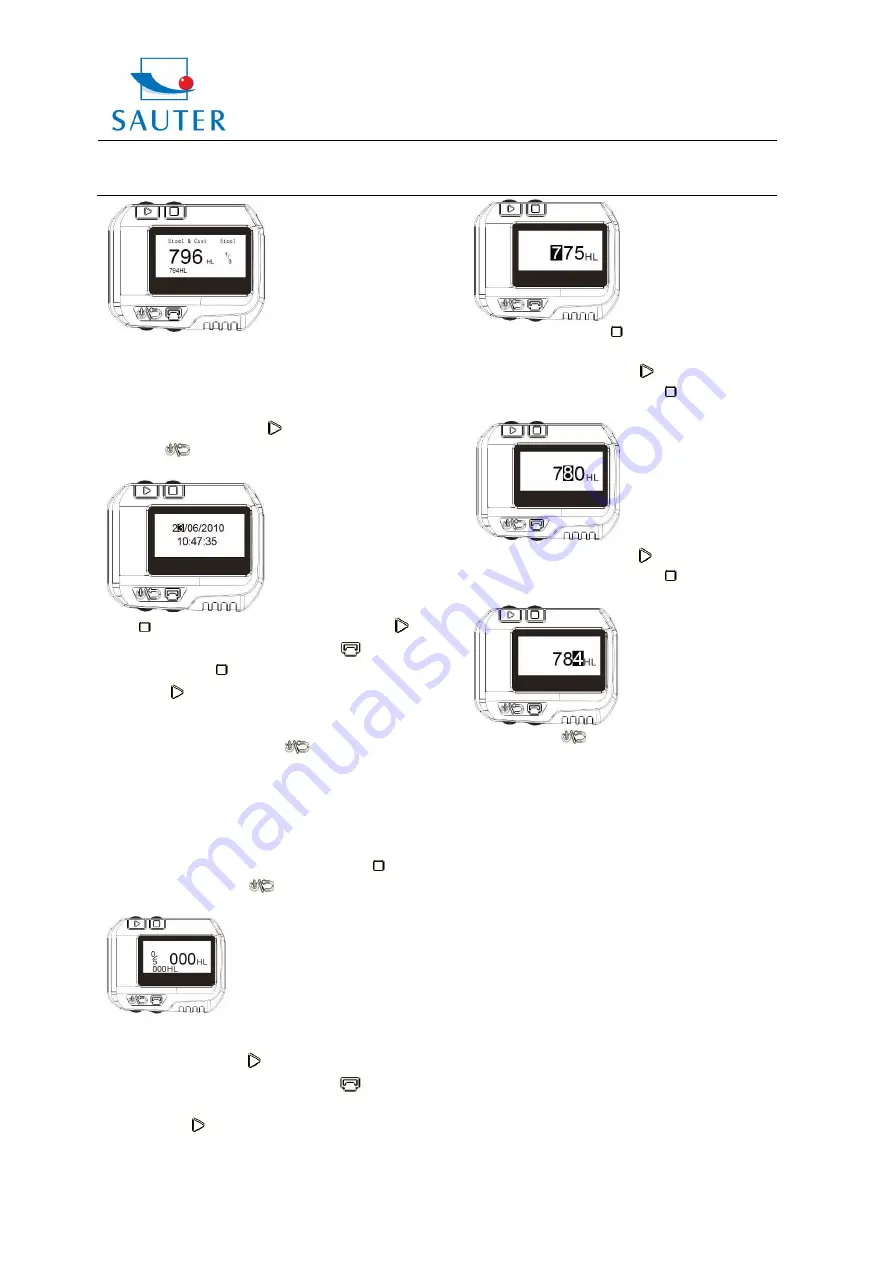
5.3.5  Setting Date and Time 

The  HN-D  has  gota  built-in  real-time-clock.  Clock  and 
calendar  have  to  be  adjusted  if  it  is  necessary.  The 
procedure is as follows:  

In  shut-off  mode,  the  button

  has  to  be  pressed  and 

held,  then 

has  to  be  pressed  for  about  3  seconds  to 

enter the date and time setting mode. 


Press

to  increase  the  „day“  from  1  to  31,  press 

to 

decrease  the  “day”  from  31  to  1.  Press

to  set  the 

month.  Then  press 

to  increase  the  month  from  1  to  12 

and  press 

to  decrease  the  month  from  12  to  1.  The 

same  way  is  used  to  set  the  year,  hour,  minute  and 
second. In the “second “ set-up process, the setting will be 

finished  by  pressing  the  button 

  and  the  instrument 

returns to the measuring mode. 
 

5.3.6  Calibration 

Calibration  is  used  to  calibrate  the measured  value  (HLD) 
of the hardness tester up to the minimum measuring error. 
The procedure is as follows:  

1.  When  the  instrument  is  turned  off,  the  button

has  to 

be pressed and held; then 

has to be pressed and held 

for about 3 seconds to display the calibration mode. 


Now, 5 tests have to be performed on the test block to get 
the average value of these values. 

2.  By  pressing  the  button

,  the  5  measured  values  can 

be  browsed  and  by  pressing  the  button 

,  the  error 

values can be deleted. 

3. If the button 

is pressed, it can be started to input the 

value  written on the test block: Primary, the „hundred“ bit 
has to be set (see illustration below). 


4. By pressing the button

, it can be increased from 0 to 

9 to set the “hundred” bit.  

5.  By  pressing  the  button 

,  the  „ten“  bit  will  be 

highlighted. By pressing the button 

, it can be increased 

from 0 to 9 to set this bit. 


6.  By  pressing  the  button 

,  the  “one”  bit  will  be 

highlighted. By pressing the button 

, it can be increased 

from 0 to 9 to set this bit. 


7. If the button  

 is pressed, the instrument returns to 

the measurement mode and the calibration is finished. 

Note: 1. Before the first use, the hardness tester has to 
be calibrated on the test block. 
2. The impact direction has to be set straight down. 


5.4 

The Format of Memory Data 


The data (such as hardness value, scale , sample material 
and  impact  direction,  time,  date  etc.)  will  be  saved  in  the 
memory  automatically  after  each  individual  impact.  HN-D 
can  store  500  data.  When  the  test  times  are  more  than 
500, the last data will be stored in the 1

st

 position and the 

first dat will be erased, simultaneously the position of other 
data will be automatically moved into the lower position. 
 

5.5 

Backlight 


LED  backlight  is  used  for  poor  light  conditions.  If  there  is 
no impact performed or any key operation has taken place 
in 3 seconds, the backlight will be turned off automatically. 
When  testing  continues  or  any  key  is  pressed,  the 
backlight will be turned on again. 


Содержание HN-D

Страница 1: ...The environmental temperature should be within the range of 30 C up to 80 C and relative humidity from RH 5 bis 95 1 Summary 1 1 Measuring Principle Scope When the test is carried out an impact body with a tungsten carbide test tip is being impelled by spring force against the surface to be tested from which it rebounds Impact and rebound velocities are measured by the following method a permanent...

Страница 2: ...xcellent for material selection and acceptance tests 1 5 Primary Industries Metal production processing Automotive transportation Machinery power plants Petro chemical refinery Aerospace shipyard Metal constructions testing services laboratories Metallproduktion und Entwicklung 2 Technical Specifications Indication range 0 to 999 HLD Accuracy 4HLD Measuring direction any direction LCD display 128 ...

Страница 3: ...to be pressed to select the hardness scale The hardness scale changes according to the following sequence Illustration highlighted Hardness Scale character HLD Leeb Hardness HB Brinell HRB Rockwell B HRC Rockwell C HV Vickers HSD Shore Hardness D Note 1 The value means out of range 2 The default hardness scale is HLD 5 3 3 Data in One Group In measurement mode the button has to be pressed four tim...

Страница 4: ...s can be browsed and by pressing the button the error values can be deleted 3 If the button is pressed it can be started to input the value written on the test block Primary the hundred bit has to be set see illustration below 4 By pressing the button it can be increased from 0 to 9 to set the hundred bit 5 By pressing the button the ten bit will be highlighted By pressing the button it can be inc...

Страница 5: ...ker angeschaltet so ist nur die Taste zu betätigen um die laufenden Messdaten auszudrucken Mini Printer SAUTER AHN 01 www sauter eu A complete test report is shown below 7 Hardness Testing 7 1 Checking of Settings The button has to be pressed to turn on the instrument First it has to be checked if it has to be charged Then it has to be inspected if every setting is correctly particularly material ...

Страница 6: ...tenance After 1000 2000 times use the impact device and the impact body should be cleaned with a nylon brush The screw of the supporting ring has to be turned off before the catheter can be cleaned Then the impact body has to be taken out and it has to be rotated into the tube with the nylon brush in anti clockwise direction The brush has to be pulled out when touching the bottom This procedure ha...

Страница 7: ...ght of the sample is more than or equal to 5 kg testing can be directly started If it is less than 5 kg the sample needs a special charge The supporting piece has to be coupled by a coupling medium and pressed onto the surface of the test piece By doing this better test results will be achieved The area of the testing points should be free of vibrations or shaking If the weight of the sample is no...

Отзывы: