SATO TC408 Скачать руководство пользователя страница 22

22 

TC Series - User

’s Manual       

Loading Ribbon   


The following steps only apply to thermal transfer printing mode only.   

Direct thermal does not need ribbon to be installed.   


Note

:   

1.


Media and ribbon types should be matched to provide with   

optimal print results. 

2.


Always use ribbon that is wider than the media to protect the   

print head from wear. 

3. For direct thermal printing, do not load ribbon in the printer. 
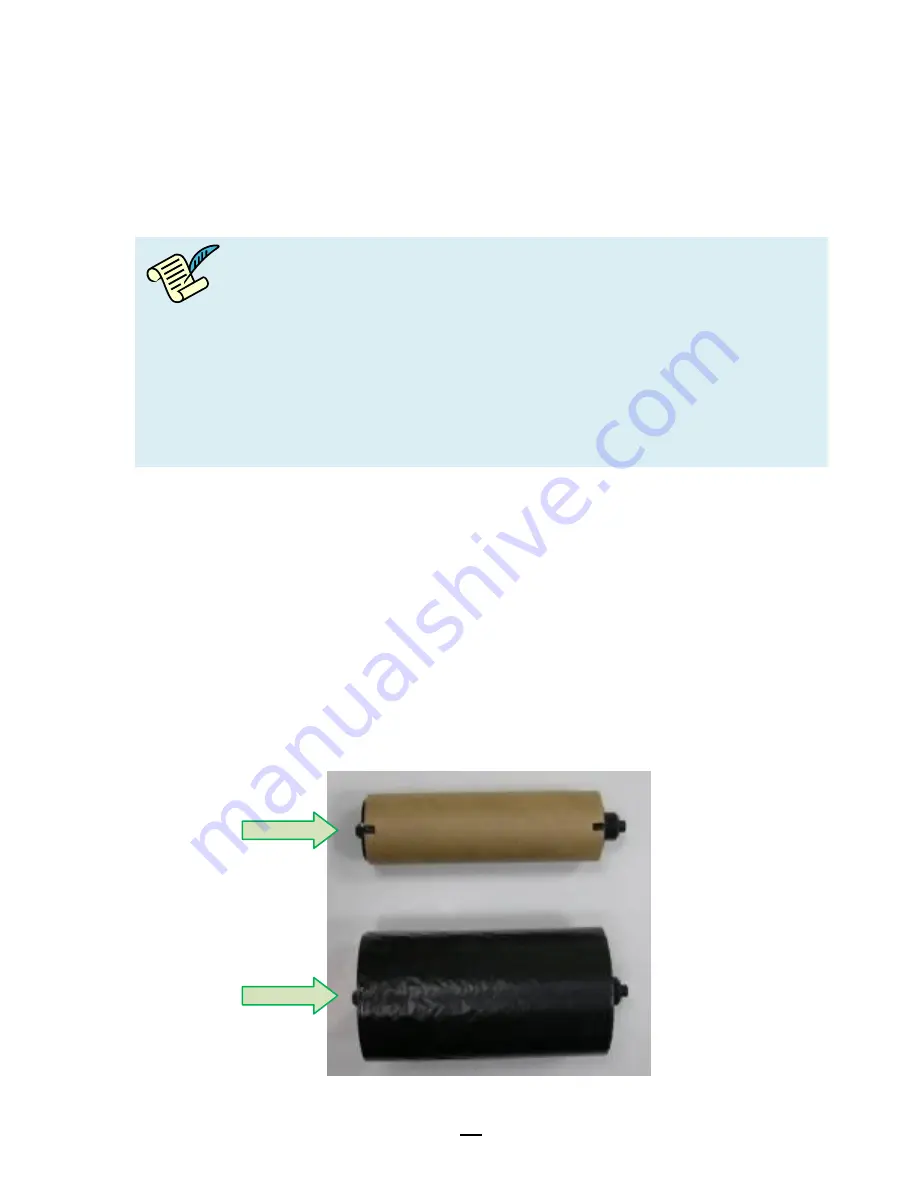


Preparing Ribbon 


Find the two Ribbon Core Adaptors in printer package and fix them into 

the empty core for ribbon and new ribbon supply roll, from the left to the 

right.     


Содержание TC408

Страница 1: ...TC Series User s Manual TC408 TC408X...

Страница 2: ...2 TC Series User s Manual SATO CORPORATION http www satoworldwide com...

Страница 3: ...rinter Overview 10 Front View 10 Rear View 11 Interior View I 12 Interior View II 13 Connecting Power Cord 14 Loading Media 15 Preparing Media 15 Placing Media Roll 15 Sensor type 19 Loading Ribbon 22...

Страница 4: ...or other interfaces except USB 46 5 Troubleshooting 53 LED Diagnosis 53 Printer Status 56 Transmission Problems 57 Recovery 57 Printer Maintenance 58 Cleaning Print Head 59 Cleaning Roller 61 Cleaning...

Страница 5: ...TC Series User s Manual 7 Index 73 Rotary Cutter and Guillotine Cutter Installation 73 Rotary Cutter and Guillotine Cutter Settings 76 Rotary Cutter with Paper Jam 79 Guillotine Cutter with Paper Jam...

Страница 6: ...any s published engineering specifications and manuals are correct however errors do occur SATO CORPORATION reserves the right to correct any such errors and disclaims any resulting liability In no ev...

Страница 7: ...ly be applicable to some situations Caution Advises of possible failure to take or avoid a specific action under certain circumstances Caution Electricity Warns of a potential electric shock situation...

Страница 8: ...r please unpack and check first before use 1 Inspect the outside of both the box and the printer to see if there is any damage caused by transportation 2 Open package of the printer then open top cove...

Страница 9: ...e Contents Quick Installation Guide CD Documentation Software Power Cord Printer USB cable Ribbon Core Adaptors 1 ID Core for Ribbon Power Cord Ribbon Core Adaptors 1 ID Core for Ribbon Printer USB Ca...

Страница 10: ...10 TC Series User s Manual Printer Overview Front View Printer s front panel includes 3 LED indicators READY MEDIA and RIBBON 3 buttons FEED PAUSE and CANCEL Front Cover Top Access Door Front Panel...

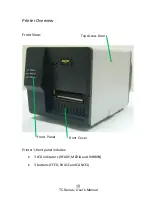
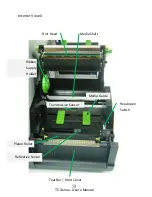
Страница 11: ...11 TC Series User s Manual Rear View Power Switch Parallel Port USB Port AC Power connector RS232 Serial Port...

Страница 12: ...12 TC Series User s Manual Interior View I Head Latch Media Supply Hanger Media Supply Guide Ribbon Pick up Holder DIP Switch...

Страница 13: ...13 TC Series User s Manual Interior View II Platen Roller Reflective Sensor Print Head Ribbon Supply Holder Head open Switch Media Shaft Media Guide Transmissive Sensor Tear Bar Front Cover...

Страница 14: ...turn Power switch to the O position Make sure to turn off printer s power first every time before connecting or disconnecting Power cord from printer 2 Connect AC power cord to AC Power connector of p...

Страница 15: ...nto the printer in the same way In case media roll may become dirty or dusty during shipment handling or storage firstly remove the outside length of media which helps to avoid dragging adhesive or di...

Страница 16: ...int of Media supply hanger and then check the scale numbers located right upon both edges of media roll Then find the Knob under Media supply guide at left turn clockwise to loosen it and move to the...

Страница 17: ...edia supply hanger Check the scale number on Media Supply Hanger and make sure the roll is centrally aligned Turn the Knob under Media supply guide at left anti clockwise to tighten it and fix media r...

Страница 18: ...User s Manual 4 Push the Head latch to open the printer module Pull a short length of media till it reaches the Platen roll of printer Locate the media under Media shaft PUSH Head latch Platen roller...

Страница 19: ...Refer to DIP Switch section to know more details about setting methods Sensor type Media type sample Reflective movable Multi column labels or labels with gaps make sure to locate sensor under media w...

Страница 20: ...en press firmly at the both sides to properly latch until you hear a click Note For thermal transfer printing mode ribbon is required to be installed Refer the steps in section Loading Ribbon Press th...

Страница 21: ...dia pull the media edge against the Tear off bar as in the direction below Note If printer will be printed in thermal transfer mode which requires ribbon to be installed continue the next section Load...

Страница 22: ...bbon types should be matched to provide with optimal print results 2 Always use ribbon that is wider than the media to protect the print head from wear 3 For direct thermal printing do not load ribbon...

Страница 23: ...23 TC Series User s Manual Placing Ribbon Rolls 1 Open Top access door of the printer 2 Push the Head latch to open the printer module Top access door PUSH Head latch...

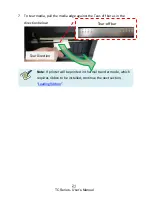
Страница 24: ...24 TC Series User s Manual 3 Lift up the printer module to check the Ribbon supply holder Ribbon supply holder...

Страница 25: ...ne ribbon roll and rotate it until the notches align and lock into the left side of Ribbon supply holder and then into the right Note The Ribbon Supply Holder accepts the coated side of ribbon to be w...

Страница 26: ...ock into the left side of Ribbon pick up holder and then the right Pull a short length of ribbon from Ribbon supply holder Move upward and attach to Core for ribbon on Ribbon pick up holder Note Ribbo...

Страница 27: ...lose the printer module and then press firmly at both sides to properly latch it until you hear a click Rotate Thumb wheel of Ribbon pick up holder to remove slack and ribbon wrinkle and to align ribb...

Страница 28: ...28 TC Series User s Manual 7 Double check the installation path of media and ribbon...

Страница 29: ...t media out print tasks cancelled printing errors printer paused printer receiving data from host MEDIA On Normal operation Blinking Media is used out install new media Print head overheated printer w...

Страница 30: ...2 Press the button and power on printer at the same time FEED CONFIG Feed a label Perform self test print a configuration report PAUSE CALIBR Pause printing Press again to resume printing Perform a me...

Страница 31: ...ting have been loaded correctly 3 The label sensor needs to locate properly to index labels gaps notches holes For more details refer to the section Sensor type Steps 1 Turn off the printer 2 Press an...

Страница 32: ...n report 4 Printer will enter Dump mode after printing configuration if it s with SATO SEPL emulation To return to normal operation mode from Dump mode press the CANCEL RESET button Another way is to...

Страница 33: ...33 TC Series User s Manual Sample of Configuration Report based on TC408...

Страница 34: ...34 TC Series User s Manual Sample of Configuration Report based on TC408X...

Страница 35: ...Switch Switch Function 4 Media Sensor Switch 2 Print Mode Switch Position is Up Off Printer s firmware defaults to reflective sensor As long as switch is at Up position labeling software windows drive...

Страница 36: ...mains illuminated the following information is now back to defaults Label parameters Heat Darkness Speed Symbol set language Others for specific emulation Note 1 Be cautioned that this will reset all...

Страница 37: ...f printer before connecting communication cables 2 Printer complies with FCC Rules and Regulations Part 15 for Class A Equipment for use with fully shielded six foot data cables Use of longer cables o...

Страница 38: ...end which is plugged into the parallel port located on the back of the printer The other end of the parallel interface cable connects to the printer connector at the host computer Serial and Parallel...

Страница 39: ...The screens included for these steps are taken from Windows XP steps in other versions of operation systems are similar Drivers can be installed via the CD included in printer package Installing a Pl...

Страница 40: ...ted it using a USB cable then the Windows Add Hardware Wizard will automatically detect the printer and display a dialog that allows you to install a driver Click Cancel and do not install the driver...

Страница 41: ...41 TC Series User s Manual 4 On the prompt Windows Printer Driver select I accept and click Next Assign the directory to keep Seagull driver for example C Seagull and click Next...

Страница 42: ...42 TC Series User s Manual 5 Make sure the first option Run Driver Wizard is checked and click Finish Select Install printer drivers and click Next...

Страница 43: ...prompt will pop up if printer is off If USB cable is well connected to PC and to printer and printer is powered on this Seagull Driver Wizard prompt will pop up Select the first radio button to Insta...

Страница 44: ...44 TC Series User s Manual 7 Enter Printer name i e SATO TC408X SZPL and select do not share this printer and click Next Check the data on the screen shown If all is correct click Finish...

Страница 45: ...45 TC Series User s Manual 8 After the related files have been copied to your system click Finish After driver installation is complete click Close Now the driver should have been installed completely...

Страница 46: ...ctor Connect the Parallel cable or Serial cable to the proper port on the printer and also on your computer 2 Prepare the documentation and software CD from printer package and then install to CD driv...

Страница 47: ...47 TC Series User s Manual 3 On the prompt Windows Printer Driver select I accept and click Next Assign the directory to keep Seagull driver for example C Seagull and click Next...

Страница 48: ...48 TC Series User s Manual 4 Check the first option Run Driver Wizard and click Finish Select Install printer drivers and click Next...

Страница 49: ...49 TC Series User s Manual 5 This Seagull Driver Wizard prompt will pop up 6 Select model emulation and click Next The following examples are based on model TC408X SZPL...

Страница 50: ...50 TC Series User s Manual 7 Select the port of the printer and click Next 8 Enter Printer name i e SATO TC408X SZPL and select do not share this printer and click Next...

Страница 51: ...51 TC Series User s Manual 9 Check the data on the screen shown If all is correct click Finish After the related files have been copied to your system click Finish...

Страница 52: ...52 TC Series User s Manual 10 After driver installation is complete click Close Now the driver should have been installed completely...

Страница 53: ...LEDs and refer to the following solutions suggested below Media Problems LED Indication READY and MEDIA LEDs Blinking Possible Problems Solutions Remarks Miss detected gap Check the media path Check t...

Страница 54: ...able to direct thermal Ribbon jam Recover the jam Ribbon sensor error Replace ribbon sensor Note If you use direct thermal set by labeling software windows driver printer commands or DIP Switch Other...

Страница 55: ...the connection between cutter and main board Call for service Memory full Check graphics and soft fonts from host Delete by application software for those no longer in use Need to reboot the system No...

Страница 56: ...ud rate of RS232 communication is inconsistent between printer and host CUTTER FAILED READY Cutter cannot cut off the media check media and cutter MEMORY FULL READY Printer buffer full due to loaded s...

Страница 57: ...on the printer at the other end 2 Check if the printer power is turned on If the data has been sent but there is no output from the printer Check the active printer driver and see if Seagull Driver f...

Страница 58: ...em persists replace the print head For unstable ribbon roll rotation check the label path and make sure the head latch is securely closed Poor printout quality The ribbon may not be qualified or not m...

Страница 59: ...f print head may be very hot Please wait till print head cools down properly before maintenance Do not touch print head directly Caution Touch printer s metal frame to discharge static electricity or...

Страница 60: ...nt is very fragile To prevent from any possible damage please use soft cloth cotton buds with Ethanol or IPA to clean print head surface It s strongly recommended to wear hand gloves during cleaning p...

Страница 61: ...glue Note Clean the roller after it has been in contact with foreign materials such as dust or adhesives Cleaning Media Compartment Clean the media compartment with a cotton bud that has been moisten...

Страница 62: ...sensor x 1 movable Media Transmissive sensor x 1 Centrally fixed Head open switch Ribbon end sensor Operation Interface LED indicator Ready Media Ribbon x 3 Button Feed Config Pause Calibr Cancel Rese...

Страница 63: ...sin Resin Ribbon wound ink side out or ink side in Dimensions W 282 7mm x H 285 4mm x L 466 6mm Weight 9 kg Power Source Internal Universal Switching Power supply Input voltage 100 240V 50 60Hz Operat...

Страница 64: ...6 fonts with ASD smooth font Courier font with different symbol sets Symbol sets Code pages Courier font symbol set Roman 8 ECMA 94 PC PC A PC B Legal and PC437 Greek Russian Soft fonts Downloadable s...

Страница 65: ...point size Symbol sets Code pages 8 bits code page 437 850 852 860 863 865 857 861 862 855 866 737 851 869 1252 1250 1251 1253 1254 1255 7 bits code page USA BRITISH GERMAN FRENCH DANISH ITALIAN SPANI...

Страница 66: ...2 5 digit add on UPCA 2 5 digit add on UPCE 2 5 digit add on GS1 Data bar RSS 2D Barcodes MaxiCode PDF417 Data Matrix ECC 200 only QR code Composite Codes Aztec Barcode Printer Programming Language S...

Страница 67: ...subset A B C Interleave 2 of 5 Interleaved 2 of 5 with check sum Interleaved 2 of 5 with human readable check digit Code 93 Code 39 with check sum digit MSI EAN 8 Codabar Code 11 EAN 13 Plessey GS1 Da...

Страница 68: ...e pin assignments protocols and detailed information about how to properly interface your printer with your host or terminal USB Interface Connector Terminal Pin Assignment Pin Signal Description 1 VB...

Страница 69: ...Transmitted Data 4 No function No connection 5 GND Signal Ground 6 No function Shorted to Pin 1 7 Request to Send RTS Output Used as the control signal for H W Flow Control 8 Clear to Send CTS Input...

Страница 70: ...In Data 1 8 17 Ground 10 Out nACK 18 NC 11 Out BUSY 19 30 Ground 12 Out PE 31 In NC 13 Out 5V 32 Out nFAULT 14 In NC 33 35 NC 15 NC 36 In NC Auto Polling Both the serial port and parallel port of thi...

Страница 71: ...R TX 2 2 RX TX 3 2 RX RX 3 3 TX RX 2 3 TX CTS 5 7 RTS CTS 8 7 RTS RTS 4 8 CTR RTS 7 8 CTS GND 7 5 GND GND 5 5 GND Alternatively you can just connect the 3 wires in the following way Host 25S Printer 9...

Страница 72: ...off as flow control it will be problem free Baud rate 2400 4800 9600 default 19200 38400 57600 115200 bauds programmable by command Data format always 8 data bits 1 start bit and 1 stop bit Parity alw...

Страница 73: ...er operations including installation adjustment or recovery from paper jam please power off printer first and unplug printer s power cord Refer to the following steps to install the cutter kit onto pr...

Страница 74: ...ront Cover to the right to remove it off from printer 3 Thread Cutter Cable through the hole between print module and case 4 Find screws in cutter s box Install Cutter Module by fixing Cutter Bracket...

Страница 75: ...le to connector CUTTER on printer main board 6 Find Cutter Baby Board in cutter s box and then install onto J16 socket on printer main board 7 Assemble back the printer case Now cutter installation ha...

Страница 76: ...er the cutter in use is Rotary Cutter or Guillotine Cutter Then select proper settings via Seagull Driver for printer The following installation steps are based on TC408X as an example 1 Check TC408X...

Страница 77: ...al 3 Cutter Setup prompts will be indicated as below Check on the radio button Rotary if there s Rotary Cutter installed Then click OK Check on the radio button Guillotine if there s Guillotine Cutter...

Страница 78: ...Go to Printing Preference prompt of TC408X driver and then click on the Stock tag Check Mode settings and select Cut If there s Guillotine Cutter installed and partial cut function is needed select P...

Страница 79: ...cutter refer to Rotary Cutter Installation section to remove the rotary cutter Check the Cam as marked in Figure 2 find a slotted screwdriver to turn counter clockwise During turning the Cam of cutte...

Страница 80: ...uillotine cutter It is to control cut actions of guillotine cutter Find a Phillips screwdriver to lay down the blade by turning the screw as directions marked in the figures Then paper can be removed...

Отзывы: