background image


~ 17 ~ 


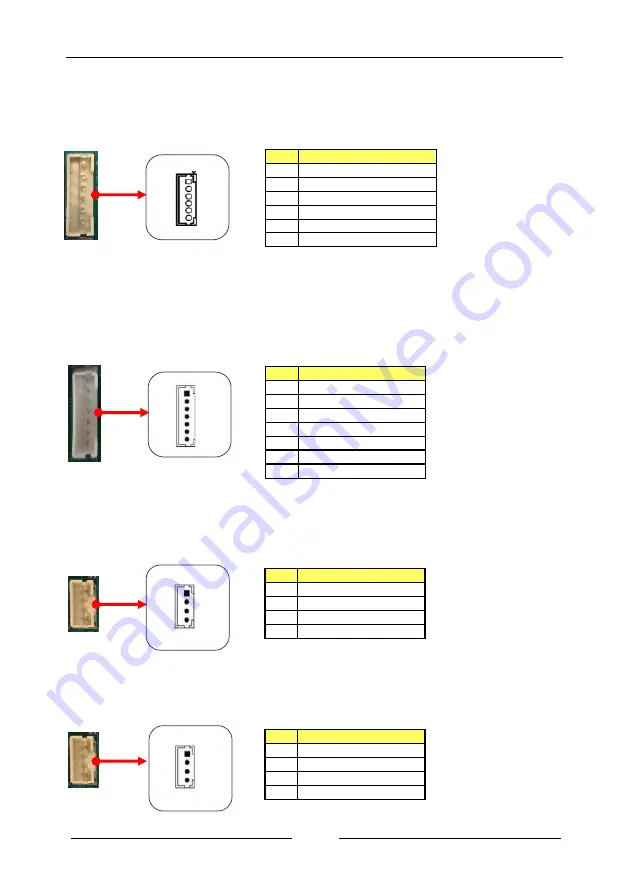
LVDS Backlight Control Header 

This is an 1 x 6 pin with pitch 2.00 mm header for LVDS backlight control 
interface. 


LVDS Brightness Control Header 

This is an 1 x 7 pin with pitch 2.00 mm header for LVDS brightness adjustment 
interface. 


Mic-In Header 

This is an 1 x 4 pin with pitch 2.00 mm header for Mic-in interface 


Line-In Header 

This is an 1 x 4 pin with pitch 2.00 mm header for Line-in interface 


Pin   

Definition 

+12V 

+12V 

INVERTER ENABLE 

LVDS_BACKLIGHT_CONTROL 

GND 

GND 

Pin   

Definition 

POWER ON BUTTON 

NC 

NC 

BRIGHTNESS UP 

BRIGHTNESS DOWN 

GND 

POWER LED 

Pin   

Definition 

MIC_L 

AUDIO_GND 

MIC_R 

MIC_In Plug In Detection 

Pin   

Definition 

LINE_IN_L 

AUDIO_GND 

LINE_IN_R 

LINE_IN Plug In Detection 

Содержание AMD V2000

Страница 1: ...ITX Board TM FP6 TM FP6 4DP TRADEMARK All products and company names are trademarks or registered trademarks of their respective holders These specifications are subject to change without notice Manual Revision 1 0 November 16 2021 ...

Страница 2: ...ff and on the user is encouraged to try to correct the interference by one or more of the following measures Reorient or relocate the receiving antenna Increase the separation between the equipment and receiver Connect the product into an outlet on a circuit different from that to which the receiver is connected Consult the dealer or an experienced radio TV technician for help Note1 Connecting thi...

Страница 3: ...nt to separate collection facilities for recovery and recycling DISPOSAL Do not dispose of this product as unsorted municipal waste Collect such waste separately for special treatment Manufacturer Sapphire Technology Limited Unit 1909 1919 19 F Tower 2 Grand Central Plaza 138 Shatin Rural Committee Road Shatin Hong Kong ...

Страница 4: ...t 11 M 2 M Key Slot 12 2 3 Connecting Cables and Jumper Settings 13 Front Panel Header 13 SATA Power Header 14 LVDS Connector 15 COM Header 15 USB2 0 Header 1x4 pin 2x4 pin 16 GPIO Header 16 SPI Header 16 LVDS Backlight Control Header 17 LVDS Brightness Control Header 17 Mic In Header 17 Line In Header 17 Speaker Out Header 18 Fan Headers 18 JP1 DP LVDS Select Jumper 18 JP2 JP5 LVDS Panel Resoluti...

Страница 5: ...7 RTC Wake Settings 29 CPU Configuration 30 SATA Configuration 31 SIO Configuration 32 PCI Subsystem Settings 32 USB Configuration 33 Network Stack Configuration 34 CSM Configuration 35 NVMe Configuration 37 Onboard Devices 37 AMD CBS 38 AMD PBS 42 3 5 Chipset Menu 43 South Bridge 43 North Bridge 44 3 6 Security Menu 45 3 7 Boot Menu 47 3 8 Save Exit Menu 48 4 1 Driver Install 49 ...

Страница 6: ...HDR System Memory Two 260 pin DDR4 SDRAM SO DIMM ECC Non ECC sockets Supports 1 2V DDR4 2133 2400 2666 2933 3200 DIMMs with dual channel architecture Supports 4GB 8GB 16GB and 32GB DDR4 SO DIMMs up to maximum 64GB Expansion Slots One M 2 Slot E key with 2230 type with PCIe x1 and USB2 0 for Wifi BT One M 2 Slot M key with 2280 storage type with PCIe x4 for SSD USB Ports Eight USB 2 0 ports two at ...

Страница 7: ...monitoring CPU and system temperature Back Panel I O Ports 1 x DC in 12V 24V Jack dimension 5 6x2 6mm 2 x DisplayPorts TM FP6 4 x DisplayPorts TM FP6 DP 2 x RJ45 Gigabit LAN port 2 x USB3 1 Gen 2 ports 2 x USB2 0 ports 1 x Line Out port 1 x Mic In port Internal I O Connectors 1 x DC in 2 pin 12V 24V Power connector 1 x LVDS connector 2 x SATA3 connectors 1 x SATA Power header 2 50mm pitch 4 x USB2...

Страница 8: ...mper 2 54mm pitch 1 x Auto Power ON jumper 2 54mm pitch 1 x LVDS Voltage Select Jumper 2 54mm pitch 1 x Clear CMOS jumper 2 54mm pitch BIOS 128Mb SPI Flash with AMI based BIOS Supports ACPI Advanced Configuration and Power Interface Onboard jumper to clear the CMOS data Form Factor Mini ITX form factor of 170mm 170mm Operating systems Supports Windows 10 64bit and Ubuntu 20 04 2 64bit Environmenta...

Страница 9: ... location of components on the mainboard See page 5 for component description See next page for details Note Picture is for reference only actual board may be slightly different 1 10 3 2 4 24 25 5 6 8 7 12 13 14 15 17 18 19 21 29 9 22 11 16 20 23 26 27 28 ...

Страница 10: ...ader 2 00mm pitch 14 COM1 COM2 Header for RS232 mode 2 54mm pitch 15 GPIO Header 2 00mm pitch 16 SPI Header 1 27mm pitch 17 Mic In Header 2 00mm pitch 18 Line In Header 2 00mm pitch 19 Speaker Out Header 2 00mm pitch 20 CPU Fan Header 2 54mm pitch 21 SYSTEM Fan Header 2 54mm pitch 22 DP1 LVDS Select Jumper 2 54mm pitch 23 Clear CMOS Jumper 2 54mm pitch 24 LVDS Panel Resolution Select Jumper 2 54mm...

Страница 11: ... indicate the status of the LAN LED LED Color LED state Indicates A Green Off LAN link is not established On LAN link is established Blinking LAN activity is occurring B N A Off 10 Mb s data rate Green On 100 Mb s data rate Yellow On 1000 Mb s data rate 2 1 DP0 option DP1 DP3 DP2 option Note 1 TM FP6 2 x DisplayPorts TM FP6 4DP 4 x Displayports 2 DP1 is shared with LVDS connector The default is DP...

Страница 12: ... 7 1 3 Mainboard Dimension PCB Size 170 x 170mm ...

Страница 13: ... 8 TM FP6 supports both active and passive cooling solutions Cooler size 89 x 69 x 18 3 mm active TM FP6 4DP TM FP6 ...

Страница 14: ... 9 Heatsink size 89 x 69 x 19 mm passive TM FP6 TM FP6 4DP ...

Страница 15: ... top socket DIMM slot 2 To use 2 DIMMs Install into DIMM slot 1 and DIMM slot 2 Memory Installation DDR4 and DDR3 memory modules are physically different Please only install DDR4 DIMMs on this mainboard To make sure you have the correct DIMM check that all the notches line up with the DDR4 DIMM slot To install the DIMM follow these steps 1 Align the notch in the DIMM with the key in the socket 2 I...

Страница 16: ...gn the notch on the M 2 wifi bluetooth card edge connector with the tab in the slot 2 Plug the M 2 wifi bluetooth card firmly into the slot at a 20 degree angle and until it clicks into place 3 Fasten M 2 wifi bluetooth card onto the nut with accompanied screws Key E Slot 22 30 Key E 12 contacts 12 pins Unit mm M1 M 2 E key for wifi bluetooth card M2 M 2 M key for M 2 SSD device Note Recommended t...

Страница 17: ...M 2 slot M 2 M Key Slot To install the M 2 SSD device 1 Remove screws and align the notch on the M 2 SSD device edge connector with the tab in the slot 2 Plug the M 2 SSD device firmly into the slot at a 20 degree angle and until it clicks into place 3 Fasten M 2 SSD device onto the nut with accompanied screws 20o Supported module type 2280 20o Key M Slot Key M 5 contacts 5 pins Unit mm 22 80 ...

Страница 18: ...S4 The LED is off PW_ON Pin5 and 6 Attach the power button cable from the case to these two pins Pressing the power button on the front panel turns the system on and off rather than using the onboard button HD_LED Pin3 and 4 Attach the hard disk drive indicator LED cable to these two pins The HDD indicator LED indicates the activity status of the hard disks Note The HDD indicator LED supports SATA...

Страница 19: ...provide 5V and 12V power to SATA3 HDD SSD Pin Definition 1 12V 24V 2 GND Pin Definition 1 GND 2 TX 3 TX 4 GND 5 RX 6 RX 7 GND Pin Definition 1 12V 2 GND 3 GND 4 5V Note There are two ways to source power to the board DC jack or 2 pin power connector Two different physical ports that can only be used one at a time e g When DC in 12V 24V jack is being used the 2 pin power connector shouldn t be conn...

Страница 20: ...10 LVDS_VDD 3 3V 5V 12V selectable 11 DDC_CLK 12 DDC_DATA 13 LVDS_BACKLIGHT_CONTROL 14 LVDS_VDD_ENABLE 15 LVDS_BACKLIGHT_ENABLE 16 GND 17 LVDS_A0 18 LVDS_A0 19 LVDS_A1 20 LVDS_A1 21 LVDS_A2 22 LVDS_A2 23 LVDS_ACLK 24 LVDS_ACLK 25 LVDS_A3 26 LVDS_A3 27 GND 28 GND 29 LVDS_B0 30 LVDS_B0 31 LVDS_B1 32 LVDS_B1 33 LVDS_B2 34 LVDS_B2 35 LVDS_BCLK 36 LVDS_BCLK 37 LVDS_B3 38 LVDS_B3 39 GND 40 GND Pin Defin...

Страница 21: ...board It can connect a variety of simple one or two wire devices SPI Header The SPI header 1 27mm pitch is for SPI signal interface Pin Definition 1 VDD 2 DATA 3 DATA 4 GND Pin Definition Pin Definition 1 VDD 2 GND 3 DATA 4 DATA 5 DATA 6 DATA 7 GND 8 VDD Pin Definition Pin Definition 1 GPIO1 2 GPIO2 3 GPIO3 4 GPIO4 5 GPIO5 6 GPIO6 7 GPIO7 8 GPIO8 9 VCC 3 3V_ALW 10 GND Pin Definition Pin Definition...

Страница 22: ... with pitch 2 00 mm header for Mic in interface Line In Header This is an 1 x 4 pin with pitch 2 00 mm header for Line in interface Pin Definition 1 12V 2 12V 3 INVERTER ENABLE 4 LVDS_BACKLIGHT_CONTROL 5 GND 6 GND Pin Definition 1 POWER ON BUTTON 2 NC 3 NC 4 BRIGHTNESS UP 5 BRIGHTNESS DOWN 6 GND 7 POWER LED Pin Definition 1 MIC_L 2 AUDIO_GND 3 MIC_R 4 MIC_In Plug In Detection Pin Definition 1 LINE...

Страница 23: ...e fans are automatically turned off after the system enters S3 S4 or S5 mode JP1 DP LVDS Select Jumper You can use JP1 to select DP1 or LVDS as the default output setting Pin Definition 1 SPEARK_OUT_L 2 AUDIO_GND 3 AUDIO_GND 4 SPEARK_OUT_R Pin Definition 1 GND 2 12V 3 Sense 4 Control Pin Definition 1 GND 2 12V 3 Sense 4 Control Pin Settings 1 2 DP1 Default 2 3 LVDS Note The CPU fan cable can be ei...

Страница 24: ...efault JP2 1 2 JP3 1 2 JP4 1 2 JP5 2 3 1110 18 5 W LED 1366x768 AUO_M185_VD JP2 1 2 JP3 1 2 JP4 2 3 JP5 1 2 1101 18 5 W LCD 1366x768 AUO_M185_V5 JP2 1 2 JP3 1 2 JP4 2 3 JP5 2 3 1100 17 W LCD 1280x1024 AUO_M17 JP2 1 2 JP3 2 3 JP4 1 2 JP5 1 2 1011 15 W 1024x768 AUO_15 JP2 1 2 JP3 2 3 JP4 1 2 JP5 2 3 1010 15 W 1024x768 CPT15 Pin Settings 1 2 Disable Press power button manually to power on after power...

Страница 25: ...MOS data to reconfigure the system back to the default values stored in the ROM BIOS Settings 1 2 Normal default 2 3 Clear CMOS To clear CMOS data please follow the steps below 1 Turn off the system 2 Change the jumper from 1 2 to 2 3 position for a few seconds 3 Replace the jumper back to the 1 2 position 4 Turn on the system and hold down the Del key to enter BIOS Setup 1 3 ...

Страница 26: ...ing the BIOS parameters is critical to maintain optimal system performance Use the following procedure to change BIOS settings 1 Power on the computer 2 Press the Del or F2 key to enter BIOS Setup during BIOS Power On Self Test POST Note1 It is strongly recommended that you do not change the default BIOS settings Changing some settings could damage your computer Note2 The BIOS options in this manu...

Страница 27: ... Moves cursor left or right to select screens Moves cursor up or down to select items Enter To bring up the selected item To change option for the selected items F1 To display the General Help Screen F2 To load previous values for all the settings F3 F9 To load optimized default values for all the settings F4 F10 To save changes and exit the setup utility ESC To jump to the Exit Screen or exit the...

Страница 28: ...usted by users System Time Allows you to set the system time The time format is hour minute second Advanced Chipset Security Boot Save Exit Aptio Setup Utility Copyright C 2021 American Megatrends Inc Setup Main BIOS Information BIOS Vendor American Megatrends Core Version 5 16 Compliancy UEFI 2 7 PI 1 6 Project Version V013 I914I013 ROM x64 Build Date and Time 09 10 2021 12 19 30 Access Level Adm...

Страница 29: ...eneral Help F2 Previous Values F3 F9 Optimized Defaults F4 F10 Save and Exit ESC Exit Aptio Setup Utility Copyright C 2021 American Megatrends Inc Setup Advanced TPM 2 0 Device Found Firmware Version 7 40 Vendor IFX Security Device Support Enable Active PCR banks SHA 1 SHA256 Available PCR banks SHA 1 SHA256 SHA 1 PCR Bank Enabled SHA256 PCR Bank Enabled Pending operation None Platform Hierarchy E...

Страница 30: ... reboot during restart in order to change State of Security Device Options None TPM Clear Platform Hierarchy Enable or disable Platform Hierarchy Options Enabled Disabled Storage Hierarchy Enable or disable Storage Hierarchy Options Enabled Disabled Endorsement Hierarchy Enable or disable Endorsement Hierarchy Options Enabled Disabled TPM2 0 UEFI Spec Version Select the TCG2 Spec Version Support T...

Страница 31: ... The default is 80 EuP Function Enables the EuP Energy Using Products function allows BIOS to switch off some power at S5 state to get system ready for the EuP requirement to reduce power consumption Options Enabled Disabled Aptio Setup Utility Copyright C 2021 American Megatrends Inc Setup Advanced ACPI Settings Enable Hibernation Enabled ACPI Sleep State S3 Suspend to RAM APU ACPI Shutdown Tempe...

Страница 32: ... Setup Advanced PC Health Status APU Fan Stopped Working Prompt Disabled SmartFan Configuration APU Temperature 57 oC System Temperature 34 oC APUFAN Speed 895 RPM SYSFAN Speed N A APU Vcore 1 256 V APU NB 0 744 V VCC3V 3 312 V Select Screen Select Item Enter Select Change Opt F1 General Help F2 Previous Values F3 F9 Optimized Defaults F4 F10 Save and Exit ESC Exit Version 2 20 1275 Copyright C 20...

Страница 33: ...y the system Aptio Setup Utility Copyright C 2021 American Megatrends Inc Setup Advanced SmartFan Configuration APU Fan Mode Setting SmartFan Highest Fan Speed In Percentage 100 Highest Temperature Threshold oC 85 2nd Fan Speed In Percentage 60 2nd Temperature Threshold oC 80 3rd Fan Speed In Percentage 50 3rd Temperature Threshold oC 70 4th Fan Speed In Percentage 30 4th Temperature Threshold oC ...

Страница 34: ...current time Increment in minutes s after shutdown When enabled the related items will appear Options Enabled Disabled Duration minute This item allows you to set duration time to wake system Options 1 30 Aptio Setup Utility Copyright C 2021 American Megatrends Inc Setup Advanced Wake system at specific Time Disabled Wake System duration after Disabled shutdown Version 2 20 1275 Copyright C 2021 A...

Страница 35: ... 2021 American Megatrends Inc Setup Advanced CPU Configuration Module Version RenoirCpu 08 AGESA Version Embedded FP6 PI 1006 NX Mode Enabled SVM Mode Enabled CPU Information Version 2 20 1275 Copyright C 2021 American Megatrends Inc Enable or disable No execute page protection function Select Screen Select Item Enter Select Change Opt F1 General Help F2 Previous Values F3 F9 Optimized Defaults F4...

Страница 36: ... L1 Data Cache 32 KB 8 way L2 Cache 512 KB 8 way Total L3 Cache per Socket 8 MB 16 way Version 2 20 1275 Copyright C 2021 American Megatrends Inc Aptio Setup Utility Copyright C 2021 American Megatrends Inc Setup Aptio Setup Utility Copyright C 2021 American Megatrends Inc Setup Advanced SATA Configuration SATA Controller 0 Port0 S1 SATA SAMSUNG SSD 885 256 0GB Port1 S2 SATA Not Present SATA Contr...

Страница 37: ...s Single Root IO Virtualization Support Select Screen Select Item Enter Select Change Opt F1 General Help F2 Previous Values F3 F9 Optimized Defaults F4 F10 Save and Exit Aptio Setup Utility Copyright C 2021 American Megatrends Inc Setup Advanced AMD SIO Driver Version A5 10 00 Super IO Chip Logical Device s Configuration Active Serial Port 1 Active Serial Port 2 WARNING Logical Device state on th...

Страница 38: ...isabled USB transfer time out The time out value for control bulk and interrupt transfers Options 1 sec 5 sec 10 sec 20 sec Aptio Setup Utility Copyright C 2021 American Megatrends Inc Setup Advanced USB Configuration USB Module Version 25 USB controllers 2 XHCIs USB Devices 1 Keyboard 1 Mouse 1 Hub Legacy USB Support Enabled XHCI Hand off Enabled USB Mass Storage Driver Support Enabled USB Hardwa...

Страница 39: ...tack This item is used for network boot in UEFI mode Options Enabled Disabled Ipv4 PXE Support This item is used to enable or disable the Ipv4 PXE boot support If disabled Ipv4 PXE boot option will not be available Options Enabled Disabled Aptio Setup Utility Copyright C 2021 American Megatrends Inc Setup Advanced Network Stack Enabled Ipv4 PXE Support Enabled Ipv4 HTTP Support Disabled Ipv6 PXE S...

Страница 40: ...t Press ESC key to abort the PXE boot Options 0 5 sec Media detect count Number of times the presence of media will be checked CSM Configuration Aptio Setup Utility Copyright C 2021 American Megatrends Inc Setup Advanced Compatibility Support Module Configuration CSM Support Enabled CSM16 Module Version 07 83 GateA20 Active Upon Request Option ROM Messages Force BIOS INT19 Trap Response Immediate ...

Страница 41: ...o mode This will suppress option ROM messages Option ROMs requiring interactive inputs may not work properly in this mode INT19 Trap Response This item allows BIOS reaction on INT19 trapping by option ROM Immediate Execute the trap right away Postponed Execute the trap during legacy boot HDD Connection Order Some OS require HDD handles to be adjusted i e OS is installed on drive 80h Options Adjust...

Страница 42: ...Item Enter Select Change Opt F1 General Help F2 Previous Values F3 F9 Optimized Defaults F4 F10 Save and Exit ESC Exit Aptio Setup Utility Copyright C 2021 American Megatrends Inc Setup Advanced Onboard GigaLAN0 Enabled Onboard GigaLAN1 Enabled M 2 E Key Socket PCIE x1 Enabled M 2 M Key Socket PCIE x4 Enabled HD Audio Azalia Device Enabled Bluetooth device M 2 E key Enabled WatchDog Timer Disabled...

Страница 43: ...d Enabled WatchDog Timer Allow you to enable WatchDog timer expires during OS boot When set to Enabled option The following items will appear Time of watchdog timer second Allows you set a period of seconds for watchdog timer Options 5 255 second AMD CBS Aptio Setup Utility Copyright C 2021 American Megatrends Inc Setup Advanced AMD CBS CPU Common Options UMC Common Options NBIO Common Options FCH...

Страница 44: ...OF FACTORY SETTINGS ARE NOT COVERED UNDER YOUR AMD PRODUCT WARRANTY AND MAY NOT BE CONVERED BY YOUR SYSTEM MANUFACTURE S WARRANTY Operating your AMD processor outside of specification or in excess of factory settings including but not limited to overclocking may damage or shorten the life of your processor or other system components create system instabilities e g data loss and corrupted images an...

Страница 45: ...ion to enable disable DRAM ECC Auto will set ECC to enable Options Enabled Disabled Auto DRAM UECC Retry Use this option to enable disable DRAM UECC Retry Options Enabled Disabled NBIO Common Options IOMMU This item allows you to enable or disable the IOMMU Input Output Memory Management Unit Options Disabled Enabled Auto PSPP Policy This item allows you to select PCIe speed power policy Options D...

Страница 46: ... UMA version Options Legacy Non Legacy Hybrid Secure Auto Audio Configuration DP HDMI Audio Allows you to enable or disable the Integrated HD Audio Controller Options Disabled Enabled Auto SMU Common Options System Configuration This item allows you to select the System Configuration Options 10W POR Configuration 15W POR Configuration 25W POR Configuration Auto Warning Select System Configuration ...

Страница 47: ...9 Optimized Defaults F4 F10 Save and Exit ESC Exit Advanced AMD Firmware Version AGESA Version EmbeddedPI FP6_1 0 0 3 PSP BootLoader Version 0 11 0 65 PSP SecureOS Version 0 11 0 65 ABL Version 11253031 APCB Version 0030 APOB Version 0018 Ucode Patch Version 8600106 SMU FW Version 0 55 82 0 DXIO FW Version 0037 02FB MP2 FW Version 4 0 5 8 KVM Engine Version 48 48 2071 VBIOS FW Version 113 V2000 00...

Страница 48: ...Chipset South Bridge North Bridge Version 2 20 1275 Copyright C 2021 American Megatrends Inc South Bridge Parameters Select Screen Select Item Enter Select Change Opt F1 General Help F2 Previous Values F3 F9 Optimized Defaults F4 F10 Save and Exit ESC Exit Aptio Setup Utility Copyright C 2021 American Megatrends Inc Setup Chipset SB USB Configuration Version 2 20 1275 Copyright C 2021 American Meg...

Страница 49: ...4 Memory Information Version 2 20 1275 Copyright C 2021 American Megatrends Inc View Information related to Socket 0 Select Screen Select Item Enter Select Change Opt F1 General Help F2 Previous Values F3 F9 Optimized Defaults F4 F10 Save and Exit ESC Exit Chipset Memory Information Staring Address 0 KB Ending Address 16777215 KB Dimm1 Dimm0 size 8192 MB Current speed 2400 MTs Max speed 2400 MTs D...

Страница 50: ... in setup does not have any impact on HDD when password is set or removed If the Set HDD User Password option is hidden do power cycle to enable the option again To set a password enter it twice and acknowledge by pressing Return The password must be 1 to 12 characters long Main Advanced Chipset Boot Save Exit Aptio Setup Utility Copyright C 2021 American Megatrends Inc Setup Security Password Des...

Страница 51: ...ssword 2 To Clear Password please input Enter 3 To complete clearing old password please select Yes when the following message shows up Secure Boot Secure Boot feature is Active if Secure Boot is Enabled Platform Key PK is enrolled and the system is in user mode The mode change requires platform reset ...

Страница 52: ...s that appears on the screen depends on the number of devices installed in the system Network Device BBS Priorities Allows you to configure the boot order for a specific Network device class Main Advanced Chipset Security Save Exit Aptio Setup Utility Copyright C 2021 American Megatrends Inc Setup Boot Boot Configuration Setup Prompt Timeout 1 Bootup NumLock State On Full Screen Logo Enabled Boot ...

Страница 53: ...in the boot order Select a drive to immediately boot that device regardless of the current boot order Launch EFI Shell from filesystem device Attempts to launch EFI Shell application Shellx64 efi form one of the available filesystem devices Main Advanced Chipset Security Boot Aptio Setup Utility Copyright C 2021 American Megatrends Inc Setup Save Exit Save Options Save Changes and Reset Discard Ch...

Страница 54: ...l utilities that enhance the motherboard features 4 1 Driver Install Insert the bundled driver DVD into your optical drive and the main menu will be displayed on your PC screen Click each item button and select the item you want to install Note If Autorun function is not enabled in your computer browse the contents of the support DVD to locate the file autorun exe and click this file to run the DV...

Отзывы: