background image

_

English

_


IMPORTANT SAFETY INSTRUCTIONS 

 
When using an electrical appliance, basic precautions should always be followed, including the 
following: 


The assorted adapter cannot be washed or contact with water.   


No washing or contacting water while the shaver is under charging.       


Do not touch the adapter that is on the electric outlet or the charging shaver with wet hands.   


Start shaving by applying skin lotion and water, but do not use while bathing or in the shower. 


Disconnect the appliance from the power supply cord before cleaning.   


Do not place or store this appliance where it can fall or be pulled into a tub or sink. Do not 
place or drop into water or other liquids.   


Do not open the shaver switch or shave under charging, the appliance is not plug and play type.   


Please keep the appliance out of the reach of children.   


Close supervision is necessary when this appliance is used by individuals with certain 
disabilities or special needs. 


Never operate this appliance if it has a damaged cord or plug or if it is not working properly, if 
it has been dropped or damaged, or if it has been dropped into water deeper than 20cm over 30 
minutes.   


Keep the appliance away from heated surfaces. 


Never drop or insert any objects into the appliance’s openings.   


Household use only.   


Do not use outdoors or operate where aerosol (spray) products are being used or where oxygen 
is being administered. 


Always attach the plug to the appliance, then to outlet. Never pull on electric cord. 


Do not use an extension cord or a voltage converter with this appliance.   


Do not wrap the cord around the appliance. 


Always store this appliance and cord in a moisture-free area. Do not store it in temperatures 
exceeding 140°F (60°C).   


Detach removable power cords from appliance for storage.   


Do not use this appliance with a damaged or broken head or cutters, as facial injury may occur.   


The power unit is intended to be correctly oriented.   


Shavers, including the trimmer, are for use on facial hair only. They should  not be used for 
shaving the hair on your head or any other part of your body.   


This appliance is not intended for use by persons (including children) with reduced physical, 
sensory or mental capabilities, or lack of experience and knowledge, unless they have been 
given supervision or instruction concerning use of the appliance by a person responsible for 
their safety. 


Children should be supervised to ensure that they do not play with the appliance. 


INSTRUCTION FOR USE 
 
Before using for the first time, read the important safety instruction in front of the manual. 

1.


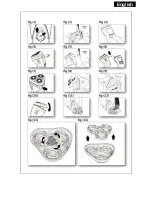
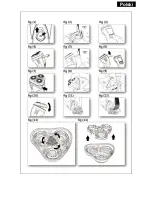
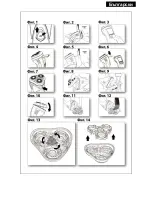
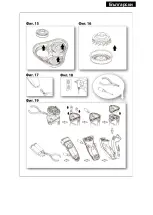
Plug power adaptor into shaver. (Diagram 1) 

2.


Note: 

When push on the switch, please press the lock button on the switch.   

3.


Shave face and neck with circular manner. (Diagram 2)     

4.


Please push the power switch to close it after using. 


Содержание Z-1814-B

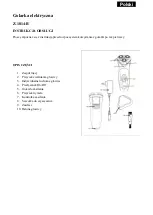
Страница 1: ...lease read all the instructions before using the shaver for the first time PARTS LIST 1 Cutter assembly 2 Head release button 3 Individual flexing head 4 On Off switch 5 Power port 6 Trimmer button 7 Charge indicator 8 Cleaning brush 9 Charger 10 Head guard ...

Страница 2: ..._English_ ...

Страница 3: ..._English_ ...

Страница 4: ...tdoors or operate where aerosol spray products are being used or where oxygen is being administered Always attach the plug to the appliance then to outlet Never pull on electric cord Do not use an extension cord or a voltage converter with this appliance Do not wrap the cord around the appliance Always store this appliance and cord in a moisture free area Do not store it in temperatures exceeding ...

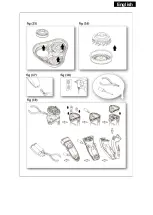
Страница 5: ...ir Diagram 5 4 Please close the long hair trimmer Diagram 6 5 Please push the power switch to close it after using USE INSTRUCTION OF CHARGER 1 Insert the charger output into shaver Diagram 17 2 Insert the charger input plug into AC power Diagram 18 3 Unplug the adapter after 8 hours Suggestion Generally after 8 hours of charging the shaver may operate of about 35 minutes we suggest you take charg...

Страница 6: ...deep cleaning Additional remark Clean the shaver with liquid soap after separating each component according to above steps OTHER INSTRUCTIONS FOR USE When your rechargeable shaver reaches the end of its useful life the batteries must be removed from the shaver and be recycled or disposed of properly in accordance with your state and local requirements The method to disassemble shaver and take out ...

Страница 7: ..._English_ TECHNICAL SPECIFICATION Name of product Electric shaver Input of shaver DC 2 8V 100mA Input of charger AC 220 240V 50Hz ...

Страница 8: ...kcją przed rozpoczęciem korzystania z golarki po raz pierwszy OPIS CZĘŚCI 1 Zespół tnący 2 Przycisk zwalniania głowicy 3 Indywidualne ruchome głowice 4 Przełącznik On Off 5 Gniazdo zasilania 6 Przycisk trymera 7 Kontrolka zasilania 8 Szczotka do czyszczenia 9 Zasilacz 10 Osłona głowicy ...

Страница 9: ..._Polski_ ...

Страница 10: ..._Polski_ ...

Страница 11: ...dy głębiej niż 20 cm na okres 30 minut Przechowuj urządzenie z dala od gorących powierzchni Nie wolno wpuszczać ani wkładać żadnych przedmiotów w otwory urządzenia Tylko do użytku handlowego Nie używaj golarki na zewnątrz ani tam gdzie produkty zawierające aerozol spray są wykorzystywane lub gdzie podawany jest tlen Należy podłączać wtyczkę do urządzenia a następnie do gniazdka elektrycznego Nigdy...

Страница 12: ...ziennie przez okres do czterech tygodni aby dać czas włosom i skórze aby przyzwyczaiły się do nowego systemu golenia INSTRUKCJA DO TRYMERA DO DŁUGICH WŁOSÓW Trymer do długich włosów służy do golenia brody i włosów dłuższych niż 5mm 1 Naciśnij przełącznik zasilania Diagram 1 2 Otwórz trymer przez przesunięcie przełącznika trymera w dół Diagram 3 Diagram 4 3 Rozpocznij golenie długiej brody lub włos...

Страница 13: ...ktywności 1 Wykonaj codzienne czynności czyszczące z w w pkt 1 i 2 2 Umieścić kroplę płynnego mydła we zewnętrzu w pobliżu każdego noża Diagram 11 3 Wyczyść starannie mydło z użyciem dołączonej szczotki Diagram 12 4 Zdejmij głowicę odkręcając zamek w kierunku oznaczonym w zamku Diagram 13 potem wyjmij wspornik blokady Diagram 14 usuń i oddziel głowicę jedną po drugiej Diagram 15 Diagram 16 wyczyść...

Страница 14: ...oże wystąpić podrażnienia skóry Proszę nie używać jej ponownie lecz wymienić głowicę Uczucie podrażnienie w pierwszej chwili jest wyjątkiem skóra może być nieprzyzwyczajona do nowej metody golenia 2 Ciągnięcie Kiedy noże są zużyte możesz mieć odczucie ciągnięcia i utratę bliskości podczas golenia Oznacza to że nadszedł czas aby wymienić głowicę i noże SPECYFIKACJA TECHNICZNA Nazwa produktu Golarka...

Страница 15: ...ции преди да използвате самобръсначката за първи път ОПИСАНИЕ НА ЧАСТИТЕ 1 Бръснеща част 2 Бутон за освобождаване на главата 3 Бръснещи глави 4 Бутон за Вкл Изкл 5 Букса за зареждане 6 Бутон за изваждане на тримера 7 Индикатор за зареждане 8 Почистваща четка 9 Зарядно устройство 10 Предпазител на бръснещата част ...

Страница 16: ..._Български_ ...

Страница 17: ..._Български_ ...

Страница 18: ...от 30мин Дръжте уреда далеч от източници на топлина Не изпускайте и не пъхайте никакви предмети в отворите на уреда Уредът е предназначен само за домашна употреба Не използвайте на открито или в помещения където се използват аерозолни продукти или има висока концентарция на кислород Винаги свързвайте зарядното устройство първо с уреда и след това го включвайте в контакта Никога не дърпайте захранв...

Страница 19: ...а използвате самобръсначката ежедневно за най много четири седмици за да може кожата Ви да свикне с новата система за бръснене ИНСТРУКЦИИ ЗА РАБОТА С ТРИМЕРА Тримерът се използва за подстригване на брада или коса над 5мм 1 Натиснете бутона за Вкл Изкл Фигура 1 2 Отворете тримера като натиснете бутона за отваряне на тримера надолу Фигура 3 Фигура 4 3 Подстрижете дългата брада или коса Фигура 5 4 За...

Страница 20: ... дълъг живот на самобръсначката и ефективно бръснене 1 Изпълнете стъпки 1 и 2 от инструкциите за общо почистване 2 Поставете по капка течен сапун във вътрешността близо до всяко ножче Фигура 11 3 Избършете сапуна като използвате четката от комплекта Фигура 12 4 Демонтирайте бръснещата глава развийте заключващата част в оказаната посока Фигура 13 след това махнете заключващата скоба Фигура 14 махне...

Страница 21: ...м 1 Раздразнение При наличие на износване на главите може да получите раздразнение на кожата Моля не използвайте самобръсначката отново подменете бръснещата глава Раздразнението при първоначалната употреба е изключение кожата Ви може да не е свикнала с новия метод на бръснене 2 Подръпване При износване на ножчетата може да почувствате подръпвания при бръснене Това е индикация че е време да подмени...

Отзывы: