background image

5

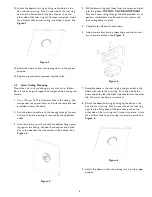
12. Attach the dome/trim ring by lining up the dots on the

box and the trim ring. Push on one side of the trim ring
near the the flat section of the box, then push on the
other side of the trim ring until it snaps into place. Listen
for a distinct click to ensure ring is securely in place. See
Figure 3.

Figure 3

13. Adjust the dome so that the viewing slot is in the proper

position.

14. Replace any previously removed  adjacent tiles.

4.2

Hard Ceiling Mounting

Mount the unit in a hard ceiling, e.g. dry wall etc. as follows.
Be sure the ceiling will support the weight of the housing and
camera.

1. Cut a 172 mm (6.75 in) diameter hole in the ceiling. Use

two pencils (or a pencil and a nail) with the template tool
provided to draw the circle.

2. Run the electrical cable into the housing through the con-

duit and the hole in ceiling as required by the applicable
codes.

3. Install box into pre-cut hole with the bottom flange press-

ing against the ceiling. Position the round section of the
box in the direction that the camera will be aimed. See
Figure 4.

Figure 4

4. Pull the drawstring tight (away from the screw) and lock

into the groove. DO NOT CUT DRAWSTRING
Push the excess string through the hole provided. As an
option, a screwdriver may be used to turn screws and
lock ceiling clamps in place.

5. Complete the electrical connections.

6. Adjust camera bracket to proper angle and mount cam-

era to camera bracket. See Figure 5.

Figure 5

7. Assemble dome in the trim ring by lining the slots in the

dome with tabs in the trim ring. Push one side of the
dome under the tab; the other side should clear the other
tab. Now turn the dome to secure it.

8. Attach the dome/trim ring by lining up the dots on the

box and the trim ring. Push on one side of the trim ring
near the the flat section of the box, then push on the
other side of the trim ring until it snaps into place. Listen
for a distinct click to ensure ring is securely in place. See
Figure 6.

Figure 6

9. Adjust the dome so that the viewing slot is in the proper

position

Содержание VSE-6300 SERIES

Страница 1: ...300 SERIES INSTRUCTION MANUAL 6 inch Fixed In Ceiling Dome Housings About this manual Before installing and using this unit please read this manual carefully Be sure to keep it available for later reference ...

Страница 2: ...nto this unit through openings as they may touch dangerous voltage points or short out parts that could result in a fire or electric shock Never spill liquid of any kind on the unit 15 Servicing Do not attempt to service this unit yourself as opening or removing covers may expose you to dangerous voltage or other hazards Refer all servicing to qualified service personnel 16 Damage Requiring Servic...

Страница 3: ...trucciones de operación y mantenimiento importantes acompañan al equipo PRECAUCIONES DE SEGURIDAD Debido a limitaciones de espacio esta etiqueta puede aparecer en la parte inferior de la unidad CONTENTS 1 UNPACKING 3 2 SERVICE 3 3 DESCRIPTION 3 4 INSTALLATION 4 5 MAINTENANCE 6 6 DIMENSIONAL OUTLINE 6 WARRANTY 7 1 UNPACKING Unpack carefully This equipment should be handled with care Check to ensure...

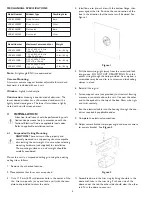
Страница 4: ...t supplied for installation The mounting surface and unit s weight should be carefully considered Mount the unit in a suspended ceiling grid using the existing ceiling tile as follows 1 Remove tile at desired location 2 Move adjacent tiles for access as required 3 Cut a 172 mm 6 75 in diameter hole in the center of the tile Use two pencils or a pencil and a nail with the tem plate tool provided to...

Страница 5: ...ottom flange press ing against the ceiling Position the round section of the box in the direction that the camera will be aimed See Figure 4 Figure 4 4 Pull the drawstring tight away from the screw and lock into the groove DO NOT CUT DRAWSTRING Push the excess string through the hole provided As an option a screwdriver may be used to turn screws and lock ceiling clamps in place 5 Complete the elec...

Страница 6: ... of isopropyl alcohol diluted with water While holding the dome with its opening facing down wipe the interior using a circular motion spiraling in toward the center Use a new paper towel for each two passes To clean the exterior of the dome use any nonabrasive clean ing cloth and cleaning agent that is safe for use on acrylic plastic Liquid or spray cleaner wax suitable for use on fine furniture ...

Страница 7: ... any party to assume for it any other obligation or liability SFC DISCLAIMS ALL OTHERWARRANTIES EXPRESS OR IMPLIED WITH REGARDTOTHIS PRODUCT INCLUDINGTHEWARRANTIES OF MERCHANTABILITY AND FITNESS IN NO EVENT SHALL SFC BE LIABLE FOR ANY SPECIAL INCIDENTAL OR CONSEQUENTIAL DAMAGES ARISING FROM THE OWNERSHIP OR USE OF THIS PRODUCT OR FOR ANY DELAY IN THE PERFORMANCE OF ITS OBLIGATIONS UNDERTHISWARRANT...

Страница 8: ...Sanyo Fisher Company Security Video Division 21605 Plummer Street Chatsworth CA 91311 Tel 818 998 7322 Fax 818 717 2716 Technical Support 888 66SANYO Printed in USA 100 0008 001 SAN 6 02 ...

Отзывы: