-
2
-
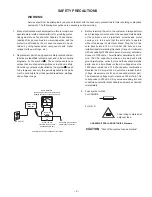
AC VOLTMETER
(5000 ohms per volt or more sensitivity)
Reading should not exceed 300 mVrms
1500 Ohm
10 Watt
0.15uF 150 VAC
Place this probe on each
exposed metallic part
Good earth ground such as
a water pipe,conduit etc.
Voltmeter Hook-up for Leakage Current Check
AC OUTLET
SAFETY PRECAUTIONS
WARNING:
Service should not be attempted by anyone unfamiliar with the necessary precautions for this recording or playback
equipment. The following precautions are necessary during servicing:
1.
Many electrical and mechanical parts in this recorder have
special safety-related characteristics for providing protec-
tion against shock, fire and other hazards. These charac-
teristics often go unnoticed in a visual inspection, and the
protection afforded by them cannot necessarily be ob-
tained by using replacement components with higher
ratings (voltage, wattage, etc.).
2.
Replacement parts having special safety-related charac-
teristics are identified in this manual, and in the schematic
diagrams, by the symbol
. These components have
values that are of special significance to product safety.
Should any component (identified by the symbol
) need
to be replaced, use only the part designated in the parts
List. Do not deviate from the specified resistance, wattage,
and voltage ratings.
3.
Before returning the set to the customer, always perform
an AC leakage current check on the exposed metallic parts
of the cabinet, such as terminals, screwheads, metal
overlays, etc. to be sure that the set is safe to operate
without the danger of electrical shock, Plug the AC line
cord directly into a 120 V AC outlet. (Do not use a line
isolation transformer during this check.) Use an AC voltmeter
with a sensitivity of 5000 ohms per volt (or more) as follows:
Connect a 1500 ohms, 10 watt resistor, paralleled by a 0.15
mfd, 150 VAC capacitor, between a known good earth
ground (water pipe, conduit, etc.) and the exposed metallic
parts, one at a time. Measure the AC voltage across the
1500 ohms resistor and 0.15 mfd capacitor combination.
Reverse the AC plug at the AC outlet and repeat the AC
voltage measurements for each exposed metallic part.
The measured voltage must not exceed 300 mVrms. This
corresponds to 200 µA AC. Any value exceeding this limit
constitutes a potential shock hazard and must be corrected
immediately.
4.
Fuse symbol marks.
For CANADA
UNDERWRITERS LABORATORIES Standard
CAUTION
"Risk of fire-replace fuse as marked"
For U.S.A.
Fuse rating is marked at
adjacent fuse.
Color LCD
monitor


