


– 2 –
Surface Mount
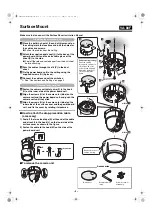
Make sure to also consult the Surface Cover Instruction Manual.
1
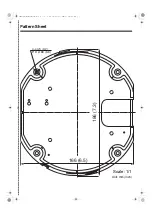
Place the pattern sheet at the end of this manual on
the ceiling, mark the locations and drill the holes for
the cables and screws.
●
Pull out the cables from the ceiling.
2
Attach the supplied dust sheet (A) to the base of the
power board unit and the detachable piece of the
sheet (B) to the side.
●
Peel off the release-coated paper from the dust sheet
before attaching.
3
Pass the cables through the slit (C) in the dust
sheet.
4
Fix the power board unit to the ceiling using the
supplied screws (D) (4 places).
5
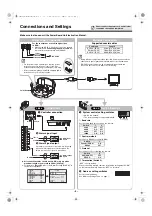
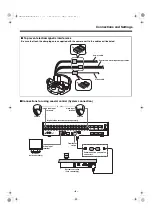
Connect the cables and set the switches.
☞
See “Connections and Settings” on page 5.
6
Fasten the camera unit safety wire (F) to the hook
(G) on the inner side of the power board unit.
7
Align the arrows (H) of the same color (blue) on the
camera unit and the power board unit, and push the
camera unit until they click.
8
Align the arrows (H) of the same color (blue) on the
inner side of the surface cover and the power board
unit, and fix the cover by rotating it clockwise.
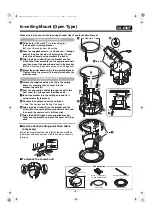
■
How to attach the drop-prevention cable
(accessory)
1) Peel off the two-sided tape (K) at the end of the cable
and attach it to the hook (L) on the inner side of the
surface cover as shown in the figure.
2) Fasten the cable to the hook (M) on the side of the
power board unit.
■
To remove the camera unit
1. Installing the power board unit
2. Mounting the camera unit
M
K
L
Protrusion
2
1
3
6
4
E
A
A
B
B
B
B
D
D
C
G
F
5
A
A
H; Blue
8
H; Blue
7
Removed in case of
surface routing.
Surface routing (ceiling)
Pass the cables
through the cable hole
(E) at the side of the
power board unit, and
attach the dust sheet
(A) as shown in the
figure.
VA-80F
Accessories
Dust sheet
Drop-prevention
cable
Screw (for power
board unit)
L5BU2_XE(INSTALLATION).book 2 ページ 2007年8月1日 水曜日 午前11時7分


