


CONNECTIONS AND INSTALLATION
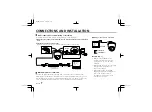
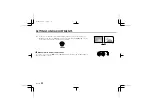
Basic connections for monitoring or recording
The peripheral devices (VCR, monitor, etc.) and cables are sold separately.
1
Make the video signal connection between the camera and the monitor or time lapse
VCR.
2
Plug the AC adaptor to a wall outlet.
Adjust the picture on the monitor using the Brightness and Contrast controls.
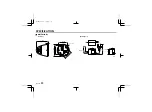
Multiple cameras connection
You can use multiple cameras by connecting them a camera switcher or a quad unit (sold
separately), then conducting the surveillance from one location by splitting the monitor screen to
view the image from each camera, or by switching the image from each camera on the monitor
screen. For detailed information, please refer to the installed devices instruction manuals.
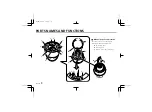
(Example of connection to a monitor)
CAUTION: (Fig. 1)
•
Make sure the AC adaptor is not
connected to the wall outlet before
connecting it to the 12 V DC input
terminals.
•
When making the connections be careful
to respect the polarity and not to
shortcut the terminals.
•
When using this unit, the supplied
clamping cores must be installed on the
power cord, in order to prevent
electromagnetic interference to the
other devices connected.
VIDEO IN
Time lapse VCR
VIDEO OUT VIDEO IN
Monitor
(sold separately)
(sold separately)
Fig. 1
+ –
VIDEO IN
: VIDEO IN
: VIDEO OUT
L53D2/XE GB 1998, 4, 14
English
7


