background image

22

COMPUTER MODE

PC ADJUSTMENT

This Projector can automatically tune to the display signals from most personal computers currently distributed.
However, some computers employ special signal formats which are different from the standard ones and may
not be tuned by the Multi-Scan system of this projector.  If this happens, the projector cannot reproduce a proper
image and the image may be recognized as a flickering picture, a non-synchronized picture, a non-centered
picture or a skewed picture.
This projector has a PC ADJUSTMENT function, to enable you to precisely adjust several parameters to match
with those special signal formats.  This projector has five independent memory areas to memorize those
parameters manually adjusted.  This enables you to recall the setting for a specific computer whenever you use
it. 

Note  : This PC ADJUSTMENT function cannot be operated when “RGB,” “HDTV1035i” or “HDTV1080i” is selected on the

SYSTEM MENU (P21).

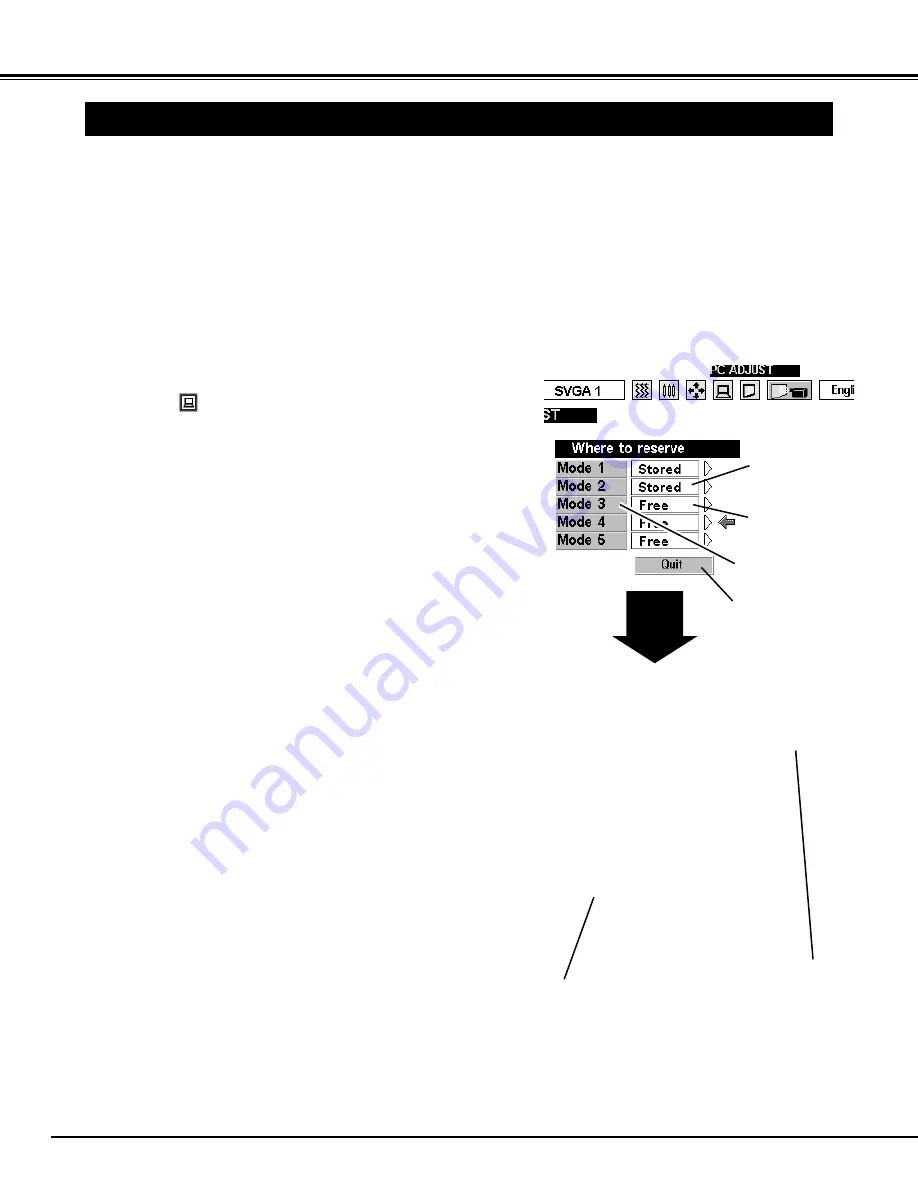
Press the MENU button and the ON-SCREEN MENU will
appear.  Press the POINT RIGHT/LEFT buttons to select PC
ADJUST 

and press the SELECT button.  Another dialog box

“Where to reserve” Menu will appear. 

In this dialog box, you can store the parameter into the area from
“Mode 1” to “Mode 5.”  When memorizing the new computer
parameter, select the Mode with the message “Free” by pressing
the POINT UP/DOWN buttons and the SELECT button.  To
change the parameters of the Mode previously set, select the
Mode with “Stored.”

1

2

When the Mode is selected, Parameter adjustment dialog box
appears.  Move the arrow to the item that you want to change by
pressing the POINT UP/DOWN buttons, and adjust each item to
match with your computer.  To change the value, press either
the POINT RIGHT / LEFT button.
Refer to the next page for adjusting each item.  

3

Move the arrow to “Stored” and press the SELECT button.  The
parameter is memorized in the selected Mode.

4

This Mode has
parameters being
stored.

Closes the PC
ADJUSTMENT Menu.

The Vacant Mode.

Manual set Computer
Mode (1 to 5).

Press the POINT
RIGHT/LEFT buttons to
adjust the value.

Press the SELECT
button to set Full
screen function on/off.

To activate the Mode manually adjusted in this PC
ADJUSTMENT Menu, select the Mode at the SYSTEM SELECT
Menu.  (Refer to page 21.)

5

Содержание PLV-30

Страница 1: ...Owner s Manual PLV 30 Multimedia Projector MODEL ...

Страница 2: ...TES THAT THERE ARE IMPORTANT OPERATING AND MAINTENANCE INSTRUCTIONS IN THE OWNER S MANUAL WITH THIS UNIT CAUTION RISK OF ELECTRIC SHOCK DO NOT OPEN WARNING TO REDUCE THE RISK OF FIRE OR ELECTRIC SHOCK DO NOT EXPOSE THIS APPLIANCE TO RAIN OR MOISTURE This projector produces intense light from the projection lens Do not stare directly into the lens as possible Eye damage could result Be especially c...

Страница 3: ...cabinet slots as they may touch dangerous voltage points or short out parts that could result in a fire or electric shock Never spill liquid of any kind on the projector This projector should be operated only from the type of power source indicated on the marking label If you are not sure of the type of power supplied consult your authorized dealer or local power company Do not overload wall outle...

Страница 4: ...e cord should be suitably prepared and the correct plug fitted See Over WARNING A PLUG WITH BARED FLEXIBLE CORD IS HAZARDOUS IF ENGAGED IN A LIVE SOCKET OUTLET The Wires in this mains lead are coloured in accordance with the following code Green and yellow Earth Blue Neutral Brown Live As the colours of the wires in the mains lead of this apparatus may not correspond with the coloured markings ide...

Страница 5: ......

Страница 6: ... in English Deutsch Français Italiano Español or Japanese Compact Design This projector is extremely compact in size and weight It is designed to carry and work anywhere you wish to use Multi Scan System This projector has Multi Scan System to conform to almost all computer output signals quickly There is no need for troublesome manual adjustment of frequency and other settings Keystone Correction...

Страница 7: ......

Страница 8: ...work with single phase power systems having a grounded neutral conductor To reduce the risk of electrical shock do not plug into any other type of power system Consult your authorized dealer or service station if you are not sure of the type of power supply being in use Connect the projector with the peripheral equipment before turning the projector on Refer to pages 11 13 for connection CAUTION F...

Страница 9: ...creen size Screen Size W x H mm Height H1 30 Height H2 610 x 457 60 1219 x 914 100 2032 x 1524 150 3048 x 2286 200 4064 x 3048 ADJUSTABLE FEET Picture tilt and projection angle can be adjusted by rotating the ADJUSTABLE FEET Projection angle can be adjusted to 7 6 degrees Lift the front of the projector and pull the FEET LOCK LATCHES on both sides of the projector 1 ADJUSTABLE FEET FEET LOCK LATCH...

Страница 10: ...CAUTION IN CARRYING OR TRANSPORTING THE PROJECTOR Do not drop or bump the projector otherwise damages or malfunctions may result When carrying the projector use a suitable carrying case Do not transport the projector by using a courier or transport service in an unsuitable transport case This may cause damage to the projector To transport the projector through a courier or transport service consul...

Страница 11: ...icing this projector Connect an external audio amplifier to this terminal Refer to P12 13 Connect the S VIDEO output from the video equipment to this terminal Refer to P12 Connect the audio output from the computer to this terminal Refer to P13 Connect the audio output from the video equipment to this terminal Refer to P12 COMPUTER INPUT TERMINAL SERVICE PORT JACK COMPUTER AUDIO INPUT JACK AUDIO I...

Страница 12: ...ed the Y Pb Cb Pr Cr jacks has priority over the S VIDEO jack S VIDEO Output Audio Input Cables used for connection Cables are not supplied with this projector Video Cable RCA x 1 or RCA x 3 S VIDEO Cable Audio Cable RCA x 2 Mini Plug x 1 stereo NOTE When connecting the cable the power cords of both the projector and the external equipment should be disconnected from AC outlet Turn the projector a...

Страница 13: ...IO OUT COMPUTER AUDIO IN COMPUTER IN MAC Adapter Set the slide switches following the chart below Set the switches as shown in the table below depending on the RESOLUTION MODE that you want to use before you turn on the projector and computer MAC ADAPTER Not supplied Cables used for connection Cables are not supplied with this projector VGA CABLE HDB 15 pin MAC ADAPTER When connecting to Macintosh...

Страница 14: ...ave leaked on the remote control carefully wipe the case clean and load new batteries Press the latch and pull it up Remove the battery compartment lid Slide the batteries into the compartment and replace the lid Two AA UM3 or R06 size batteries For correct polarity and be sure the battery terminals are in contact with the pins in the compartment Remote Control Batteries Installation 1 2 OPERATION...

Страница 15: ...be turned on And it flashes green in Power Management mode P33 This indicator is dim when the projector is turned on And bright when the projector is in stand by mode This indicator turns to yellow when the life of the projection lamp draws to an end P35 This indicator flashes red when internal projector temperature is too high P34 Used to reset to normal picture adjustment preset by factory P25 3...

Страница 16: ...t the Item Control and adjust through ON SCREEN MENU 1 2 3 5 4 You can control and adjust this projector through the ON SCREEN MENU Refer to the following pages to operate each adjustment in the ON SCREEN MENU 1 MOVING THE POINTER 2 SELECT THE ITEM Move the pointer see the NOTE below by pressing POINT button s on the TOP CONTROL or the REMOTE CONTROL Select the item by pressing SELECT button Used ...

Страница 17: ...ortion Refer to P27 AUTO IMAGE MENU Used to adjust Fine sync Total dots and Picture Position automatically Refer to P26 MENU BAR IN COMPUTER MODE Press MENU BUTTON while in Computer mode SYSTEM MENU Used to select a color system of the selected video source Refer to P29 IMAGE MENU Used to adjust the picture image Color Tint White Balance Contrast Brightness Sharpness Gamma Refer to P30 SCREEN MENU...

Страница 18: ...G TO THE PROJECTOR on Pages 11 13 for connecting that equipment 3 When the projector has cooled down the READY indicator turns to green again and you can turn the projector on After cooling down completely disconnect the AC power cord 30 The Preparation Display disappears after 30 seconds Power off The message disappears after 4 seconds When the TEMPERATURE WARNING indicator flashes red the projec...

Страница 19: ...e and press the KEYSTONE button or the POINT DOWN button to reduce the lower part The message disappears after 4 seconds Reduce the upper width with the KEY STONE button or the POINT UP button Reduce the lower width with the KEY STONE button or the POINT DOWN button Keystone If the picture has keystone distortion correct image with KEYSTONE adjustment ZOOM ADJUSTMENT Turn the ZOOM RING to adjust t...

Страница 20: ...nction is cancelled when the FREEZE button is pressed again or any other function button is pressed Press the NO SHOW button on the Remote Control Unit to black out the image This function is cancelled when the NO SHOW button is pressed again or any other function button is pressed NO SHOW FUNCTION PICTURE FREEZE FUNCTION SOUND MUTE ADJUSTMENT SOUND VOLUME ADJUSTMENT Indicates the level of the vol...

Страница 21: ...ctor may display one of the following messages The projector cannot discriminate or detect the input signal from the computer Adjust and set the computer system manually Refer to page 22 There is no signal input from the computer Make sure the connection of the computer and the projector is set correctly Refer to TROUBLESHOOTING on page 36 Go to PC adj No signal SELECT COMPUTER SYSTEM MANUALLY To ...

Страница 22: ... RIGHT LEFT buttons to select PC ADJUST and press the SELECT button Another dialog box Where to reserve Menu will appear In this dialog box you can store the parameter into the area from Mode 1 to Mode 5 When memorizing the new computer parameter select the Mode with the message Free by pressing the POINT UP DOWN buttons and the SELECT button To change the parameters of the Mode previously set sel...

Страница 23: ...Total dots Adjustment of the horizontal or vertical picture position When the image is not centered on the screen adjust each of those items Horizontal Vertical Adjustment of the clamp level When the image has a dark bar s try this adjustment Clamp Adjustment of the area displayed with this projector Select the resolution at the Display area dialog box or adjust the number at the column of H or V ...

Страница 24: ...A 7 800 x 600 34 50 55 38 SVGA 8 800 x 600 38 00 60 51 SVGA 9 800 x 600 38 60 60 31 SVGA 10 800 x 600 32 70 51 09 SVGA 11 800 x 600 38 00 60 51 ON SCREEN DISPLAY RESOLUTION H Freq kHz V Freq Hz XGA 10 1024 x 768 XGA 11 1024 x 768 XGA 12 1024 x 768 Interlace XGA 13 1024 x 768 62 04 77 07 XGA 14 1024 x 768 61 00 75 70 XGA15 1024 x 768 35 522 43 48 46 90 58 20 XGA 8 1024 x 768 47 00 58 30 XGA 9 1024 ...

Страница 25: ...ighter From 0 to 63 Closes the PICTURE IMAGE ADJUSTMENT Menu Move the arrow to the item and press POINT RIGHT LEFT buttons Recalls the data previously adjusted Reset Stores the adjusted data in the memory Stored Closes the PICTURE IMAGE ADJUSTMENT Menu Quit Move the arrow to the color that you want to adjust Press POINT LEFT button to lighten the color and press POINT RIGHT button to deepen the co...

Страница 26: ... adjust Picture Position Closes the AUTO IMAGE FUNCTION Menu Move the arrow to the item and then press the SELECT button Starts the adjustment on the item set to On Adjust the picture as necessary to eliminate flicker from the display This item can be adjusted manually Refer to page 25 The number of the total dots in one horizontal period This item can be adjusted manually Refer to page 25 Adjustm...

Страница 27: ...OOM button or the SELECT button The image is magnified by degrees Compress function To compress the image size press the D ZOOM button The size of image is reduced by degrees Panning function To pan the image press the POINT UP DOWN LEFT RIGHT buttons Panning function can work only when the image is larger than the screen size To cancel Digital Zoom mode press any button except D ZOOM SELECT or PO...

Страница 28: ...CT button Another dialog box VIDEO SOURCE Menu will appear Press the POINT DOWN button and a red arrow icon will appear Move the arrow to the source that you want to select and then press the SELECT button 1 2 This box indicates the Video source being selected SELECTING VIDEO SOURCE Video S Video Y Pb Cb Pr Cr The projector automatically detects the incoming Video source and adjusts itself to opti...

Страница 29: ...eo image it is necessary to select a specific broadcast signal format among PAL SECAM NTSC NTSC 4 43 PAL M and PAL N Move the arrow to the Mode and press the SELECT button This box indicates the system being selected Move the arrow to the Mode and press the SELECT button This box indicates the system being selected Auto PAL SECAM NTSC NTSC4 43 PAL M PAL N The projector automatically detects the in...

Страница 30: ... LEFT button to lighten the image and press POINT RIGHT button to deepen the image From 0 to 63 Press POINT LEFT button to increase purple and press POINT RIGHT button to increase green From 0 to 63 Press POINT LEFT button to decrease contrast and press POINT RIGHT button to increase contrast From 0 to 63 Press POINT LEFT button to darken the image and press POINT RIGHT button to brighten the imag...

Страница 31: ...r Press the POINT DOWN button and a red arrow icon will appear Move the arrow to the screen size that you want to set and then press the SELECT button 1 2 Normal Video Image size with 4 x 3 aspect ratio Resizes the image for wide screen size with 16 x 9 aspect ratio Move the pointer to the function and press the SELECT button Regular Wide Keystone When the image is distorted vertically select Keys...

Страница 32: ...and the Number counting down Display Mode Display Computer Video Volume Mute Displays Normal Display No show Display Keystone Display True Display D Zoom Display Press the POINT RIGHT LEFT buttons to adjust the volume Ceiling When this function is On the top bottom and the left right reversed picture is provided to project the image from a ceiling mounted projector Rear When this function is On th...

Страница 33: ...jection Lamp off when the projector detects signal interruption and the projector is not used for a certain period in order to reduce power consumption and maintain the Lamp life This projector is shipped with this function ON Power Management function operates to turn the Projection Lamp off when the input signal is interrupted and the projector is not operated over 5 minutes This function operat...

Страница 34: ...Turn the power off and disconnect the AC power cord from the AC outlet Turn the projector upside down and remove two Air Filters Large and Small by pulling the latches upward 1 2 The Removable Air Filters prevent dust from accumulating on the surface of the Projection Lens and the Projection Mirror Should the Air Filters become clogged with dust particles it will reduce the Cooling Fans effectiven...

Страница 35: ...amp Assembly is replaced When the Lamp Replacement Monitor Timer is reset the LAMP REPLACEMENT indicator stops lighting Turn the projector on and press the MENU button and the ON SCREEN MENU will appear Press the POINT LEFT RIGHT buttons to select SETTING and press the SELECT button refer to the page 32 33 Another dialog box SETTING MENU will appear 1 Press the POINT DOWN button and a red arrow ic...

Страница 36: ...EADY indicator will light green again and the projector may be turned on by pressing the power ON OFF button Check the TEMPERATURE WARNING indicator If the indicator flashes red the projector cannot be turned on See TURNING ON OFF THE PROJECTOR section on page 18 Check the Projection Lamp Refer to page 35 Image is out of focus Adjust the focus Make sure the projection screen is at least 4 6 1 4m f...

Страница 37: ... the problem still persists after following all operating instructions contact the sales dealer where you purchased the projector or the service center Give the model number and explain the difficulty We will advise you how to obtain service Remote Control Unit does not work Check the batteries Make sure nothing is between the Remote Receiver and the Remote Control Unit Make sure you are not too f...

Страница 38: ...re Accessories LCD Panel System The specifications are subject to change without notice F 2 0 2 3 lens with f 28 mm 33 6 mm Manual zoom and focus 4 6 26 3 1 4 m 8 0 m 120 W RCA Type x 3 Video Y Pb Cb Pr Cr and Mini DIN 4 pin x 1 S Video Projection Lens Throw Distance Projection Lamp AV Input Jacks Mini Jack stereo AV Audio Input Jack VGA HDB 15 Terminal x 1 Mini Jack stereo Mini DIN 8 pin x 1 Mini...

Страница 39: ...39 ...

Страница 40: ...Printed in Japan Part No 610 291 0056 1AA6P1P2420A M4GA A SANYO Electric Co Ltd ...

Отзывы: