background image

Basic Operation

Basic Operation

18

Connect the projector's AC power cord into an AC 

outlet.  The POWER indicator becomes red.  

Press  the  POWER  ON/STAND-BY  button  on  the 

top control or on the remote control.  The POWER 

indicator becomes green and the cooling fans start 

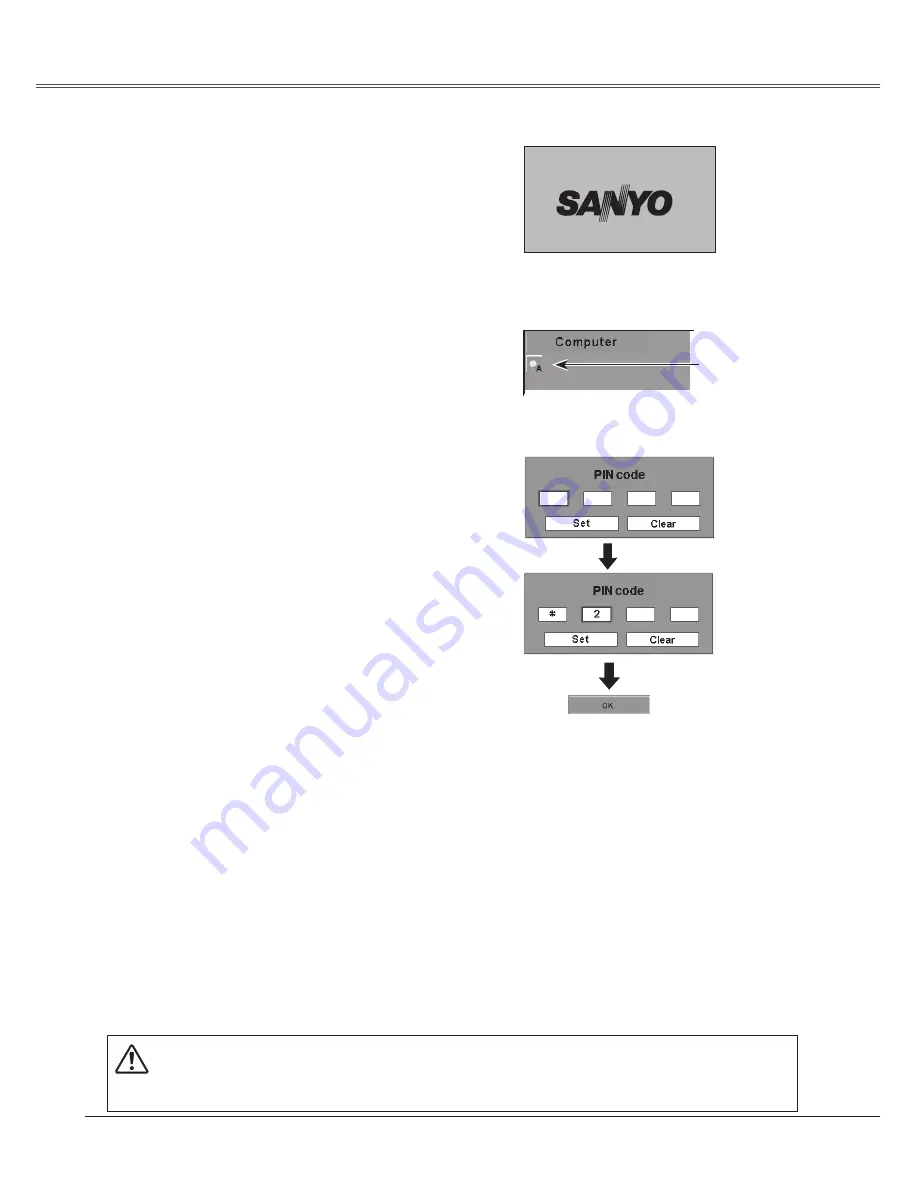
to operate.  The preparation display appears on the 

screen and the count down starts.

2

3

1

4

After  the  countdown,  the  input  source  that  was 

selected  the  last  time  and  the  Lamp  mode  status 

icon (see page 47) appears on the screen.

If the projector is locked with a PIN code, PIN code 

Input Dialog Box appears.  Enter the PIN code as 

instructed below. 

Complete peripheral connections (with a computer, 

VCR, etc.) before turning on the projector.

Turning On the Projector

To Enter a PIN code

Select a number by pressing the Point 

ed

 buttons, and 

then  press  the  Point 

  button  to  fix  the  number  and 

move the pointer.  The number changes to "

". If you 

fixed  an  incorrect  number,  move  the  pointer  to  the 

number  you  want  to  correct  by  pressing  the  Point 

button, and then select the correct number by pressing 

the Point 

▲▼

 buttons.

Repeat  this  step  to  complete  entering  a  four-digit 

number. 

"134" is set as the initial PIN code at the factory.

After  entering  the  four-digit  number,  move  the  pointer 

to  "Set"  by  pressing  the  Point 

  button.    Press  the 

SELECT  button  so  that  you  can  start  to  operate  the 

projector.

If  you  entered  an  incorrect  PIN  code,  "PIN  code"  and 

the number (



) turns red.  Enter the PIN code all 

over again.

What is PIN code?

PIN  (Personal  Identification  Number)  code  that  allows 

the  person  who  knows  it  to  operate  the  projector. 

Setting  a  PIN  code  prevents  unauthorized  use  of  the  

projector. 

A PIN code consists of a four-digit number. Refer to the 

PIN code lock function in the Setting on pages 48 and 

49 for locking operation of the projector with your PIN 

code.

CAUTION ON HANDLING PIN CODE

If you forget your PIN code, the projector can no longer be started.  Set a new PIN code with special care, 

write it down in column on page 65 of this manual, and keep it at hand.  Should the PIN code be missing 

or forgotten, consult your dealer or service center.

16

The preparation display disappears after 30 

seconds.

(See page 47 for Lamp mode.)

Selected Input Source and Lamp Mode

Lamp mode

After the OK icon 

disappears, you can 

operate the projector.

PIN Code Input Dialog Box


Note:


• When the Input Search function is set 

on  On1  or  On,  the  input  signal  will 

be searched automatically (p.45) 

  • When the Logo select function is off, 

the logo is not shown on the screen. 

(p.4)

  • When  the  "Countdown  off"  or  "Off" 

is  selected  in  the  Display  function, 

the  countdown  is  not  shown  on  the 

screen. (p.4)

  • During  the  countdown  period,  all 

operations are invalid.

  • If  the  correct  PIN  code  number  is 

not  input  for  three  minutes  after  the 

PIN  code  dialog  box  appeared,  the 

projector is turned off automatically.

Содержание PLC-XW56

Страница 1: ...Multimedia Projector Owner s Manual PLC XW56 MODEL ...

Страница 2: ... Noise reduction function helps you to reduce the contained noise on the screen to get smoother images p 39 Blackboard Function Blackboard can be used as a projection screen The board color is limited to Green p 30 37 Quick Termination The AC power cord can be unplugged immediately after turning off the projector without waiting for the termination of the cooling fan rotation Multilanguage Menu Di...

Страница 3: ...Bar 21 Zoom and Focus Adjustment 22 Keystone Correction 22 Sound Adjustment 23 Remote Control Operation 23 Computer Input 25 Input Source Selection 25 Computer System Selection 26 Auto PC Adjustment 27 Manual PC Adjustment 28 Image Level Selection 30 Image Level Adjustment 31 Screen Size Adjustment 32 Video Input 34 Input Source Selection Video 34 Input Source Selection S Video Component RGB Scart...

Страница 4: ... your local community waste collection recycling centre In the European Union there are separate collection systems for used electrical and electronic products Please help us to conserve the environment we live in Safety Precaution WARNING TO R E D U C E T H E R I S K O F F I R E O R ELECTRIC SHOCK DO NOT EXPOSE THIS APPLIANCE TO RAIN OR MOISTURE This projector produces intense light from the proj...

Страница 5: ...through cabinet slots as they may touch dangerous voltage points or short out parts that could result in a fire or electric shock Never spill liquid of any kind on the projector Safety Instructions Do not install the projector near the ventilation duct of air conditioning equipment This projector should be operated only from the type of power source indicated on the marking label If you are not su...

Страница 6: ...o project an image Do not point the projector down to project an image Do not put the projector on either side to project an image Install the projector properly Improper Installation may reduce the lamp life and cause a fire hazard Installing the Projector in Proper Position USE CAUTION IN CARRYING OR TRANSPORTING THE PROJECTOR Do not drop or bump the projector otherwise damages or malfunctions m...

Страница 7: ...es UL and certified by the Canadian Standard Association CSA AC Power Cord has a grounding type AC line plug This is a safety feature to be sure that the plug will fit into the power outlet Do not try to defeat this safety feature Should you be unable to insert the plug into the outlet contact your electrician GROUND AC Power Cord Requirement AC Power Cord for the United Kingdom This cord is alrea...

Страница 8: ...s near this side Power Cord Connector Top Controls and Indicators Terminals and Connectors Air Intake Vents back and bottom Adjustable Feet Lamp Cover Air Filters Kensington Security Slot This slot is for a Kensington lock used to deter theft of the projector Kensington is a registered trademark of ACCO Brands Corporation CAUTION Do not turn on a projector with lens cap attached High temperature f...

Страница 9: ...inal outputs sound from AUDIO IN terminal or VIDEO IN Connect the composite video output from video equipment to VIDEO jack p 16 AUDIO IN Connect the audio output from video equipment connected to or to this jack When the audio output is monaural connect it to L MONO jack p 16 COMPONENT COMPUTER AUDIO IN Connect the audio output stereo from a computer or video equipment connected to to this jack p...

Страница 10: ...ojector on or off p 18 19 POWER indicator Emit a red light until the projector gets ready to be turned on It turns red when the projector is in the stand by mode It remains green while the projector is under operation p 18 19 60 INPUT button Select input source p 25 34 35 SELECT button Execute the selected item p 20 Expand or compress the image in Digital zoom mode p 33 MENU button Open or close t...

Страница 11: ... TIMER button Operate the P timer function p 24 NO SHOW button Temporarily turn off the image on the screen p 24 KEYSTONE button Correct the keystone distortion p 22 41 Point VOLUME buttons Select an item or adjust the value in the On Screen Menu p 20 Pan the image in Digital zoom mode p 33 Adjust the volume level Point buttons p 23 SELECT button Execute the selected item p 20 Expand or compress t...

Страница 12: ...all new batteries Risk of explosion if a battery is replaced by an incorrect type Dispose of used batteries according to the instructions Open the battery compartment lid Install new batteries into the compartment Replace the compartment lid Two AA size batteries For correct polarity and be sure battery terminals are in contact with pins in the compartment Remote Control Battery Installation 1 2 3...

Страница 13: ...release the adjustable foot At the desirable angle release the latch to lock the adjustable foot Rotate the adjustable foot from side to side for fine adjust Keystone distortion of the projected image can be corrected by menu operation p 22 41 Adjustable Foot Foot Lock Latch Press upward Adjustable Foot A B 43 3 13 2 m 23 9 7 3 m 18 0 5 5 m 11 8 3 6 m A B 6 1 Inch Diagonal 4 6 1 4 m Center Min Zoo...

Страница 14: ...ord supplied to the projector Note Unplug the AC power cord when the projector is not in use When this projector is connected to an outlet with the AC power cord it is in Stand by mode and consumes a little electric power To the AC outlet 200 240 V AC To power cord connector on your projector Projector side Ground To the AC outlet 120 V AC To the AC outlet 200 240 V AC NOTE ON THE POWER CORD AC po...

Страница 15: ...UDIO IN AUDIO OUT stereo Audio Input Monitor Output COMPUTER IN S VIDEO IN COMPONENT IN Note Input sound to the COMPONENT COMPUTER AUDIO IN terminal when using the COMPUTER IN S VIDEO IN COMPONENT IN terminal as input When connecting the AUDIO OUT to external audio equipment the projector s built in speaker is disconnected See page 63 for ordering optional cables Unplug the power cords of both the...

Страница 16: ...external audio equipment the projector s built in speaker is disconnected See page 63 for ordering optional cables Unplug the power cords of both the projector and external equipment from the AC outlet before connecting cables External Audio Equipment VIDEO IN S VIDEO S Video VGA cable Video and Audio cable Composite Video and Audio Output S Video Output AUDIO IN Audio Input AUDIO OUT stereo R L R...

Страница 17: ...io cable stereo Audio cable stereo Audio Input Component Video Output Y Pb Cb Pr Cr RGB Scart 21 pin Output Audio Output Scart VGA cable Component VGA cable AUDIO OUT stereo Component cable Note When connecting AUDIO OUT to external audio equipment the projector s built in speaker is disconnected RGB Scart signal can not be output from the OUTPUT terminal See page 63 for ordering optional cables U...

Страница 18: ...start to operate the projector If you entered an incorrect PIN code PIN code and the number turns red Enter the PIN code all over again What is PIN code PIN Personal Identification Number code that allows the person who knows it to operate the projector Setting a PIN code prevents unauthorized use of the projector A PIN code consists of a four digit number Refer to the PIN code lock function in th...

Страница 19: ...t p 47 The running speed of cooling fans is changed according to the temperature inside the projector Do not put the projector in a case before the projector is cooled enough If the WARNING indicator blinks or emits a red light see Warning Indicator on page 51 While the POWER indicator is blinking lamp is being cooled down and the projector cannot be turned on Wait until the POWER indicator become...

Страница 20: ...data press the Point buttons Refer to the following pages for each adjustment To close the On Screen Menu press the MENU button again Press the MENU button to display the On Screen Menu Note The selected item is not active until the SELECT button is pressed 1 2 3 Top Control MENU button SELECT button SELECT button POINT buttons Remote Control MENU button Menu bar Pointer red framed Menu icon Item ...

Страница 21: ...mma p 31 32 Sound Menu Used to adjust the volume or mute the sound p 23 PC Adjust Menu Used to adjust parameters to match with input signal format p 27 29 Input Menu Used to select input source either Computer or Video p 25 For video source Input Menu Used to select input source either Video or Computer p 34 35 Image Select Menu Used to select an image level among Dynamic Standard Cinema Blackboar...

Страница 22: ...d p 41 Reduce the upper width with KEYSTONE button or Point button Reduce the lower width with KEYSTONE button or Point button Keystone Correction The arrows are white when there is no correction The direction of the arrow being corrected turns red The arrows disappear at the maximum correction If you press the KEYSTONE button on the remote control once more while the keystone dialog box is being ...

Страница 23: ...e SELECT button Volume Mute Press the Point button to turn up the volume and press the Point button to turn down the volume Menu Operation Remote Control Operation For some frequently used operations using the remote control is advisable Just pressing one of the buttons enables you to make the operation and no need for calling up the On Screen Menu Press the FREEZE button on the remote control to ...

Страница 24: ...e timer starts to count time 00 00 59 59 To stop the P Timer press the P TIMER button Press the P TIMER button again then the P timer display disappears P TIMER button Press the IMAGE button on the remote control to select a desired image level of the screen For more detail see pages 30 and 37 IMAGE button For detail see page 22 KEYSTONE button LAMP CONTROL button Press the LAMP CONTROL button on ...

Страница 25: ...ow to Computer and press the SELECT button Input Menu icon Move the pointer to RGB and press the SELECT button Source Select Menu Computer Press the MENU button to display the On Screen Menu Press the Point buttons to move the red framed pointer to the Input Menu icon 1 Press the Point buttons to move the red arrow pointer to Computer and then press the SELECT button 2 After the Source Select Menu...

Страница 26: ...om computer Check the connection between your c o m p u t e r a n d t h e p r o j e c t o r S e e Troubleshooting on page 56 Auto The preset system is manually adjusted in the PC Adjust Menu The adjusted data can be stored in Mode 1 5 p 28 29 PC Systems provided in this projector is chosen The projector chooses a proper system provided in the projector and displays it Mode 1 and SVGA 1 are example...

Страница 27: ...T button twice Auto PC Adj Menu Operation 1 2 Move the red framed pointer to the Auto PC Adj item and press the SELECT button Please wait message appears while Auto PC adjustment is in process PC Adjust Menu PC Adjust Menu icon To store adjustment parameters Adjustment parameters from Auto PC Adjustment can be memorized in this projector Once parameters are memorized the setting can be done just b...

Страница 28: ... 2 Press the Point buttons to adjust the value to eliminate flicker from the image displayed From 0 to 31 Fine sync Press the Point buttons to adjust the number of total dots in one horizontal period to match your PC image Total dots Press the Point buttons to adjust the horizontal picture position Horizontal Press the Point buttons to adjust the vertical picture position Vertical Press the SELECT...

Страница 29: ...s the SELECT button The confirmation box appears and then select Yes All adjustments return to their previous figures Mode free To clear the stored data select Mode free and press the SELECT button Move the red arrow pointer to the Mode that you want to clear and then press the SELECT button Note Display area H V cannot be selected when 480i 575i 480p 575p 720p 1035i or 1080i is selected in the PC...

Страница 30: ...u p 32 Press the MENU button to display the On Screen Menu Press the Point buttons to move the red framed pointer to the Image Select Menu icon Press the Point buttons to move the red framed pointer to the level that you want to set and then press the SELECT button Menu Operation 1 2 Normal picture level preset on this projector Standard Picture level with improved halftone for graphics Real Pictu...

Страница 31: ...ghten the red tone and the Point button to deepen the red tone From 0 to 63 White balance Red Press the Point button to lighten the green tone and the Point button to deepen the green tone From 0 to 63 White balance Green Press the Point button to lighten the blue tone and the Point button to deepen the blue tone From 0 to 63 White balance Blue Press the Point buttons to select the desired Color t...

Страница 32: ...h Point buttons When adjusted the arrows turns red When reached to the correction limit the arrows disappears 1 Wide Provide the image to fit wide video aspect ratio 16 9 by expanding the image width uniformly This function can be used for providing a squeezed video signal at 16 9 Full Provide the full screen image Move the red framed pointer to any of Image 1 to 4 where you want to set and then p...

Страница 33: ... size To exit the Digital zoom mode press any button except the D ZOOM buttons SELECT and Point buttons To return to the previous screen size select a screen size from the Screen Size Adjustment or select an input source from the Input Source Selection p 25 again or adjust the screen size with the D ZOOM buttons Digital zoom For zooming in and out the images Remote Control D ZOOM button POINT butt...

Страница 34: ... Selection Video Direct Operation Video INPUT button Remote Control Top Control INPUT button VIDEO button Computer Press the MENU button to display the On Screen Menu Press the Point buttons to move the red framed pointer to the Input Menu icon Press the Point buttons to move the red arrow pointer to Video and then press the SELECT button 1 2 Menu Operation Move the pointer to Video and press the ...

Страница 35: ...button to display the On Screen Menu Press the Point buttons to move the red framed pointer to the Input Menu icon When the input source is coming from video equipment connected to the COMPUTER IN S VIDEO IN COMPONENT IN terminal with a Component VGA Cable select Component When the input source is coming from video equipment connected to the COMPUTER IN S VIDEO IN COMPONENT IN terminal with a Scar...

Страница 36: ...itself to optimize its performance If the projector cannot reproduce proper video image it is necessary to select a specific component video signal format among 480i 575i 480p 575p 720p 1035i and 1080i COMPONENT VIDEO SIGNAL FORMAT Video or S Video Component The projector automatically detects incoming video system and adjusts itself to optimize its performance When Video System is PAL M or PAL N ...

Страница 37: ...splay the On Screen Menu Press the Point buttons to move the red framed pointer to the Image Select Menu icon Press the Point buttons to move the red framed pointer to the level that you want to set and then press the SELECT button Menu Operation 1 2 Normal picture level preset on this projector Standard Picture level adjusted for the picture with fine tone Cinema Picture level suitable for the im...

Страница 38: ...ess the Point button to lighten the green tone and the Point button to deepen the green tone From 0 to 63 White balance Green Press the Point button to lighten the blue tone and the Point button to deepen the blue tone From 0 to 63 White balance Blue Press the Point buttons to select the desired Color temp level XLow Low Mid or High Color temp Press the Point button to lighten the color and the Po...

Страница 39: ...ting Image in the Image Level Selection on page 37 Store Exit the Image Adjust Menu Quit Note Noise reduction and Progressive cannot be selected when 480p 575p 720p 1035i or 1080i is selected p 36 Interlaced video signal can be displayed in a progressive picture Select one of the following Off disabled L1 Select L1 for an active picture L2 Select L2 for a still picture Film Select Film for watchin...

Страница 40: ...Point buttons and move the red framed pointer to the function that you want to select and then press the SELECT button Provide the image at a wide screen ratio of 16 9 Wide Provide the image at a normal video aspect ratio of 4 3 Normal Screen Size Adjustment Note Screen Menu cannot be operated when 720p 1035i or 1080i is selected in the AV System Menu p 36 1 2 Move the red framed pointer to a func...

Страница 41: ...Setting dialog box appears This function corrects distortion of a projected image Select either Store or Reset with the Point buttons and then press the SELECT button The keystone dialog box appears Correct keystone with the Point ed buttons p 22 Store store the keystone correction even when the AC power cord is unplugged Reset reset the keystone correction when the AC power cord is unplugged Sett...

Страница 42: ...is not bright enough Off Do not show On Screen Displays except On Screen Menu Power off message P Timer No signal message for Power management item p 46 Please wait message Arrows for panning mode Arrows for the Screen position Adjustment Logo select This function decides the start up display as follows User the image you captured Default the factory set logo Off countdown only Logo Logo and Logo ...

Страница 43: ...d 1080i When capturing the image that has been adjusted by the Keystone function the adjustment data is automatically reset and the projector captures an image without keystone adjustment When the Logo PIN code lock function is On Capture menu cannot be selected When starting to capture a new image the previously stored image is cleared even if you cancel the capturing This function prevents an un...

Страница 44: ...IN code all over again To Change the Logo PIN code Logo PIN code can be changed to your desired four digit number Select Logo PIN code change with the Point button and press the SELECT button Set a new Logo PIN code Be sure to note the new Logo PIN code and keep it at hand If you lost the number you could no longer change the Logo PIN code setting For details on PIN code setting refer to relevant ...

Страница 45: ...on on the remote control On2 Input search works under the situation below When turning on the projector with pressing the POWER ON STAND BY button on the top control or on the remote control When pressing the COMPUTER button or VIDEO button on the remote control When missing the current input signal When pressing the INPUT button on the top control Note While Input search is set On1 or On2 the sta...

Страница 46: ...oled down the POWER indicator changes to green blinking In this condition the projection lamp is turned on if the input signal is reconnected or any button on the top control or remote control is pressed Shut down When the lamp has been fully cooled down the power is turned off Off Power management function is off Then set the countdown timer with the Point buttons Time left before Lamp is off Pre...

Страница 47: ... the code make sure the remote control operates properly Note If the batteries are removed from the remote control for a long period of time the remote control code will be reset Remote control Press and hold MENU and IMAGE buttons for more than 5 seconds On start When this function is On the projector is automatically turned on just by connecting the AC power cord to a wall outlet Note Be sure to...

Страница 48: ...service center Key lock Select Key lock Choose one of the alternatives with the Point ed buttons and select Yes to activate it PIN code lock This function prevents the projector from being operated by an unauthorized person and provides the following settings for security options Off the projector is not locked with a PIN code On1 require to enter a PIN code every time turning on the projector On2...

Страница 49: ... pressing the Point buttons And then press the Point button to fix the number and move the pointer Repeat it to complete entering a four digit number After entering the four digit number move the pointer to Set by pressing the Point button Then press the SELECT button To Change the PIN code caution when you have changed THE PIn code write down the new pin code in column of the pin code no memo on ...

Страница 50: ... logo PIN code lock Logo PIN code lock and the lamp counter to the factory default settings This function provides the following alternatives in the cooling fans operation after turning off the projector p 19 L1 normal operation L2 slower and lower sound than the normal operation L1 but it takes longer to cool the projector down Fan Exit the Setting Menu Quit Select Factory default and this box ap...

Страница 51: ...inking Then check the matters below Did you provide appropriate space for the projector to be ventilated Check the installing condition to see if ventilation slots are not blocked Has the projector been installed near the Air Conditioning Heating Duct or Vent Move the installation of the projector away from the duct or vent Are the air filters clean Clean the air filters periodically p 52 The proj...

Страница 52: ...in malfunction of the projector RECOMMENDATION We recommend avoiding dusty smoky environments when operating the projector Usage in these environments may cause a poor image quality When using the projector under dusty or smoky conditions dust may accumulate on a lens LCD panels or optical elements inside the projector This condition may degrade the quality of a projected image When the symptoms a...

Страница 53: ...e projector is not in use put the projector in an appropriate carrying case to protect it from dust and scratches Cleaning the Projection Lens Disconnect the AC power cord before cleaning Gently wipe the projection lens with a cleaning cloth that contains a small amount of non abrasive camera lens cleaner or use lens cleaning paper or a commercially available air blower to clean the lens Avoid usi...

Страница 54: ... cool for at least 45 minutes Loosen the 3 screws of the lamp with a screwdriver and lift the lamp out of the projector by using the built in handles Replace the lamp with a new one and secure it with the 3 screws Make sure that the lamp is set properly Replace the lamp cover and tighten the screw Loosen the screw with a screwdriver and remove the lamp cover Connect the AC power cord to the projec...

Страница 55: ...There is no guarantee of the same life for each lamp Some lamps may fail or terminate their life in a shorter period of time than other similar lamps If the projector indicates that the lamp should be replaced i e if the LAMP REPLACE indicator lights up replace the lamp with a new one IMMEDIATELY after the projector has cooled down Follow carefully the instructions in the Lamp Replacement section ...

Страница 56: ...stance between the projector and the projection screen See page 13 Check the projection lens to see if it needs cleaning See page 53 Moving the projector from a cool to warm place may result in moisture condensation on the projection lens If this occurs leave the projector off and wait until condensation evaporates No image Check the connection between your computer or video equipment and the proj...

Страница 57: ... are used to operate this projector Do not attempt to open the cabinet If problems still persist after following all operating instructions contact the dealer where you purchased the projector or the service center Specify the model number and explain about the problem We will advise you how to obtain service This symbol on the nameplate means the product is Listed by Underwriters Laboratories Inc...

Страница 58: ... Clamp Display area H Reset Mode free 0 31 PC Adjust Mode 3 Mode 4 Mode 5 Quit Yes No H sync freq V sync freq Quit Mode 1 Mode 2 Display area V Store Mode 3 Mode 4 Mode 5 Quit Mode 1 Mode 2 Quit Image Adjust Contrast Brightness Color temp Red Green Blue Gamma Store Quit 0 63 0 63 High 0 63 0 63 0 63 0 15 Image 1 Image 2 Image 3 Image 4 Quit Mid Reset Yes No Low XLow Adj Sharpness 0 15 Digital zoom...

Страница 59: ...Language Setting English Italian Spanish Portuguese Dutch Polish Chinese Korean Japanese On Off On Countdown off Off Blue back Display Ceiling Power management On start Quit Russian Capture Ready Shut down Hour s Security Timer 1 30 Min Quit Off Logo Factory default L1 L2 Fan Quit Logo select Remote control Swedish Finnish Romanian Hungarian Default User Yes No Logo PIN code lock Off On Quit Quit ...

Страница 60: ...R red green Indicators LAMP REPLACE yellow WARNING red The projector detects an abnormal condition and cannot be turned on Unplug the AC power cord and plug it again to turn on the projector If the projector is turned off again disconnect the AC power cord and contact the dealer or the service center Do not leave the projector on It may cause an electric shock or fire hazard The projector is opera...

Страница 61: ... 1152 x 900 61 20 65 20 SVGA 10 800 x 600 32 70 51 09 SXGA 13 1280 x 1024 50 00 86 00 Interlace ON SCREEN DISPLAY RESOLUTION H Freq kHz V Freq Hz VGA 1 640 x 480 31 47 59 88 VGA 2 720 x 400 31 47 70 09 VGA 3 640 x 400 31 47 70 09 VGA 4 640 x 480 37 86 74 38 VGA 5 640 x 480 37 86 72 81 VGA 6 640 x 480 37 50 75 00 SXGA 1 1152 x 864 64 20 70 40 ON SCREEN DISPLAY RESOLUTION H Freq kHz V Freq Hz SXGA 4...

Страница 62: ...ow Distance 4 6 43 3 1 4m 13 2m Projection Lamp 200W Interface Video Input Jack RCA Type x 1 Audio Input Jacks RCA Type x 2 Computer Input S VIDEO Analog RGB Mini D sub 15 pin Terminal x 1 Component Input Terminal Monitor Output Terminal Analog RGB Mini D sub 15 pin Terminal x 1 Component Computer Audio Input Jack Mini Jack stereo x 1 Service Port Connector Mini DIN 8 pin x 1 Audio Output Jack Min...

Страница 63: ...ards Even though 99 99 of the pixels are effective a tiny fraction of the pixels 0 01 or less may be ineffective by the characteristics of the LCD panels Model No S VIDEO VGA Cable POA CA VGAS COMPONENT VGA Cable POA CA COMPVGA SCART VGA Cable POA CA SCART Laser Pointer Remote Control POA RCKIT03 Presentation Kit POA RCKIT04 Soft Carrying Case POA CAC VCL2 The parts listed below are optionally ava...

Страница 64: ...pin 5 1 2 3 4 10 9 6 7 8 15 14 13 11 12 Configurations of Terminals Red R Cr Input Output Ground Horiz sync Green G Y Input Output Blue B Cb Input Output Ground Red Ground Green Ground Blue 1 5 2 4 3 6 7 8 Horiz sync Input Output Composite H V sync Ground Vert sync Ground Vert sync 9 13 10 12 11 14 15 Serial GND R X D RTS CTS T X D GND 4 1 3 2 5 6 7 GND 8 Appendix ...

Страница 65: ...ed the factory set number will be invalid PIN Code Lock No Logo PIN Code Lock No Factory default set No 4 3 2 1 While the projector is locked with the PIN code Put the label below supplied on in a prominent place of the projector s body while it is locked with a PIN code When using the projector ceiling mounted put the Lamp replacement label supplied on in a prominent place of the projector s body...

Страница 66: ... SANYO Electric Co Ltd 3 74 95 13 0 330 2 18 55 3 9 33 237 3 62 92 3 94 100 5 83 148 4 72 120 2 95 75 5 31 135 Screw Holes for Celling Mount Screw M4 Depth 0 394 10 0 Unit inch mm 10 MAX Dimensions Appendix ...

Отзывы: