background image

25

Basic Operation

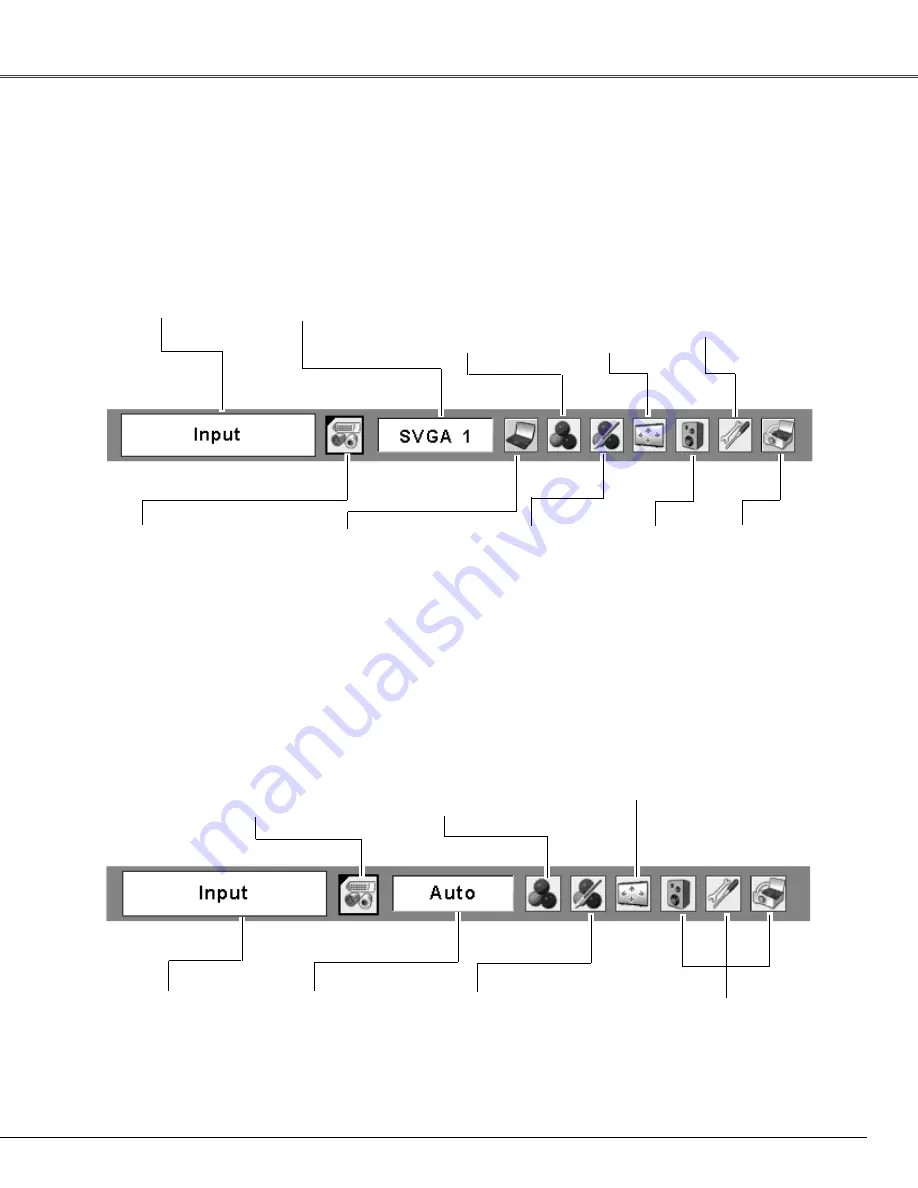
Menu Bar

PC System Menu

Used to select
computer
system (p.32).

Image Adjust Menu

Used to adjust computer
image [Contrast/Brightness/
Color temp./White balance
(R/G/B)/Sharpness/Gamma]
(pp.37–38).

Setting Menu

Used to set the
projector’s operating
configurations (pp.47-
57).

Used to adjust
the volume or
mute the sound
(p.27).

Image Select Menu

Used to select an image
mode among Dynamic,
Standard, Real,
Blackboard(Green), and
Image 1–4 (p.36).

For computer source

AV System Menu

Used to select
system of
selected video
source (p.42).

Image Adjust Menu

Used to adjust picture image
[Contrast/Brightness/Color/Tint/
Color temp./White balance
(R/G/B)/Sharpness/Gamma/
Noise reduction/Progressive]
(pp.44–45).

For video source

Same function as
computer menu.

Input Menu

Used to select an
input source either
Video or Computer
(pp.40, 41).

PC Adjust Menu

Used to adjust
parameters to match
with input signal
format (pp.33–35).

Image Select Menu

Used to select an image mode
among Dynamic, Standard,
Cinema, Blackboard(Green)
and Image 1–4 (p.43).

Screen Menu

Used to set size of
image to
Normal/Wide/Custom
(p.46).

Guide Window

Show the selected
Menu of the On-
Screen Menu.

Same function as
menu for computer
source.

Input Menu

Used to select an
input source either
Computer or Video.
(pp.30–31).

Screen Menu

Used to adjust size of
the image [Normal/
True/Wide/Full
screen/Custom/Digital
zoom +/–] (pp.38–39).

For detailed functions of each menu, see “Menu Tree” on pages 69–70.

Sound Menu

See owner’s manual
“Network Setup
and Operation.”

Wired Menu

Содержание PLC-XU111

Страница 1: ...N 100 Base TX 10 Base T Memory Viewer USB Memory Viewer optionally available Compatible with a dedicated USB memory Refer to the owner s manuals below for details about network and memory viewer function Network Set up and Operation Owner s Manual USB Memory This manual is provided with optionally supplied USB memory ...

Страница 2: ...2 ...

Страница 3: ...Multilanguage Menu Display Operation menu is available in 16 languages English German French Italian Spanish Portuguese Dutch Swedish Finnish Polish Hungarian Romanian Russian Chinese Korean and Japanese p 47 Security Function The Security function helps you to ensure security of the projector With the Key lock function you can lock the operation on the top control or remote control p 54 PIN code ...

Страница 4: ...ment 26 Auto Setup Function 26 Keystone Correction 26 Sound Adjustment 27 Remote Control Operation 28 Computer Input 30 Input Source Selection RGB Computer 1 Analog Computer 2 30 Input Source Selection RGB PC digital RGB AV HDCP 31 Computer System Selection 32 Auto PC Adjustment 33 Manual PC Adjustment 34 Image Mode Selection 36 Image Adjustment 37 Screen Size Adjustment 38 Video Input 40 Input So...

Страница 5: ...ace on the top sides and rear of the projector cabinet is critical for proper air circulation and cooling of the unit The dimension shown here indicate the minimum space required If the projector is to be built into a compartment or similarly enclosed these minimum distances must be maintained Do not cover the ventilation slot on the projector Heat build up can reduce the service life of your proj...

Страница 6: ...ltage points or short out parts that could result in a fire or electric shock Never spill liquid of any kind on the projector Do not install the projector near the ventilation duct of air conditioning equipment This projector should be operated only from the type of power source indicated on the marking label If you are not sure of the type of power supplied consult your authorized dealer or local...

Страница 7: ...IN CARRYING OR TRANSPORTING THE PROJECTOR Do not drop or bump the projector otherwise damages or malfunctions may result When carrying the projector use a suitable carrying case Do not transport the projector by courier or any other transport service in an unsuitable transport case This may cause damage to the projector For information about transporting the projector by courier or any other trans...

Страница 8: ...ions Avoid positioning the projector as described below when installing Positioning Precautions Do not tilt the projector more than 10 degrees from side to side Do not put the projector on either side to project an image 10 10 10 10 10 10 In upward projection do not tilt the projector over 10 degrees right and left In downward projection do not tilt the projector over 10 degrees right and left Fan...

Страница 9: ...isted by the Underwriters Laboratories UL and certified by the Canadian Standard Association CSA AC Power Cord has a grounding type AC line plug This is a safety feature to be sure that the plug will fit into the power outlet Do not try to defeat this safety feature Should you be unable to insert the plug into the outlet contact your electrician GROUND THE SOCKET OUTLET SHOULD BE INSTALLED NEAR TH...

Страница 10: ...rminal and 3 LAN Connection Terminal are for the Network function Refer to the owner s manual Network Set up and Operation and owner s manual of Memory viewer optionally available u o o 6 i Speaker o Air Intake Vents 0 Terminals and Connectors 1 Power Cord Connector 2 USB Terminal 3 LAN Connection Terminal 4 Lamp Cover 5 Air Filter 6 Adjustable Feet 7 Battery Cover Kensington Security Slot This sl...

Страница 11: ... control connect the wired remote control to this jack with a remote control cable not supplied e SERVICE PORT This jack is used to service the projector y COMPUTER IN 1 DVI I Connect computer output Digital Analog DVI I type to this terminal p 19 4 USB Series A Connect the supplied USB Wireless LAN Adapter or optionally available USB memory for Memory viewer operation refer to the owner s manual ...

Страница 12: ...de p 52 r INPUT button Select an input source pp 30 31 40 41 1 MENU button Open or close the On Screen Menu p 24 y POINT ed7 8 VOLUME buttons Select an item or adjust the value in the On Screen Menu p 24 Pan the image in the Digital zoom mode p 39 Adjust the volume level Point 7 8 buttons p 27 q ALARM indicator Blinks red when informing the setting or battery status pp 58 59 Top Control r y 0 AUTO...

Страница 13: ...cute the selected item p 24 Expand or compress the image in the Digital zoom mode p 39 w r Remote Control 0 1 5 4 8 4 LAMP CONTROL button Select a lamp mode pp 28 53 u i 3 4 0 5 q q L CLICK button Act as the left mouse button for wireless mouse operation p 15 r SIGNAL EMISSION indicator Lights red while the laser beam is being emitted from the laser light window or a signal is being sent from the ...

Страница 14: ...s for more than 10 seconds to activate the Pointer function The Laser pointer has switched to the Pointer function 1 Press the LASER button on the remote control pointing toward the projector The Spotlight or Pointer is displayed on the screen with the LASER button lighting green Then move the Spotlight or Pointer with the PRESENTATION POINTER button If the LASER button does not light green and co...

Страница 15: ...codes prevents interference from other remote controls when several projectors or video equipment next to each other are operated at the same time Change the remote control code for the projector first before changing that for the remote control See Remote control in the Setting Menu on page 53 Press and hold the MENU and IMAGE buttons for more than five seconds to switch between the codes The cod...

Страница 16: ...ompartment Replace the compartment lid Two AAA size batteries For correct polarity and be sure battery terminals are in contact with pins in compartment 1 2 3 Point the remote control toward the projector Infrared Remote Receiver when pressing the buttons Maximum operating range for the remote control is about 16 4 5 m and 60 degrees in front of the projector 16 4 5 m 60 Remote control Remote Cont...

Страница 17: ... x 2286 20 0 6 1 m 16 4 5 0 m 200 4064 x 3048 26 6 8 1 m 22 0 6 7 m 300 6096 x 4572 32 8 10 0 m Inch Diagonal 4 3 1 3 m Center For projector positioning see the figures below The projector should be set perpendicularly to the plane of the screen Notes The brightness in the room has a great influence on picture quality It is recommended to limit ambient lighting in order to obtain the best image Al...

Страница 18: ...ect input voltage It is designed to work with single phase power systems having a grounded neutral conductor To reduce the risk of electrical shock do not plug into any other type of power system If you are not sure of the type of power being supplied consult your authorized dealer or service station Connect the projector with all peripheral equipment before turning the projector on CAUTION For sa...

Страница 19: ... the COMPUTER COMPONENT AUDIO IN terminal when using the COMPUTER IN 1 DVI I and the COMPUTER IN 2 COMPONENT IN terminal as input When connecting the AUDIO OUT to external audio equipment the projector s built in speaker is disconnected USB cable connection is needed when operating the computer with the remote control or using the PAGE ed buttons on the remote control Monitor Output COMPUTER IN 2 ...

Страница 20: ...deo and audio cable Composite Video and Audio Output S video Output AUDIO IN Audio Input AUDIO OUT stereo R L Video Unplug the power cords of both the projector and external equipment from the AC outlet before connecting cables Notes When connecting the AUDIO OUT to external audio equipment the projector s built in speaker is disconnected The S VIDEO jack connection overrides the VIDEO jack connec...

Страница 21: ... Pr Cr RGB Scart 21 pin Output Audio Output Scart VGA cable Component VGA cable AUDIO OUT stereo Component cable COMPUTER IN 2 COMPONENT IN COMPUTER COMPONENT AUDIO IN Notes When connecting the AUDIO OUT to external audio equipment the projector s built in speaker is disconnected See page 75 for ordering optional cables RGB Scart signal cannot be output from the MONITOR OUT terminal Unplug the pow...

Страница 22: ...umber changes to If you fixed an incorrect number use the Point 7 button to move the pointer to the number you want to correct and then enter the correct number Repeat this step to complete entering a four digit number After entering the four digit number move the pointer to Set Press the SELECT button so that you can start to operate the projector If you entered an incorrect PIN code PIN code and...

Страница 23: ...cally by connecting the AC power cord to an AC outlet p 53 DO NOT OPERATE THE PROJECTOR CONTINUOUSLY WITHOUT REST CONTINUOUS USE MAY RESULT IN SHORTENING THE LAMP LIFE TURN OFF THE PROJECTOR AND LET STAND FOR ABOUT AN HOUR IN EVERY 24 HOURS The running speed of cooling fans is changed according to the temperature inside the projector Do not put the projector in a case before the projector is coole...

Страница 24: ...8 buttons to adjust the values To close the On Screen Menu press the MENU button again Press the MENU button on the top control or the remote control to display the On Screen Menu Note The selected item is not active until the SELECT button is pressed 1 2 3 Menu bar Pointer red frame Menu icon Item data Press the Point 7 8 buttons to adjust the value SELECT button Pointer red frame Press the Point...

Страница 25: ...s Gamma Noise reduction Progressive pp 44 45 For video source Same function as computer menu Input Menu Used to select an input source either Video or Computer pp 40 41 PC Adjust Menu Used to adjust parameters to match with input signal format pp 33 35 Image Select Menu Used to select an image mode among Dynamic Standard Cinema Blackboard Green and Image 1 4 p 43 Screen Menu Used to set size of im...

Страница 26: ...nnot work when Ceiling feature is set to On in the Setting menu p 51 Perfect correction of the image distortion cannot be ensured with the Auto setup function If the distortion cannot be corrected properly by pressing the AUTO SETUP AUTO SET button adjust manually by pressing the KEYSTONE button on the top control or on the remote control or selecting Keystone in the Setting menu p 48 Rotate the Z...

Страница 27: ...ess the VOLUME buttons The Mute function is also effective for the AUDIO OUT jack Press the Point 7 8 buttons to switch the mute function On Off When the sound is turned off On is displayed Press the Point 7 8 buttons again to turn the sound back on Use the Point ed buttons to move the red frame pointer to the desired item and then press the SELECT button Volume Volume Mute Press the Point 8 butto...

Страница 28: ...rk input COMPUTER VIDEO NETWORK button FREEZE button Press the AUTO PC button on the remote control to operate the Auto PC Adj function The computer screen adjustment can be done easily by pressing this button See page 33 for details AUTO PC button Press the D ZOOM buttons on the remote control to enter to the Digital zoom mode See page 39 for details D ZOOM buttons LAMP CONTROL button D ZOOM butt...

Страница 29: ...sappears after 4 seconds NO SHOW button Press the P TIMER button on the remote control The P Timer display 00 00 appears on the screen and the countdown starts 00 00 59 59 To stop the countdown press the P TIMER button To cancel the P Timer function press the P TIMER button again P TIMER button P Timer display Press the IMAGE button on the remote control to select a desired image mode of the scree...

Страница 30: ...ct Menu appears Move the pointer to RGB and then press the SELECT button 3 Computer 1 Analog Video Computer 2 Input Source Selection RGB Computer 1 Analog Computer 2 Computer Input Move the pointer red arrow to Computer 1 Analog and press the SELECT button Input Menu icon COMPUTER button Notes Wired Wireless and Memory viewer are for the Network function See owner s manual Network Set up and Opera...

Страница 31: ...press the SELECT button Input Menu icon Notes HDCP High bandwidth Digital Content Protection is a system for protecting digital entertainment content delivered by DVI Digital Visual Interface from being copied The specification of HDCP is decided and controlled by Digital Content Protection LLC Should the specification be changed this projector may not display the digital content protected by HDCP...

Страница 32: ...conforming to the provided PC Systems The Auto is displayed on the System Menu box and the Auto PC Adjustment function works to display proper images If the image is not projected properly a manual adjustment is required pp 34 35 There is no signal input from the computer Check the connection between your computer and the projector See Troubleshooting on page 67 Auto The preset system is manually ...

Страница 33: ...rameters are stored the setting can be done just by selecting a Mode 1 5 in the PC System Menu see page 32 See also Store on page 35 Notes Fine sync Total dots Horizontal and Vertical position of some computers cannot be fully adjusted with the Auto PC Adjustment function When the image is not provided properly with this operation manual adjustments are required pp 34 35 The Auto PC Adjustment can...

Страница 34: ...tting value Move the red frame pointer to the desired item and press the SELECT button PC Adjust Menu icon Press the SELECT button here to adjust other items Use the Point 7 8 buttons to adjust the value Status Stored Free of the selected Mode Selected Mode Press the SELECT button at Current mode to show the information of the connected computer Use the Point 7 8 buttons to adjust the value elimin...

Страница 35: ...d data select Store and then press the SELECT button Move the red arrow pointer to one of the Modes 1 to 5 in which you want to store and then press the SELECT button To reset the adjusted data select Reset and press the SELECT button A confirmation box appears and then select Yes All adjustments will return to their previous figures Mode free To clear the stored data select Mode free and then pre...

Страница 36: ...ard Green Image 1 Image 2 Image 3 and Image 4 by pressing the IMAGE button on the remote control Standard Picture mode with improved halftone for graphics Real Blackboard Green Image 1 4 For the image projected on a blackboard This mode help enhance the image projected on a blackboard This is mainly effective on a green colored board not truly effective on a black colored board Dynamic Direct Oper...

Страница 37: ...ton to decrease the brightness press the Point 8 button to increase the brightness from 0 to 63 Contrast Brightness Press the Point 7 button to lighten red tone press the Point 8 button to deepen red tone from 0 to 63 White balance Red Press the Point 7 button to lighten green tone press the Point 8 button to deepen green tone from 0 to 63 White balance Green Press the Point 7 button to lighten bl...

Страница 38: ...p 1035i or 1080i is selected in the PC System Menu p 32 This projector cannot display any resolution higher than 1600 x 1200 If your computer s screen resolution is higher than it reset the resolution to the lower before connecting to the projector The image data in other than 1024 x 768 is modified to fit the screen size in initial mode True Full screen and Digital zoom cannot be selected when 48...

Страница 39: ...ng True Full screen and Digital zoom cannot be selected when 480i 575i 480p or 575p is selected in the PC System Menu p 32 Digital zoom cannot be selected when Full screen or True is selected D ZOOM button Remote Control SELECT button POINT buttons D ZOOM button Adjust the screen scale and position manually with this function Press the SELECT button at Custom and the Custom is displayed on the scr...

Страница 40: ...lf to optimize its performance The projector selects connection in the following order 1 S video 2 Video Auto When video input signal is connected to the VIDEO jack select Video Video When video input signal is connected to the S VIDEO jack select S video S video Input Source Selection Video S video Notes Wired Wireless and Memory viewer are for the Network function See the owner s manual Network ...

Страница 41: ... Menu When the input source is coming from video equipment connected to the COMPUTER IN 2 COMPONENT IN terminal with a Component VGA Cable select Component Component When the input source is coming from video equipment connected to the COMPUTER IN 2 COMPONENT IN terminal with a Scart VGA Cable select RGB Scart RGB Scart Note Wired Wireless Memory viewer are for the Network function See owner s man...

Страница 42: ...M NTSC NTSC4 43 PAL M PAL N The projector automatically detects an incoming video signal and adjusts itself to optimize its performance If the projector cannot reproduce proper video image select a specific component video signal format from among 480i 575i 480p 575p 720p 1035i and 1080i Auto COMPONENT VIDEO SIGNAL FORMAT Video or S Video Component The projector automatically detects an incoming v...

Страница 43: ...cted on a blackboard This is mainly effective on a green colored board not truly effective on a black colored board For the image projected on a blackboard See above for further description Blackboard Green Dynamic Dynamic Standard Remote Control IMAGE button Direct Operation For viewing pictures in a bright room Normal picture mode preset on the projector For viewing with the user preset image mo...

Страница 44: ...Point 8 button to deepen green tone from 0 to 63 White balance Green Press the Point 7 button to lighten blue tone press the Point 8 button to deepen blue tone from 0 to 63 White balance Blue Use the Point 7 8 buttons to select the desired Color temp level High Mid Low or XLow Color temp Press the Point 7 button decrease the intensity of the color press the Point 8 button increase the intensity of...

Страница 45: ...f Disabled L1 Lower reduction L2 Higher reduction Notes Noise reduction and Progressive cannot be selected when 480p 575p 720p 1035i or 1080i is selected p 42 Reset and Store icons will be displayed when any adjustment is made To store the adjusted data select Store and press the SELECT button Use the Point ed buttons to select one from Image 1 to 4 and press the SELECT button A confirmation box a...

Страница 46: ... Yes When Custom is selected the saved scale is used Reset Reset the all adjusted values Press the SELECT button at Reset to display a confirmation box To reset press the SELECT button at Yes Custom Notes When no signal is detected Normal is set automatically and the Aspect dialog box disappears The adjustable range for Scale H V and Position H V is limited depending on the input signal Wide canno...

Страница 47: ... corrected properly by pressing the AUTO SETUP AUTO SET button adjust manually by pressing the KEYSTONE button on the remote control or selecting Keystone in the Setting menu p 26 Auto setup Select Auto setup and this box appears Choose the desired setting for Auto keystone and Auto PC adj with the Point 7 8 buttons Press the SELECT button here to display the other languages Press the MENU button ...

Страница 48: ...Point ed buttons to correct keystone distortion p 26 Keystone This function decides whether to display On Screen Displays On Show all the On Screen displays Use this function when you want to project images after the lamp becomes bright enough The factory default setting is in this option Countdown Off Show the input image instead of the countdown when turning on the projector Use this function wh...

Страница 49: ... the next time you turn on the projector or when you press the NO SHOW button see page 29 To cancel the Capture function select No Logo select This function decides on the starting up display from among following options User Show the image you captured Default Show the factory set logo Off Show the countdown display only Notes Before capturing an image select Standard in the Image Select Menu to ...

Страница 50: ...orrect Logo PIN code Logo PIN code and the number will turn red for a moment Enter the correct Logo PIN code all over again Change the Logo PIN code Logo PIN code can be changed to your desired four digit number Press the Point d button to select Logo PIN code change and then press the SELECT button The New Logo PIN code input dialog box appears Set a new Logo PIN code Be sure to note the new Logo...

Страница 51: ...tton or VIDEO button on the remote control On2 Input search works under the following situation When turning on the projector by pressing the ON STAND BY button on the top control or the remote control When pressing the COMPUTER button or VIDEO button on the remote control When pressing the INPUT button on the top control When the current input signal is cut off If the No show or Freeze function i...

Страница 52: ...en fully cooled down the power will be turned off Off Power management function is off Standby mode This function is available when operating the projector via network Normal Supply the power to the network function even after turning off the projector You can turn on off the projector via network modify network environment and receive an e mail about projector status while the projector is powere...

Страница 53: ...otlight or Pointer and press the SELECT button Then use the Point 7 8 buttons to select a size of the Spotlight Large Middle or Small or a pattern of the Pointer Arrow Finger or Dot See Pointer Function on page 14 Pointer Use the Point ed buttons to choose either Spotlight or Pointer and then use the Point 7 8 buttons to switch between the options The eight different remote control codes Code 1 Co...

Страница 54: ...the projector operation Select Key lock Use the Point ed buttons to choose one of the options and select Yes to activate it This function prevents the projector from being operated by unauthorized persons and provides the following setting options for security Off Unlocked On1 Enter the PIN code every time turning on the projector On2 Enter the PIN code to operate the projector once the power cord...

Страница 55: ...git number move the pointer to Set Press the SELECT button so that you can start to operate the projector If you entered an incorrect PIN code PIN code and the number will turn red for a moment Enter the correct PIN code all over again Enter a PIN code After a correct PIN code is entered the following dialog box appears The PIN code can be changed to your desired four digit number Press the Point ...

Страница 56: ...icon Fig 2 will appear on the screen indicating that the end of lamp life is reached When replacing the projection lamp reset the lamp counter See Resetting the Lamp Counter on page 66 Lamp counter This icon appears on the screen when the end of lamp life is approaching This icon appears on the screen when the end of lamp life is reached Fig 1 Lamp replacement icon Fig 2 Lamp replacement icon Note...

Страница 57: ...en notifying the cleaning is necessary After cleaning the filter be sure to select RESET and set the timer The Filter warning icon will not turn off until the filter counter is reset For details about resetting the timer refer to Resetting the Filter Counter on page 63 Filter counter Filter counter Use the Point 7 8 buttons to set the timer Select from Off 100H 200H 300H depending on the use envir...

Страница 58: ...r cord is connected to an outlet even if the projector detects vibrations The alarm will stop as the AC power cord is connected to an outlet except when the battery cover is open Pressing the buttons is always accompanied by a sound If no sound is produced after pressing a button you need to press it again F button Button 1 2 3 Set and release the Antitheft alarm function Notes You can test the al...

Страница 59: ... is released The Alarm operating configuration can be changed when the Antitheft alarm function is set to Off See page 58 for setting or releasing this function Press the SELECT button at Alarm icon in the Setting Menu to display the Alarm setting dialog box Use the Point ed buttons to select the desired option use the Point 7 8 buttons to set the selected option Battery charge See the next page f...

Страница 60: ...ressed inside the carrying case Remove the screw and open the battery cover Install the battery then put back the battery cover and secure it with the screw Screw Replace the rechargeable batteries Use only the specified battery for this projector Using other types of battery may cause accident or fire hazard Replacement Battery SANYO Ni MH BATTERY PACK Part No 645 089 8587 How to replace the rech...

Страница 61: ...amage Keep out of reach of children They may accidentally swallow the battery Do not short circuit battery terminals with metal objects Do not store with metal objects or in a metal case The rechargeable battery pack has a limited number of charge cycles and eventually need to be replaced If it can no longer be recharged stop charging immediately and replace it with new one Recharge the battery in...

Страница 62: ... In this case unplug the AC power cord and reconnect it and then turn the projector on once again to verify operation If the projector cannot be turned on and the WARNING indicator still lights red unplug the AC power cord and contact the service station CAUTION DO NOT LEAVE THE PROJECTOR WITH THE AC POWER CORD CONNECTED UNDER AN ABNORMAL CONDITION IT MAY RESULT IN FIRE OR ELECTRIC SHOCK Maintenan...

Страница 63: ...projector Usage in these environments may cause poor image quality When using the projector under dusty or smoky conditions dust may accumulate on a lens LCD panels or optical elements inside the projector degrading the quality of a projected image When the symptoms above are noticed contact your authorized dealer or service station for proper cleaning Note When reinserting this filter be sure tha...

Страница 64: ...mount of non abrasive camera lens cleaner or use a lens cleaning paper or commercially available air blower to clean the lens Avoid using an excessive amount of cleaner Abrasive cleaners solvents or other harsh chemicals might scratch the surface of the lens Unplug the AC power cord before cleaning Gently wipe the projector body with a soft dry cleaning cloth When the cabinet is heavily soiled use...

Страница 65: ...o cool for at least 45 minutes before you open the Lamp cover The inside of the projector can become very hot CAUTION Screw Turn off the projector and unplug the AC power cord Let the projector cool for at least 45 minutes Remove the two 2 screws that secure the lamp Lift the lamp out of the projector by using the handle 1 3 Replace the lamp with a new one and secure the two 2 screws Make sure tha...

Страница 66: ...hat there are no broken shards or pieces of glass around the projector or coming out from the cooling air circulation holes Any broken shards found should be cleaned up carefully No one should check the inside of the projector except those who are authorized trained technicians and who are familiar with projector service Inappropriate attempts to service the unit by anyone especially those who are...

Страница 67: ... needs cleaning See page 64 Moving the projector from a cool to warm place may result in moisture condensation on the projection lens In such cases leave the projector off and wait until condensation evaporates No image Check the connection between your computer or video equipment and the projector See page 19 21 See if the input signal is correctly output from your computer Some laptop computers ...

Страница 68: ...AC power cord to the AC outlet Alarm will not stop ringing when the alarm goes off while trying to remove the rechargeable battery cover Warning mode is not turned on If you cannot hear the bleeping sound when you press the Alarm buttons you are not pressing the buttons correctly Try to set the Alarm setting again This symbol on the nameplate means the product is Listed by Underwriters Laboratorie...

Страница 69: ...Sound 0 63 Input Video Auto Go to System 3 Go to System 3 Video Go to System 3 Go to System 1 S video Standard Mode 3 Mode 4 Mode 5 Quit H sync freq Quit Clamp Current mode Custom Green Blue 0 63 0 63 Quit Store Mode free System 1 Quit Mid Low XLow Quit Adj N A RGB AV HDCP N A Computer 1 Digital RGB PC digital Computer 1 Analog Go to System 2 Component Go to System 1 Computer 2 RGB N A RGB Scart S...

Страница 70: ...own Security PIN code lock Alarm Timer 1 30 Min Quit L1 L2 Fan Standard Off Noise reduction Store Reset L1 L2 Mid Low XLow 0 63 0 63 Image 2 Image 3 Image 4 L2 L1 Quit Off User Capture Yes No Logo PIN code change Quit Logo PIN code lock Off Projector Remote control Quit Key lock Default Off On1 On2 PIN code change Quit Adj Film Auto setup On Off Standby mode Eco Normal Spotlight Pointer Pointer Qu...

Страница 71: ...king and the projector can be turned on The WARNING indicator keeps blinking Check and clean the filter The projector is preparing for stand by or the projection lamp is being cooled down The projector cannot be turned on until cooling is completed and the POWER indicator stops blinking The projector is in the Power management mode 71 Appendix Check the indicators for projector condition green red...

Страница 72: ...XGA 10 1280 x 960 81 13 76 107 60 00 60 00 XGA 1 1024 x 768 XGA 4 1024 x 768 48 36 60 00 XGA 6 1024 x 768 XGA 7 1024 x 768 56 476 70 07 48 50 60 02 44 00 54 58 SXGA 8 1280 x 1024 SXGA 9 1280 x 1024 63 98 60 02 79 976 75 025 XGA 5 1024 x 768 60 31 74 92 VGA 7 640 x 480 43 269 85 00 575i 15 625 50 00 Interlace 480i 15 734 60 00 Interlace SXGA 12 1152 x 900 71 40 75 60 SXGA 11 1152 x 900 61 20 65 20 ...

Страница 73: ...terlace 28 125 50 00 Interlace D XGA 1024 x 768 43 363 60 00 D WXGA 2 1360 x 768 47 7 60 00 D WXGA 3 1376 x 768 48 36 60 00 When the input signal is digital from DVI terminal refer to the chart below Note When the input signal is D SXGA 1 D SXGA 2 or D SXGA 3 images may not be displayed properly depending on computers D WXGA 4 1360 x 768 56 160 72 000 D WXGA 5 1366 x 768 46 500 50 000 D WXGA 6 128...

Страница 74: ...ut 1 DVI I Input Terminal DVI I Terminal X 1 Computer Input 2 Component Input Terminal Analog RGB Mini D sub 15 pin Terminal x 1 Monitor Output Terminal Analog RGB Mini D sub 15 pin Terminal x 1 Computer Component Audio Input Jack Mini Jack stereo x 1 Service Port Connector Mini DIN 8 pin x 1 USB Connector USB Series A connector x 1 USB Series B connector x 1 Audio Output Jack Mini Jack stereo x 1...

Страница 75: ...ler Optional Parts Accessories Owner s Manual CD ROM Quick Reference Guide AC Power Cord Remote Control and Batteries VGA Cable PIN Code Label Alarm Label Network Application CD ROM Soft Carrying Case USB Wireless LAN Adapter The specifications are subject to change without notice LCD panels are manufactured to the highest possible standards Even though 99 99 of the pixels are effective a tiny fra...

Страница 76: ...ord see page 49 on the owner s manual Network Set up and Operation Projector Input RGB Computer1 Analog RGB AV HDCP RGB PC digital Component RGB Scart Auto PJLink Input RGB 2 RGB 1 DIGITAL 2 DIGITAL 1 RGB 3 RGB 4 Video S video VIDEO 2 VIDEO 3 VIDEO 1 NETWORK 1 Wired Computer1 Digital Computer2 Video PJLink is a registered trademark of JBMIA and pending trademark in some countries PJ Link Notice Wi...

Страница 77: ...VCC 5V DATA DATA 1 2 3 4 1 2 3 4 RX TX TX RX 2 3 4 8 7 6 5 4 3 2 1 5 6 7 8 1 USB CONNECTOR Series B Ground LAN TERMINAL DVI I TERMINAL DIGITAL ANALOG 1 9 17 2 10 18 3 11 19 4 12 20 5 13 21 6 14 22 7 15 23 8 16 24 C1 C2 C3 C5 C4 T M D S Data2 No Connect T M D S Data2 No Connect T M D S Data2 Shield DDC Clock DDC Data Analog Vert sync 1 5 2 4 3 6 7 8 T M D S Data1 No Connect T M D S Data1 No Connect...

Страница 78: ...ould the four digit number be changed the factory set number will be invalid Put the label below supplied on in a prominent place of the projector s body while it is locked with a PIN code While the projector is locked with the PIN code PIN Code Lock No Logo PIN Code Lock No Factory default set No 1 1 1 1 Alarm PIN Code No Put the label below supplied on in a prominent place of the projector s bod...

Страница 79: ...79 Dimensions 9 13 232 5 51 140 2 78 70 5 3 66 93 2 14 54 3 13 15 334 3 17 80 5 5 20 132 4 43 112 5 5 08 129 8 9º MAX Screw Holes for Ceiling Mount Screw M4 Depth 0 472 12 0 Unit inch mm Appendix ...

Страница 80: ...SANYO Electric Co Ltd KM6AC ...

Отзывы: