background image

75

Appendix

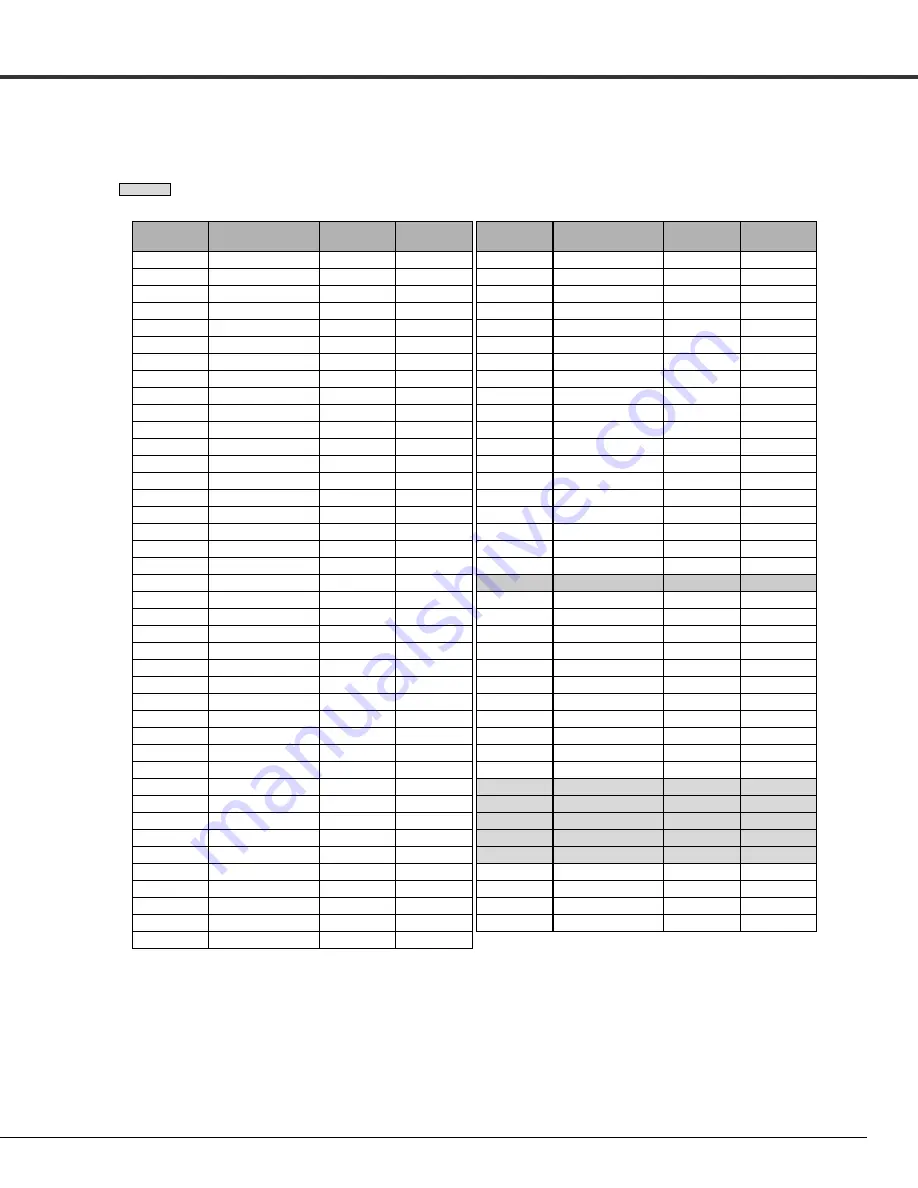
Compatible Computer Specifications

Basically this projector can accept the signal from all computers with the V- and H-Frequency mentioned
below and less than 140 MHz of Dot Clock.

PC Adjustment is limited when selecting these modes.

ON-SCREEN

DISPLAY

RESOLUTION

H-Freq.

(kHz)

V-Freq.

(Hz)

VGA 1

640 x 480

31.47

59.88

VGA 2

720 x 400

31.47

70.09

VGA 3

640 x 400

31.47

70.09

VGA 4

640 x 480

37.86

74.38

VGA 5

640 x 480

37.86

72.81

VGA 6

640 x 480

37.50

75.00

MAC LC13

640 x 480

34.97

66.60

MAC 13

640 x 480

35.00

66.67

MAC 16

832 x 624

49.72

74.55

MAC 19

1024 x 768

60.24

75.08

SXGA 1

1152 x 864

64.20

70.40

SVGA 1

800 x 600

35.156

56.25

SVGA 2

800 x 600

37.88

60.32

SVGA 3

800 x 600

46.875

75.00

SVGA 4

800 x 600

53.674

85.06

SVGA 5

800 x 600

48.08

72.19

SVGA 6

800 x 600

37.90

61.03

SVGA 7

800 x 600

34.50

55.38

SVGA 8

800 x 600

38.00

60.51

SVGA 9

800 x 600

38.60

60.31

SVGA 11

800 x 600

38.00

60.51

ON-SCREEN

DISPLAY

RESOLUTION

H-Freq.

(kHz)

V-Freq.

(Hz)

XGA 10

1024 x 768

XGA 11

1024 x 768

XGA 12

1024 x 768

XGA 13

1024 x 768

62.04

77.07

XGA 14

1024 x 768

61.00

75.70

XGA 15

1024 x 768

35.522

86.96

(Interlace)

46.90

58.20

XGA 8

1024 x 768

47.00

58.30

XGA 9

1024 x 768

58.03

72.00

SXGA 4

1280 x 1024

63.48

79.35

36.00

87.17

(Interlace)

63.34

59.98

SXGA 5

1280 x 1024

SXGA 6

1280 x 1024

SXGA 7

1280 x 1024

63.74

60.01

71.69

67.19

SXGA 10

1280 x 960

81.13

76.107

60.00

60.00

XGA 1

1024 x 768

XGA 4

1024 x 768

48.36

60.00

XGA 6

1024 x 768

XGA 7

1024 x 768

56.476

70.07

48.50

60.02

44.00

54.58

SXGA 8

1280 x 1024

SXGA 9

1280 x 1024

63.98

60.02

79.976

75.025

XGA 5

1024 x 768

60.31

74.92

VGA 7

640 x 480

43.269

85.00

575p

768 x 575

31.25

50.00

480p

640 x 480

31.47

59.88

SXGA 12

1152 x 900

71.40

75.60

SXGA 11

1152 x 900

61.20

65.20

SVGA 10

800 x 600

32.70

51.09

SXGA 13

1280 x 1024

50.00

86.00

(Interlace)

SXGA 2

1280 x 1024

62.50

58.60

SXGA 3

1280 x 1024

63.90

60.00

XGA 2

1024 x 768

68.677

84.997

XGA 3

1024 x 768

60.023

75.03

SXGA 18

1280 x 1024

46.43

86.70

(Interlace)

SXGA 19

1280 x 1024

63.79

60.18

SXGA 14

1280 x 1024

SXGA 15

1280 x 1024

SXGA 16

1280 x 1024

SXGA 17

1152 x 900

50.00

94.00

(Interlace)

63.37

60.01

76.97

72.00

61.85

66.00

1080i

1920 x 1080

33.75

60.00

(Interlace)

720p

1280 x 720

1035i

1920 x 1035

45.00

60.00

33.75

60.00

(Interlace)

50.00

(Interlace)

SXGA+ 1

1400 x 1050

63.97

60.19

MAC21

1152 x 870

68.68

75.06

UXGA 4

1600 x 1200

93.75

75.00

WXGA 2

1360 x 768

WXGA 3

1376 x 768

WXGA 4

1360 x 768

UXGA 1

1600 x 1200

47.70

60.00

UXGA 2

1600 x 1200

48.36

60.00

UXGA 3

1600 x 1200

56.16

72.00

75.00

60.00

81.25

65.00

WXGA 1

1366 x 768

87.5

70.00

48.36

60.00

SXGA+ 2

1400 x 1050

65.35

60.12

SXGA+ 3

1400 x 1050

65.12

59.90

SXGA 20

1280 x 1024

91.146

85.024

575i

––––––––

15.734

60.00

(Interlace)

480i

––––––––

15.625

50.00

(Interlace)

WXGA 7

1280 x 768

WXGA 8

1280 x 768

60.289

74.893

68.633

84.837

WXGA 6

1280 x 768

47.776

59.87

UXGA 5

1600 x 1200

106.25

85.00

1080i

1920 x 1080

28.125

Содержание PLC-XT20

Страница 1: ...Multimedia Projector MODEL PLC XT25 PLC XT25L PLC XT21 PLC XT21L PLC XT20 PLC XT20L PLC XT25K PLC XT20K Models without lens Owner s Manual PLC XT30 PLC XT30L ...

Страница 2: ...r remote control p 59 PIN code lock functions prevents unauthorized use of the projector pp 59 61 Lamp Control Brightness of the projection lamp can be selected p 54 Power Management The Power management function reduces power consumption and maintains lamp life p 58 Multilanguage Menu Display Operation menu is available in 12 languages English German French Italian Spanish Portuguese Dutch Swedis...

Страница 3: ...nent and RGB Scart 24 Basic Operation 25 Turning On the Projector 25 Turning Off the Projector 26 How to Operate the On Screen Menu 27 Menu Bar 28 Operating with Projector Control 29 Sound Adjustment 30 Operating with Remote Control 31 Input Selection 33 Input 34 Input Source Selection 35 Video System Selection 36 Computer Adjustment 37 Computer System Selection 38 Auto PC Adjustment 39 Manual PC ...

Страница 4: ...re indicate the minimum space required If the projector is to be built into a compartment or similarly enclosed these minimum distances must be maintained Do not cover the ventilation slot on the projector Heat build up can reduce the service life of your projector and can also be dangerous If the projector is unused for an extended time unplug the projector from the power outlet 0 7 20 cm 1 5 50 ...

Страница 5: ...into this projector through cabinet slots as they may touch dangerous voltage points or short out parts that could result in a fire or electric shock Never spill liquid of any kind on the projector Do not install the projector near the ventilation duct of air conditioning equipment This projector should be operated only from the type of power source indicated on the marking label If you are not su...

Страница 6: ...h generates significant heat The cooling fans and air vents are provided to dissipate the heat by drawing air into the housing and the filter is located in the intake vents to prevent dust from getting inside of the projector In order to care for the projector appropriately regular cleaning is required Remove any dirt or dust that has accumulated on the projector and on or in the filter If the pro...

Страница 7: ...nward Usual Front Downward Bottom Upward Front Upward Installing the Projector in Proper Directions Avoid positioning the projector as described below when installing Positioning Precautions CAUTION Make sure that the Fan control settings are set properly when setting up the projector with upward downward inclination of over 20 degrees to the horizontal plane Set the Fan control function in the Se...

Страница 8: ...se This may cause damage to the projector For information about transporting the projector by courier or any other transport service consult your dealer Do not put the projector in a case before it is cooled enough Cautions in Handling the Projector Do not hold the lens when lifting or moving the projector Doing so may cause damage to the lens and the projector Care must be taken when handling the...

Страница 9: ...d certified by the Canadian Standard Association CSA AC Power Cord has a grounding type AC line plug This is a safety feature to be sure that the plug will fit into the power outlet Do not try to defeat this safety feature Should you be unable to insert the plug into the outlet contact your electrician GROUND THE SOCKET OUTLET SHOULD BE INSTALLED NEAR THE EQUIPMENT AND EASILY ACCESSIBLE AC Power C...

Страница 10: ...Terminals and Connectors 3 Lamp Cover 4 Power Cord Connector 5 Optional Parts Attachment 6 Air Intake Vent 7 Hand Grip CAUTION Do not turn on the projector with the lens cap attached High temperature from light beam may damage the lens cap and result in fire hazard u Infrared Remote Receiver Front i Projection Lens for PLC XT25 XT25K XT21 XT20 XT20K o Adjustable Feet 0 Exhaust Vent Kensington Secu...

Страница 11: ... VIDEO INPUT JACK Connect the composite video output signal from video equipment to this jack p 23 u AUDIO 3 JACKS L MONO R Connect the audio output signal from video equipment connected to r or y to these jacks p 23 For a mono audio signal a single audio jack connect it to the L MONO jack q 5 BNC INPUT JACKS Connect the component or composite video output signal from video equipment to VIDEO Y Cb...

Страница 12: ...alfunction and need to be reset This can be done by pressing the RESET button with a pen which will shut down and restart the unit Do not use the RESET function excessively Rear Terminal 0 1 2 3 4 1 AUDIO MONITOR OUTPUT JACK VARIABLE This jack outputs the audio signal from computer or video equipment to external audio equipment pp 22 24 3 CONTROL PORT CONNECTOR When controlling the projector from ...

Страница 13: ...51 Adjust the volume level Point 7 8 buttons p 30 u SELECT button Execute the selected item p 27 Expand or compress the image in the Digital zoom mode p 51 Top Control r y 0 1 2 t LENS button Enter the focus zoom and lens shift adjustment mode p 29 i WARNING FILTER indicator Blinks orange indicating the filter needs cleaning Lights orange when clogging of the filter is detected urging immediate cl...

Страница 14: ...n for wireless mouse operation p 17 e SIGNAL EMISSION indicator Lights red while the laser beam is being emitted from the laser light window or a signal is being sent from the remote control to the projector p 16 0 PRESENTATION POINTER button Move a pointer of the projector or a pointer for wireless mouse operation pp 16 17 To ensure safe operation observe the following precautions Do not bend dro...

Страница 15: ...d while pressing this button for one minute When using the laser pointer for more than one minute release the LASER button and press it again p 16 Display the Pointer on the screen p 16 9 RESET ON ALL OFF switch When using the remote control set this switch to ON Set it to ALL OFF for power saving when it is not in use Slide this switch to RESET to initialize the remote control code or switch the ...

Страница 16: ...emphasize a part of the projected image Press and hold the MENU and NO SHOW buttons for more than 10 seconds to activate the Pointer function The Laser pointer has switched to the Pointer function 1 Press and hold the MENU and NO SHOW buttons for more than 10 seconds Press the LASER button on the remote control pointing toward the projector The Spotlight or Pointer is displayed on the screen with ...

Страница 17: ... for more than five seconds to switch between the codes 1 To initialize the remote control code slide the RESET ON ALL OFF switch to RESET and then to ON The initial code is set to Code 1 2 Press and hold the MENU and a number button 1 8 that corresponds to the remote control code for more than five seconds to switch between the codes MENU button Remote Control Code Wireless Mouse Operation Number...

Страница 18: ...efully wipe the case clean and install new batteries Risk of an explosion if battery is replaced by an incorrect type Dispose of used batteries according to the instructions Press the lid downward and slide it Open the battery compartment lid Install new batteries into the compartment Replace the compartment lid Two AAA size batteries For correct polarity and be sure battery terminals are in conta...

Страница 19: ...ctor Slowly turn the lens clockwise until it clicks Make sure that the lens is fully inserted to the projector 3 Red dots CAUTION Do not press the lens release button when attaching the lens Lens Installation Installation While pressing the Lens release button on the top of the cabinet turn the lens counterclockwise until it stops and pull it out slowly from the projector Shift the lens to the cen...

Страница 20: ...300 230 155 116 78 30 Max Zoom Min Zoom Screen Size W x H mm 4 3 aspect ratio Zoom min 30 Zoom max 610 x 457 3 9 1 2 m 100 2032 x 1524 14 1 4 3 m 10 8 3 3 m 150 3048 x 2286 21 3 6 5 m 16 4 5 0 m 200 4064 x 3048 28 5 8 7 m 22 0 6 7 m 300 6096 x 4572 32 8 10 0 m Inch Diagonal Center 15 15 50 50 uppermost downmost leftmost rightmost Moving the Lens For details about the Lens shift function refer to L...

Страница 21: ...ith single phase power systems having a grounded neutral conductor To reduce the risk of electrical shock do not plug into any other type of power system If you are not sure of the type of power being supplied consult your authorized dealer or service station Connect the projector with all peripheral equipment before turning the projector on CAUTION For safety unplug the AC power cord when the pro...

Страница 22: ...able stereo USB port Audio Output USB AUDIO OUT stereo Audio Input Unplug the power cords of both the projector and external equipment from the AC outlet before connecting cables Notes When the AUDIO OUT is plugged in the projector s built in speaker is not available USB cable connection is needed when operating the computer with the remote control See page 78 for ordering optional cables Monitor ...

Страница 23: ...and audio cable Composite Video and Audio Output S video Output AUDIO IN Audio Input AUDIO OUT stereo R L Video Unplug the power cords of both the projector and external equipment from the AC outlet before connecting cables AUDIO IN VIDEO R L Notes When the AUDIO OUT is plugged in the projector s built in speaker is not available The S VIDEO jack connection overrides the VIDEO jack connection when...

Страница 24: ... Component Video Output Y Cb Pb Cr Pr Audio Output AUDIO OUT stereo Audio cable stereo AUDIO IN Y Cb Pb Cr Pr ANALOG IN Scart VGA cable BNC cable DVI Digital cable RGB Scart 21 pin Output Digital Output HDCP compatible DIGITAL DVI D Unplug the power cords of both the projector and external equipment from the AC outlet before connecting cables Notes When the AUDIO OUT is plugged in the projector s ...

Страница 25: ...e remote control to enter a number Press the Point 8 button to fix the number and move the red frame pointer to the next box The number changes to If you fixed an incorrect number use the Point 7 button to move the pointer to the number you want to correct and then enter the correct number Repeat this step to complete entering a four digit number After entering the four digit number move the point...

Страница 26: ...ough the POWER indicator stops blinking and you can turn on the projector After it is cooled down completely unplug the AC power cord Power off disappears after 4 seconds Notes When the On start function is set to On the projector will be turned on automatically by connecting the AC power cord to an AC outlet p 58 The running speed of cooling fans is changed according to the temperature inside the...

Страница 27: ... For each adjustment and setting procedure refer to the respective sections in this manual Use the Point 7 8 buttons to select a Menu icon Use the Point ed buttons to select an item to in the selected menu Press the SELECT button to show the item data Use the Point 7 8 buttons to adjust the values To close the On Screen Menu press the MENU button again Press the MENU button on the top control or t...

Страница 28: ...ounter Filter counter Factory default Quit Adjust the volume or mute the sound p 30 Image Select an image mode pp 43 44 Dynamic Standard Real Cinema Image 1 4 PC Adjust Adjust parameters to match with an input signal format pp 39 41 Guide Window Show the selected Menu of the On Screen Menu Input Select either Computer or Video for input source pp 33 35 Screen Adjust the screen pp 49 52 Keystone Ce...

Страница 29: ...om on the screen Use the Point ed buttons to zoom in and out the image Zoom Adjustment Display Focus on the screen Use the Point ed buttons to adjust focus of the image Focus Adjustment Information display can be used to confirm the current operating condition of the projector and the signal being projected through the projector Press the INFO button on the top control or remote control to display...

Страница 30: ...oint 7 8 buttons to switch the mute function On Off When the sound is turned off On is displayed Press the Point 7 8 buttons again to turn the sound back on Use the Point ed buttons to move the red frame pointer to the desired item and then press the SELECT button Approximate level of the volume Exit the Sound Menu Approximate level of the volume Press the MUTE button to set the Mute function On o...

Страница 31: ...on See page 39 for details AUTO PC button Press the D ZOOM buttons on the remote control to enter to the Digital zoom mode See page 51 for details D ZOOM button D ZOOM button INFO button POINT ed buttons FREEZE button AUTO PC button Press the SCREEN buttons on the remote control to select the desired screen size The selected screen size symbol appears on the screen for 4 seconds See pages 51 52 fo...

Страница 32: ...us page for the description of other buttons Remote Control NO SHOW button P TIMER button Press the KEYSTONE button on the remote control The Keystone appears on the screen Use the Point ed buttons to correct keystone distortion The keystone adjustment can be stored see page 50 The white arrows indicate that there is no correction A red arrow indicates the direction of correction An arrow disappea...

Страница 33: ... to the projector This projector has three input options INPUT 1 INPUT 2 and INPUT 3 and they are categorized by different signal type Select an input source with the INPUT button on the top control or the INPUT 1 3 buttons on the remote control or by On Screen Menu ...

Страница 34: ...rce Remote Control Operation INPUT button Press the INPUT button on the top control It switches to INPUT 1 INPUT 2 and INPUT 3 as you press the INPUT button Before using the INPUT button on the top control you must select a correct input source by On Screen Menu and the latest input source will be displayed Top Control Operation RGB Scart RGB PC digital RGB AV HDCP Video Component Video S video Re...

Страница 35: ... AV HDCP When the RGB PC signal is connected RGB INPUT 2 When the RGB video signal is connected Video When the component signal is connected Component Auto INPUT 3 When the video signal is connected Video When the S video signal is connected S video When selecting Auto the projector automatically detects an incoming video signal and adjusts itself to optimize its performance The projector selects ...

Страница 36: ...CAM NTSC NTSC4 43 PAL M PAL N The projector automatically detects an incoming video signal and adjusts itself to optimize its performance If the projector cannot reproduce proper video image select a specific component video signal format from among 480i 575i 480p 575p 720p 1035i and 1080i Auto COMPONENT VIDEO SIGNAL FORMAT Video or S Video Component The projector automatically detects an incoming...

Страница 37: ...en needed Maximum 10 memory areas Mode 1 10 are available Some adjustments may not available with the digital video signals AV HDCP input HELPFUL HINTS We frequently receive inquiries about computer connections If the computer screen is not displayed properly check the following matters once again Is your computer cable connected to the projector s INPUT 1 or INPUT 2 terminals properly Are the pro...

Страница 38: ... automatically detects the signal format and tunes to project a proper image without any additional settings Signal formats provided in this projector are shown on pages 75 76 One of the following messages may appear when The projector cannot recognize the connected signal conforming to the provided PC Systems The Auto is displayed on the System Menu box and the Auto PC Adjustment function works t...

Страница 39: ...al and Vertical position of some computers cannot be fully adjusted with the Auto PC Adjustment function When the image is not provided properly with this operation manual adjustments are required pp 40 41 The Auto PC Adjustment cannot be operated when 480i 575i 480p 575p 720p 1035i or 1080i is selected in the PC System Menu p 38 or when the signal is coming from the DVI terminal Auto PC Adjustmen...

Страница 40: ...the horizontal picture position Horizontal Use the Point 7 8 buttons to adjust the vertical picture position Vertical Press the SELECT button to show H sync freq and V sync freq of the connected computer Current mode Use the Point 7 8 buttons to adjust the clamp level When the image has dark bars try this adjustment Clamp Press the SELECT button here to adjust other items Use the Point 7 8 buttons...

Страница 41: ...s and then select Yes All adjustments will return to their previous figures Mode free Vacant Values of Total dots Horizontal Vertical Display area H and Display area V Close this dialog box To clear the stored data select Mode free and then press the SELECT button Move the red arrow pointer to the Mode that you want to clear and then press the SELECT button Notes Display area H V cannot be selecte...

Страница 42: ...42 Computer Adjustment MEMO ...

Страница 43: ... movies etc You can also adjust image parameters in the Image Adjust Menu and save them as Image 1 4 The four image modes with respect to each input source are stored Select Image Mode with the On Screen Menu Depending on the projected image some image modes will not be available Image Mode Selection ...

Страница 44: ...eck marked Image Menu Normal picture mode preset on the projector Standard Picture mode with improved halftone for graphics This icon is displayed with the computer signal Real Picture mode adjusted with fine tone This icon is displayed with the video signal Cinema Image Menu icon Image Mode Selection For viewing with the user preset image mode in the Image Adjust Menu see page 48 This Image memor...

Страница 45: ...noise interference on the screen Certain images may be inapplicable Progressive An interlaced video signal can be displayed in progressive mode reproducing highly detailed images The adjusted parameters are stored and called up later when needed Maximum of four user image modes Image 1 Image 4 are available and they can be called up in the Image Menu see Image Mode Selection on pages 43 44 Not ava...

Страница 46: ...een Press the Point 7 button to lighten blue tone press the Point 8 button to deepen blue tone from 0 to 63 White balance Blue Use the Point 7 8 buttons to select the desired Color temp level High Mid Low or XLow Color temp Image Adjustment Notes When the White balance Red Green or Blue is adjusted the Color temp level will change to Adj Tint cannot be selected when the video system is PAL SECAM P...

Страница 47: ...r 1080i is selected p 36 Reset and Store icons will be displayed when more than one adjustment is made An interlaced video signal can be displayed in progressive mode Select one of the following options Off Disabled L1 For an active picture L2 For a still picture Film For watching a film With this function the projector reproduces pictures faithful to the original film quality Progressive Noise re...

Страница 48: ...ed up by selecting an Image 1 4 in the Image Mode Selection on page 44 To reset the adjusted data select Reset and press the SELECT button A confirmation box appears and then select Yes All adjustments will return to their previous figures Reset Store Exit the Image Adjust Menu Quit Image Mode Menu Move the red frame pointer to an image item to be set and then press the SELECT button Store icon A ...

Страница 49: ...h the following options Screen size Select a screen size conforming to the input signal source Digital zoom Zoom up and down the images Only available with the computer signals Keystone Correct Keystone distortion Ceiling Set when projecting from the ceiling Rear Set when projecting from the rear of the screen ...

Страница 50: ...8 buttons to switch between each option Store Keep the keystone correction even when the AC power cord is unplugged Reset Release the keystone correction when the AC power cord is unplugged To correct keystone distortion press the SELECT button The Keystone appears on the screen Use the Point ed buttons to correct keystone distortion p 32 Keystone Use the Point 7 8 buttons to select Store or Reset...

Страница 51: ... Point ed7 8 buttons to pan the image When adjusted the arrows will turn red When reached to the correction limits the arrows will disappear Provide the image to fit the wide video aspect ratio 16 9 by expanding the image width uniformly This function can be used for providing a squeezed video signal at 16 9 Full screen Provide the full screen image Notes The projector cannot display any resolutio...

Страница 52: ...uttons to move the red frame pointer to the desired function and then press the SELECT button 2 Provide the image at the 4 3 normal video aspect ratio Normal Wide Provide the image at the 16 9 wide screen ratio Note The Screen Menu cannot be operated when 720p 1035i or 1080i is selected in the AV System Menu p 36 Move the red frame pointer to the desired function and press the SELECT button Screen...

Страница 53: ...the location of infrared remote receiver Display Select the screen display option Power management Set the Power management function On start TurnontheprojectorautomaticallywhentheACcordisconnected Fan control Set the cooling fans operation Security Set the Security function Test pattern Convenient test patters are provided Warning log Check the records of operation failures Lamp counter Check the...

Страница 54: ...und User Project an image selected in the Logo setting Black Project a black background Note When no captured image is set the User options is not available Lamp control This function allows you to change brightness of the screen Auto 1 The brightness according to the input signal between Normal and Eco mode Auto 2 The brightness according to the input signal between High and Eco mode High Brighte...

Страница 55: ... factory set logo Off Show the countdown display only Logo Logo and Logo PIN code lock settings This function allows you to customize the screen logo with Logo select Capture and Logo PIN code lock functions Logo Note When On is selected in the Logo PIN code lock function Logo select and Capture functions cannot be selected Notes Before capturing an image select Standard in the Image Menu to captu...

Страница 56: ...r If you entered an incorrect Logo PIN code Logo PIN code and the number will turn red for a moment Enter the correct Logo PIN code all over again After a correct Logo PIN code is entered the following dialog box appears Change the Logo PIN code Logo PIN code can be changed to your desired four digit number Press the Point d button to select Logo PIN code change and then press the SELECT button Th...

Страница 57: ...receiver of the remote control See Remote Control Operating Range on page 18 for details Both Activate both the front and back receiver Front Activate only the front receiver Back Activate only the back receiver Display This function decides whether to display On Screen Displays On Show all the On Screen displays Use this function when you want to project images after the lamp becomes bright enoug...

Страница 58: ...e countdown time can be set between 1 30 minutes Use the Point 7 8 buttons to set the countdown timer Select one of the following options Ready When the lamp has been fully cooled down the POWER indicator changes to fast blinking In this condition the projection lamp can be turned on if the input signal is reconnected or any button on the top control or remote control is pressed Shut down When the...

Страница 59: ... effect set this function to On Fan control Key lock Select Key lock Use the Point ed buttons to choose one of the options and select Yes to activate it Security Key lock and PIN code lock settings This function allows you to use the Key lock and PIN code lock function to set the security for the projector operation Key lock This function locks the top control and remote control buttons to prevent...

Страница 60: ...n incorrect PIN code PIN code and the number will turn red for a moment Enter the correct PIN code all over again Setting PIN code lock This function prevents the projector from being operated by unauthorized persons and provides the following setting options for security Off Unlocked On1 Enter the PIN code every time turning on the projector On2 Enter the PIN code to operate the projector once th...

Страница 61: ...ctor Warning log This function records anomalous operations while the projector is in operation and use it when diagnosing faults Up to 10 warning logs are displayed with the latest warning message at the top of the list followed by previous warning messages in chronological order This function is used to reset the lamp counter When the lamp life is left less than 100 hours the Lamp replacement ic...

Страница 62: ...appears on the screen and the WARNING FILTER indicator lights orange notifying the cleaning is necessary After cleaning the filter be sure to select RESET and set the timer The WARNING FILTER indicator and Filter warning icon will not turn off until the filter counter is reset For details about resetting the timer refer to Resetting the Filter Counter on page 64 Filter counter Filter counter Use t...

Страница 63: ...ments may cause poor image quality IMPORTANT NOTICE ON MAINTENANCE OF THE FILTER MAINTAIN THE FILTER by using the Filter counter function in the menu Clean the filter regularly The frequency of cleaning the filter depends on the environment in which you use the projector If you use the projector in an office or home every day we recommend that you clean the filter once a week or about every 200 ho...

Страница 64: ... Do not wash the filter with water and any other liquid matter Otherwise the filter may be damaged 4 Reset the filter counter in the Setting Menu See Resetting the Filter Counter below 6 Press and hold the filter cover and pull out the filter Filter cover Filter Filter Filter cover Be sure to reset the Filter counter after cleaning or replacing the filter Press the MENU button to display the On Sc...

Страница 65: ...ouch the glass bulb The glass can shatter and may cause injury Allow a projector to cool for at least 45 minutes before you open the Lamp cover The inside of the projector can become very hot CAUTION Turn off the projector and unplug the AC power cord Let the projector cool for at least 45 minutes Remove the two 2 screws that secure the lamp Lift the lamp out of the projector by using the handle 1...

Страница 66: ...eplacement section of this manual Continuous use of the lamp with the LAMP REPLACE indicator lighted may increase the risk of lamp explosion A Lamp may explode as a result of vibration shock or degradation as a result of hours of use as its lifetime draws to an end Risk of explosion may differ according to the environment or conditions in which the projector and lamp are being used IF A LAMP EXPLO...

Страница 67: ...ate space for the projector to be ventilated Check the installing condition to see if the air vents of the projector are not blocked Has the projector been installed near an Air Conditioning Heating Duct or Vent Move the installation of the projector away from the duct or vent Is the filter clean Clean the filter periodically or replace it with a new one The projector is shut down and all five ind...

Страница 68: ... of the lens When the projector is not in use replace the lens cap Cleaning the Projector Cabinet Unplug the AC power cord before cleaning Gently wipe the projector body with a soft dry cleaning cloth When the cabinet is heavily soiled use a small amount of mild detergent and finish with a soft dry cleaning cloth Avoid using an excessive amount of cleaner Abrasive cleaners solvents or other harsh ...

Страница 69: ...een See page 20 Check the projection lens to see if it needs cleaning See page 68 Moving the projector from a cool to warm place may result in moisture condensation on the projection lens In such cases leave the projector off and wait until condensation evaporates No image Check the connection between your computer or video equipment and the projector See pages 22 24 See if the input signal is cor...

Страница 70: ...e Control does Check the batteries not work Make sure no obstruction is between the projector and remote control Make sure you are not too far from the projector when using the remote control Maximum operating range is 16 4 5 m Make sure that the remote control code conforms to the projector s code See page 57 Unlock the Key lock function for the remote control See page 59 WARNING High voltages ar...

Страница 71: ...de 1 Mode 2 XGA 1 SECAM NTSC Auto PAL PAL M PAL N NTSC4 43 SYSTEM 2 1035i 720p Auto 1080i 480p 575i 575p 480i Input H sync freq V sync freq PIN code lock Information Key lock Screen Language Lamp status Power management Security Remote control code Quit 0 63 0 63 Off L1 L2 Film Image Adjust Contrast Brightness Color Tint Red Green Blue Sharpness Reset Store Gamma Progressive 0 63 0 63 0 63 0 15 0 ...

Страница 72: ...e Digital zoom Full screen Screen Digital zoom Rear Keystone Ceiling Reset Store On Off On Off Logo select Logo Off Default User Yes No On Off Both Front Back RC sensor On Countdown off Off Display On Off On start Highland Slant Fan control Off L1 L2 On Off Projector all PIN code change PIN code lock Quit Key lock Security Off Projector part Off On 1 On 2 Remote control all Remote control part 8 t...

Страница 73: ... cooled down The projector cannot be turned on until cooling is completed and the POWER indicator stops blinking POWER green Indicators WARNING TEMP red LAMP red The projector detects an abnormal condition and cannot be turned on Unplug the AC power cord and plug it again to turn on the projector If the projector is turned off again unplug the AC power cord and contact the dealer or the service ce...

Страница 74: ...h and the projector is in stand by mode and ready to be turned on with the ON STAND BY button Projector Condition POWER green Indicators LAMP REPLACE yellow LAMP red LAMP REPLACE indicator The lamp has been used overtime Replace the lamp immediately and then reset the lamp counter The indicator will be turned off after resetting the counter If filter clogging is detected during operations the Filt...

Страница 75: ... 10 1280 x 960 81 13 76 107 60 00 60 00 XGA 1 1024 x 768 XGA 4 1024 x 768 48 36 60 00 XGA 6 1024 x 768 XGA 7 1024 x 768 56 476 70 07 48 50 60 02 44 00 54 58 SXGA 8 1280 x 1024 SXGA 9 1280 x 1024 63 98 60 02 79 976 75 025 XGA 5 1024 x 768 60 31 74 92 VGA 7 640 x 480 43 269 85 00 575p 768 x 575 31 25 50 00 480p 640 x 480 31 47 59 88 SXGA 12 1152 x 900 71 40 75 60 SXGA 11 1152 x 900 61 20 65 20 SVGA ...

Страница 76: ... 276 58 069 D SXGA 3 1280 x 1024 31 65 29 8 When an input signal is digital from the DVI terminal refer to the chart below PC Adjust Menu cannot be selected when Input 1 RGB PC digital is selected in the Input Menu Notes When the input signal is D SXGA 1 and D SXGA 1 images may not be displayed properly depending on computers Specifications are subject to change without notice D WXGA 1 1366 x 768 ...

Страница 77: ...amp 300 W Interface Input 1 Digital DVI D x 1 Analog Mini D sub 15 pin x 1 Input 2 BNC Type x 5 G or Video Y B or Cb Pb R or Cr Pr HV and V Input 3 RCA Type x 1 Mini DIN 4 pin x 1 AUDIO IN Audio 1 Mini Type stereo Audio 2 Mini Type stereo Audio 3 RCA Type x 2 Analog Out Mini D sub 15 pin x 1 Audio Out Audio Mini Type stereo x 1 R C Jack Mini Type Wired Remote x 1 Control Port Mini DIN 8 pin x 1 US...

Страница 78: ...del No to the sales dealer Optional Parts Accessories Owner s Manual CD ROM Quick Reference Guide AC Power Cord Remote Control and Batteries VGA Cable USB Cable Lens Cap for PLC XT30 PLC XT25 XT25K XT21 XT20 XT20K Lens Mount Cover for PLC XT30L PLC XT25L XT21LXT20L PIN Code Label The specifications are subject to change without notice LCD panels are manufactured to the highest possible standards E...

Страница 79: ...conformance with PJLink Standard Class 1 Projector Input Video RGB Scart RGB PC Analog Component RGB Auto PJLink Input VIDEO 1 RGB 2 RGB 1 VIDEO 2 RGB 3 Video S video VIDEO 4 VIDEO 5 VIDEO 3 Input 2 Input 3 PJLink is a registered trademark of JBMIA and pending trademark in some countries PJ Link Notice Parameter 21 12 11 22 13 24 25 23 RGB PC Digital DIGITAL 1 31 RGB AV HDCP DIGITAL 2 32 Input 1 N...

Страница 80: ...e H V sync Ground Vert sync Ground Vert sync 9 13 10 12 11 14 15 T X D USB CONNECTOR Series B DVI D TERMINAL DIGITAL 1 9 17 2 10 18 3 11 19 4 12 20 5 13 21 6 14 22 7 15 23 8 16 24 T M D S Data2 No Connect T M D S Data2 No Connect T M D S Data2 Shield DDC Clock DDC Data Analog Vert sync 1 5 2 4 3 6 7 8 T M D S Data1 No Connect T M D S Data1 No Connect T M D S Data1 Shield 5V Power Ground for 5V Hot...

Страница 81: ...the service station PIN Code Number Memo Factory default set No 1 2 3 4 Factory default set No 4 3 2 1 Should the four digit number be changed the factory set number will be invalid While the projector is locked with the PIN code Put the label below supplied on in a prominent place of the projector s body while it is locked with a PIN code PIN Code Lock No Logo PIN Code Lock No ...

Страница 82: ...82 Appendix Dimensions 13 7 348 1 1 65 41 9 5º MAX 7 87 200 6 46 164 21 09 535 7 17 48 444 10 85 275 5 3 40 86 4 11 10 282 Screw Holes for Ceiling Mount Screw M6 Depth 0 393 10 0 Unit inch mm ...

Страница 83: ...SANYO Electric Co Ltd MZ7A B ...

Отзывы: