background image

Language

  Display

Digital Out

Parental

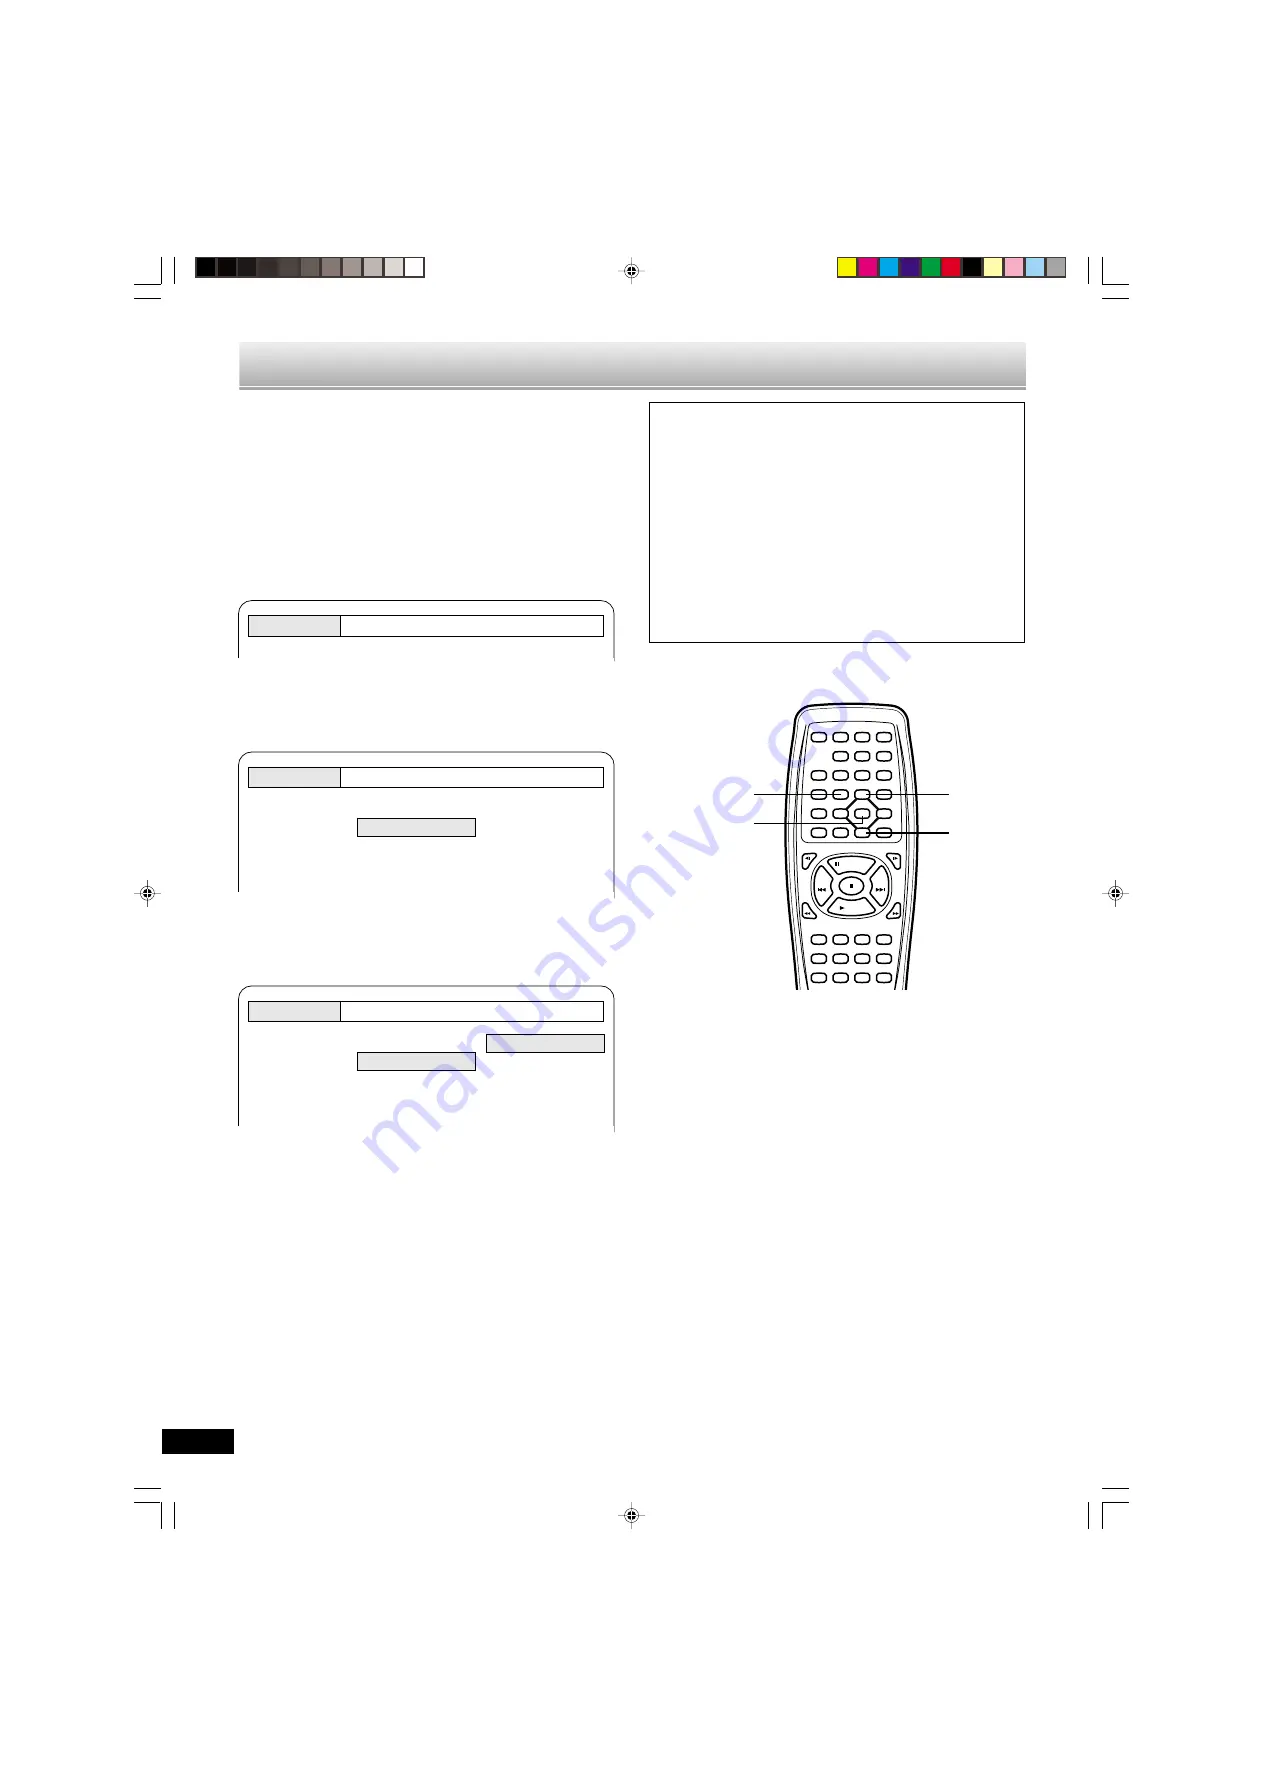
Once the initial settings have been completed, the unit can al-
ways be operated under the same conditions.
The settings will be retained in the memory until they are changed,
even if the power is turned off.

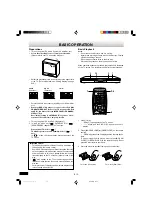
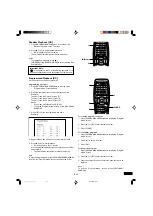
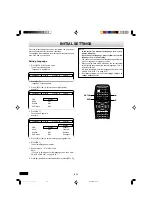
Setting Language

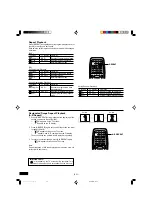
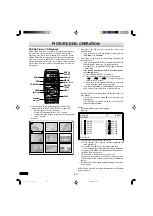
1. Press [SETUP] in the stop mode.

The setup screen appears.
“Language” is highlighted.

Notes:

In this instruction manual, the language in on-screen
display is English.
If you change the language, please follow the selected
language in on-screen display.

You cannot switch audio sound track languages if there is
only one language recorded on the disc.

When you play back a DVD video disc, the unit automati-
cally displays the pre-selected subtitle language if it is in-
cluded on the disc.

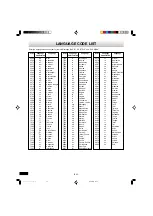
If “Others” is selected, enter the language code. (See “LAN-
GUAGE CODE LIST” on page E33.)

For improvement, on-screen displays subject to
change without notice.

INITIAL SETTINGS

Language

  Display

Digital Out

Parental

OSD
Audio
Subtitle
DVD Menu

English
Disc
Disc
Disc

English
Español
Français
Deutsch
Portugues

Language

  Display

Digital Out

Parental

OSD
Audio
Subtitle
DVD Menu

English
Disc
Disc
Disc

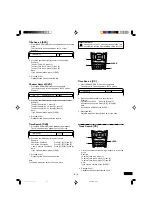
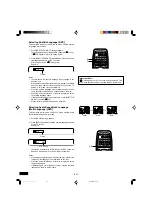
5. Press [ 

5

 ] or [ 

4

 ] to select the language (highlighted).

6. Press [ENT].

The selected language remains.

7. Repeat steps 3 ~ 6 for other items.

Note:
If “Others” is selected, enter the language code. (See “LAN-
GUAGE CODE LIST” on page E33.)

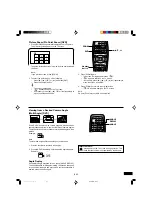
8. Press [ 

4

 ] to skip back to the setup screen (or press [SETUP]).

4. Press [ENT].

The submenu appears.
Example:

2. Press [ENT].

“Language” screen appears.

3. Press [ 

5

 ] or [ 

4

 ] to select the item (highlighted).

Example:

LAST MEMO

PICTURE

MODE

OPEN/CLOSE

z

/ON

REPEAT A-B REPEAT

PROGRAM

/RANDOM

ON SCREEN

ZOOM

ANGLE

ANGLE

REPLAY

SETUP

MENU

SUBTITLE

CHANGE

4

a

b

5

ENT

SUBTITLE

ON/OFF

AUDIO

RETURN

TOP MENU

REV SLOW

FWD SLOW

PAUSE/STEP

PREV

NEXT

PLAY

REV

FWD

CLEAR

1

2

3

C

4

5

6

0

7

8

9

SEARCH

MODE

SETUP

ENT

5

4

-E29-

DVD-SL33/CA(English)

13/06/2003, 10:06

30

Содержание DVD-SL33

Страница 1: ...OSE z ON REPEAT A B REPEAT PROGRAM RANDOM ON SCREEN ZOOM ANGLE ANGLE REPLAY SETUP MENU SUBTITLE CHANGE 4 a b 5 ENT SUBTITLE ON OFF AUDIO RETURN TOP MENU REV SLOW FWD SLOW PAUSE STEP PREV NEXT PLAY REV FWD CLEAR 1 2 3 C 4 5 6 0 7 8 9 SEARCH MODE z ON e f a n q OPEN CLOSE English DVD SL33 CA English 13 06 2003 10 06 1 ...

Страница 2: ...20 Angle Replay E20 Repeat Playback E21 Designated Range Repeat Playback A B Repeat E21 Random Playback CD E22 Programmed Playback CD E22 Selecting Subtitle Language DVD E23 Selecting Audio Soundtrack Language Multi Language DVD E23 Selecting On Screen Information E24 Selecting Picture Mode E24 MP3 CD OPERATION E25 Before Starting E25 MP3 CD Playback E25 Stopping Playback E26 Pause E26 File Skip E...

Страница 3: ...OWNERS CAUTION RISK OF ELECTRIC SHOCK DO NOT OPEN THIS CLASS B DIGITALAPPARATUS COMPLIES WITH CA NADIAN ICES 003 WARNING TO PREVENT FIRE OR SHOCK HAZARD DO NOT EXPOSE THIS APPLIANCE TO RAIN OR MOISTURE WARNING UNAUTHORIZED RECORDING OF COPYRIGHT MATERIAL MAY VIOLATE APPLICABLE COPYRIGHT LAWS THE MANUFACTURER ASSUMES NO RESPONSIBILITY FOR UNAUTHORIZED DUPLICATION USE OR OTHER ACTS WHICH INFRINGE UP...

Страница 4: ...rheating and these openings must not be blocked or covered The openings should never be blocked by placing the product on a bed sofa rug or other similar surface This product should not be placed in a built in installation such as a bookcase or rack unless proper ventilation is provided or the manufacturer s instructions have been adhered to 11 Power Sources This product should be operated only fr...

Страница 5: ...ects of any kind into this product through openings as they may touch dangerous voltage points or short out parts that could result in a fire or elec tric shock Never spill liquid of any kind on the product 19 Servicing Do not attempt to service this product yourself as opening or removing covers may expose you to dangerous voltage or other hazards Refer all servicing to qualified service personne...

Страница 6: ...ode indicators REP 1 ALL A B 5 DTS indicator dts 6 Dolby Digital indicator Digital 7 Program indicator PGM 8 Random play indicator RND 9 Message or number indicators Title cheaper track playing time or other information 10 MP3 indicator MP3 11 CD indicator CD 6 5 4 3 2 1 Rear Panel 1 Audio output jacks AUDIO OUT 2 Coaxial digital output jack DIGITAL OUT 3 Video output jack VIDEO OUT 4 Component vi...

Страница 7: ...AT A B REPEAT PROGRAM RANDOM ON SCREEN ZOOM ANGLE ANGLE REPLAY SETUP MENU SUBTITLE CHANGE 4 a b 5 ENT SUBTITLE ON OFF AUDIO RETURN TOP MENU REV SLOW FWD SLOW PAUSE STEP PREV NEXT PLAY REV FWD CLEAR 1 2 3 C 4 5 6 0 7 8 9 SEARCH MODE 1 2 4 5 6 7 8 9 10 11 12 13 14 15 16 17 18 20 21 22 23 24 25 26 27 28 29 30 31 32 19 3 Inserting batteries Two AA batteries not supplied 1 2 Note Remove the batteries i...

Страница 8: ...ample 1 and Using RF Modula tor on pages E8 E9 Please purchase the TV with Audio Video input jacks or the RF Modulator See Connecting to a Conventional TV Example 1 on page E8 See Connecting to a TV with Progres sive scan Capability Example 2 on page E10 TV and Amplifier Connection x x x x x x VIDEO Connection AUDIO Connection x x x x x x x x x x Do you connect it to an Amplifier with Dolby Digita...

Страница 9: ...S video input jack connect the DVD video player with the S video cable not supplied The VIDEO OUT jack connection is not necessary You can enjoy clearer picture playback 2 Set the VIDEO OUT SELECT switch to the S VIDEO position 3 You also need to connect the left and right audio cables not supplied to the AUDIO OUT jacks of DVD video player and the Audio input jacks of the TV DVD video player To S...

Страница 10: ...Yellow To VIDEO OUT jack Yellow Red R White L To AC 120V 60Hz RF Modulator 3 4 CHANNEL TO TV ANT IN R AUDIO L VIDEO A V INPUT JACKS VHF UHF ANTENNA IN 3 4 CHANNEL VHF UHF FROM ANT IN OUT TO TV 3 4 1 2 5 5 Example DVD video player VCR TV and RF Modulator connections 1 Connect the antenna cable not supplied to the VHF UHF FROM ANT IN terminal of the VCR 2 Connect the 75 ohm coaxial cable not supplie...

Страница 11: ... video player and the Audio input jacks of the TV 4 Set the DVD video player to the PROGRESSIVE position See page E15 Progressive Scanning While interlaced scanning produces one frame of video in two fields progressive scanning creates one frame in one field Conventional interlaced scanning constitutes one second with 30 frames 60 fields but progressive scanning constitutes it with 60 frames from ...

Страница 12: ...eo input jack connect the DVD video player with the S video cable not supplied The VIDEO OUT jack connection is not necessary You can enjoy clearer picture playback 2 Set the VIDEO OUT SELECT switch to the S VIDEO position 3 You also need to connect the left and right audio cables not supplied to theAUDIO OUT jacks of DVD video player and the Audio input jacks of the Audio System DVD video player ...

Страница 13: ...igital Amplifier Example 5 You can enjoy 2 Channel Digital Stereo Sound To digital audio input Amplifier with Dolby Digital Decoder DTS Decoder or MPEG2 Decoder Coaxial cable not supplied Surround right speaker Subwoofer Front right speaker Surround left speaker Front left speaker Center speaker Manufactured under license from Dolby Laboratories Dolby Pro Logic and the double D symbol are trademar...

Страница 14: ...l shock or a malfunc tion may result Use in an area where there is low humidity and little dust Do not disassemble or alter the unit in any way Do not use the unit in areas where extremes in temperature occur below 40 F 5 C or exceeding 95 F 35 C or where it may be exposed to direct sunlight Because of the DVD video player extremely low noise and wide dynamic range there is a tendency to set the v...

Страница 15: ...oring and Cleaning Discs Fingerprints and dust should be carefully wiped from the signal surface of the disc glossy side with a soft cloth Wipe in a straight motion from the center to the outside of the disc Never use chemicals such as record cleaning sprays an tistatic sprays or fluids benzene or thinner to clean the discs These chemicals will permanently damage the plas tic surface of the disc T...

Страница 16: ...on the TV screen or jacket or case of the disc may appear on the TV screen during operarion This icon means that the function is not available on the disc now For improvement FL displays and on screen displays sub ject to change without notice Basic Playback Notes Do not touch the disc tray while it is moving Never place anything except a disc on the disc tray Foreign objects can damage the unit D...

Страница 17: ...he disc Play Movie Languages Audio Set Up Subtitles Theatrical Trailers Scene Selections MENU TV ENT 4 b 5 a To lock the disc tray You can lock the disc tray to prevent misuse of young children While the disc tray is opened press q OPEN CLOSE on the until LOC appears on the FL display or Disc Tray Locked appears on the TV screen The disc tray closes The OPEN CLOSE or q OPEN CLOSE button will not f...

Страница 18: ...ressed Skipping backward Press PREV f or f during playback to skip back to the beginning of the chapter or track currently play f appears briefly on the TV screen Press the button again immediately to skip back to the begin ning of the previous chapter or track Note You can skip only through the chapters not over the title on the DVD disc Important Note may appear on the TV screen during operation...

Страница 19: ...5 42 minutes 39 seconds Press 4 2 3 and 9 1 hour 4 minutes 35 seconds Press 1 0 4 3 and 5 Note If you make a mistake press CLEAR 3 Press a PLAY Playback starts from the searched time Note The Search mode may not work on some discs Important Note may appear on the TV screen during operation This icon means that the function is not available on the disc now REV SLOW FWD SLOW PAUSE STEP PREV NEXT PLA...

Страница 20: ...MENU CHANGE 4 a b 5 ENT SUBTITLE ON OFF AUDIO RETURN TOP MENU REV SLOW FWD SLOW PAUSE STEP PREV NEXT PLAY REV FWD CLEAR 1 2 3 C 4 5 6 0 7 8 9 SEARCH MODE REV PLAY FWD Important Note may appear on the TV screen during operation This icon means that the function is not available on the disc now SETUP MENU CHANGE 4 a b 5 ENT SUBTITLE ON OFF AUDIO RETURN TOP MENU REV SLOW FWD SLOW PAUSE STEP PREV NEXT...

Страница 21: ...WD SLOW PAUSE STEP PREV NEXT PLAY REV FWD CLEAR 1 2 3 C 4 5 6 0 7 8 9 SEARCH MODE 4 a 5 b ZOOM Number button ENT Viewing from a Desired Camera Angle Multi Angle DVD Some DVD video discs may contain scenes which have been shot simultaneously from a number of different camera angles The jacket or case of discs that are recorded with angles will be marked Example Note The recorded angles differ depen...

Страница 22: ...OM ANGLE ANGLE REPLAY SETUP MENU SUBTITLE CHANGE 4 a b 5 ENT SUBTITLE ON OFF AUDIO RETURN TOP MENU REV SLOW FWD SLOW PAUSE STEP REPEAT Designated Range Repeat Playback A B Repeat 1 Press A B REPEAT during playback at the beginning of the section you want to repeat Point A A appears on the TV screen A appears on the FL display 2 Press A B REPEAT again at the end of the section you want to repeat Po...

Страница 23: ...ops automatically The programmed contents are retained in memory Note To play the program again press PROGRAM RANDOM twice to call up the Program Mode screen then press a PLAY 2 1 LAST MEMO PICTURE MODE OPEN CLOSE z ON REPEAT A B REPEAT PROGRAM RANDOM ON SCREEN ZOOM ANGLE ANGLE REPLAY SETUP MENU SUBTITLE CHANGE 4 a b 5 ENT SUBTITLE ON OFF AUDIO RETURN TOP MENU REV SLOW FWD SLOW PAUSE STEP PREV NEX...

Страница 24: ... with discs on which multiple audio soundtrack languages are recorded 1 Press AUDIO during playback 2 Press AUDIO repeatedly until the desired language appears on the TV screen Examples If using an amplifier with DTS Decoder the DTS sound will be heard See page E12 for the amplifier connection Notes When the desired language is not selected even if the button is pressed the language is not availab...

Страница 25: ...er Camera angle A kind of audio Subtitle language Audio language 02 29 Track elapsed playing time 02 29 Track elapsed playing time CD Track 2 22 Track number LAST MEMO PICTURE MODE OPEN CLOSE z ON REPEAT A B REPEAT PROGRAM RANDOM ON SCREEN ZOOM ANGLE ANGLE REPLAY SETUP MENU SUBTITLE CHANGE 4 a b 5 ENT SUBTITLE ON OFF AUDIO RETURN TOP MENU ON SCREEN E24 Selecting Picture Mode Press PICTURE MODE to ...

Страница 26: ...and 128kbps of constant bit rate LIMITATIONS ON DISPLAY Available letters for display are the following capital or small alphabets of A through Z and numbers of 0 through 9 Other letters than those above are replaced in hyphen CAUTION Some MP3 CDs cannot be played back depending on the recording conditions The CD has no music data or non MP3 files cannot be played back The WMA files cannot be play...

Страница 27: ...now Stopping Playback Press n during playback n appears briefly on the TV screen and playback stops completely Pause Press k PAUSE STEP during playback k appears briefly on the TV screen k appears on the FL display Note The sound is muted Press a PLAY to return to normal playback File Skip Skipping forward Press NEXT e during playback to skip to the next file e appears briefly on the TV screen Ski...

Страница 28: ... stops temporary k appears briefly Press a PLAY or k PAUSE STEP again to resume the slide show If the picture appears upside down or sideways do the following steps 1 Press k PAUSE STEP if necessary 2 Press ANGLE repeatedly until it s right side up or Normal appears briefly on the TV screen 3 Press a PLAY or k PAUSE STEP to skip to the next picture and continue the slide show If you press NEXT e o...

Страница 29: ... skips to the next file or previous file After the last file has displayed the file list appears Notes To stop the slide show press n The file list appears If the disc is loaded with the label side downward or if a badly scratched disc is loaded No Play appears on the TV screen If this occurs load the disc correctly or replace the disc The file system is ISO9660 Level 1 and Level 2 This unit can r...

Страница 30: ...ent on screen displays subject to change without notice INITIAL SETTINGS Language Display Digital Out Parental OSD Audio Subtitle DVD Menu English Disc Disc Disc English Español Français Deutsch Portugues Language Display Digital Out Parental OSD Audio Subtitle DVD Menu English Disc Disc Disc 5 Press 5 or 4 to select the language highlighted 6 Press ENT The selected language remains 7 Repeat steps...

Страница 31: ... LB LAST MEMO PICTURE MODE OPEN CLOSE z ON REPEAT A B REPEAT PROGRAM RANDOM ON SCREEN ZOOM ANGLE ANGLE REPLAY SETUP MENU SUBTITLE CHANGE 4 a b 5 ENT SUBTITLE ON OFF AUDIO RETURN TOP MENU REV SLOW FWD SLOW PAUSE STEP PREV NEXT PLAY REV FWD CLEAR 1 2 3 C 4 5 6 0 7 8 9 SEARCH MODE SETUP ENT 5 4 a 4 3 LB Letterbox Select when a conventional TV set is connected When the wide screen disc is played back ...

Страница 32: ... MEMO PICTURE MODE OPEN CLOSE z ON REPEAT A B REPEAT PROGRAM RANDOM ON SCREEN ZOOM ANGLE ANGLE REPLAY SETUP MENU SUBTITLE CHANGE 4 a b 5 ENT SUBTITLE ON OFF AUDIO RETURN TOP MENU REV SLOW FWD SLOW PAUSE STEP PREV NEXT PLAY REV FWD CLEAR 1 2 3 C 4 5 6 0 7 8 9 SEARCH MODE SETUP ENT 5 4 a 96kHz LPCM 96kHz Liner Pulse Code Modulation If your amplifier is available for 96kHz sampling select 96kHz LPCM ...

Страница 33: ...t to the following MPAA Rating System Level 7 NC 17 No one 17 and under admitted Level 6 R Restricted Level 4 PG 13 Parents strongly cautioned Level 3 PG Parental guidance suggested Level 1 G General audiences Some DVD discs contain a restriction level which enables par ents to prevent playback of discs by children This unit is equipped with a password designed to prevent children chang ing the le...

Страница 34: ... or 8065 pa 8076 pl 8083 ps 8084 pt 8185 qu 8277 rm Code Language abbreviation Language Code Language abbreviation Language Code Language abbreviation Language Afar Abkhazian Afikaans Amharic Arabic Assamese Aymara Azerbaijani Bashkir Byelorussian Bulgarian Bihari Bislama Bengali Bangla Tibetan Breton Catalan Corsican Czech Welsh Danish German Bhutani Greek English Esperanto Spanish Estonian Basqu...

Страница 35: ...nction on the TV Connect the video cable into the jack Connect the video cable into the jack Select INTERLACE mode See page E15 Turn on the TV Connect the audio cables into the jacks Turn on the audio equipment connected with the audio cable Load a playable disc Check the logo type color system and region number See page E14 The feature or action cannot be completed at this time because The featur...

Страница 36: ...cabinet Use a clean soft cloth moistened with plain lukewarm water and wrung dry Never use benzol benzene or other strong chemical cleaners since these could damage the finish of your unit It is important that no liquid reaches the inside of the unit SPECIFICATIONS AUDIO OUT R 2 V rms L 2 V rms VIDEO OUT 1 0 Vp p 75 Ω DIGITAL OUT Coaxial Power requirements AC 120 V 60 Hz Power consumption 10 Watts...

Страница 37: ...e a claim under this Warranty You the original retail purchaser are responsible for any costs of TRANSPORTING the product to and from SANYO Canada Inc or an authorized Sanyo Service Depot You also are responsible for the cost of any MAINTENANCE necessary in respect of the product WARRANTY BECOMES VOID This warranty becomes void if the product s serial numbers are altered or removed or if any repai...

Страница 38: ... E37 SANYO Canada Inc DVD SL33 CA English 13 06 2003 10 06 38 ...

Отзывы: