background image

12

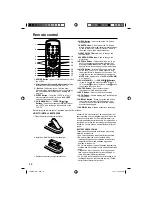
Remote control

2

10

5

1

6

14

4

17

3

HOW TO INSTALL BATTERIES

1. Open the battery compartment cover.

2. Install two “AAA” batteries (not supplied).

3. Replace the battery compartment cover.

Before using the remote control, batteries must first be installed.

Use two “AAA” size batteries. The batteries may last 

approximately one year depending on how much the 

remote control is used. For best performance, it is 

recommended that batteries should be replaced on a 

yearly basis, or when the remote operation becomes 

erratic. Do not mix old and new batteries or different 

types. 

BATTERY PRECAUTIONS

These precautions should be followed when using 

batteries in this device:

Use only the size and type of batteries specified.

Be sure to follow the correct polarity when 

installing the batteries as indicated in the battery 

compartment. Reversed batteries may cause 

damage to the device.

Do not mix different types of batteries together (e.g. 

Alkaline and Carbon-zinc) or old batteries with fresh 

ones.

If the device is not to be used for a long period of 

time, remove the batteries to prevent damage or 

injury from possible battery leakage.

Do not try to recharge batteries not intended to be 

recharged; they can overheat and rupture. (Follow 

battery manufacturer’s directions.)

1.POWER Button -

 Used to turn the power on/off to 

the LCD TV.

2.Direct Channel Selection Buttons (0-9) -

 Allows 

direct access to any channel of the LCD TV.

3.– Button -

This button is the “–” button used 

when selecting digital channels. Also can display 

the current channel number when viewing the 

program.

4.SLEEP Button -

 To set the LCD TV to turn off 

after a preset amount of time, use the 

SLEEP


button on the remote control.

5.CH (CHANNEL) + / – / CURSOR 

 / 


Buttons


-

 Used to operate the menu functions of 

the LCD TV, and to change the channels of the 

LCD TV.

6.MENU Button -

 Use to display the On-Screen 

menu function.

7.RESET Button -

 Press to reset the On-Screen 

picture adjustments to their factory preset positions.

To use this function, select “Picture” or “Audio” in 

the menu screen, then press this button.

8.INPUT SELECT Button -

 Use to change the 

external input.

9.SCREEN SIZE Button -

 Used to change the 

picture size.

10.RECALL Button -

 This button allows you to go 

back to the previous channel selected by just 

pressing the 

RECALL

 button. Press this button 

again to return to the channel you were watching.

11.MUTE Button -

 To turn off the sound, press this 

button once. The LCD TV will be silenced and 

the symbol “Mute” will appear on the screen. The 

muting feature can be released by pressing the 

MUTE

 button again or one of the 

VOL (VOLUME)


+

 or 

 buttons.

12.VOL (VOLUME) + / – / CURSOR   /   Buttons 

-

 Used to operate the menu functions of the LCD 

TV. Press the


button to increase, or the


 button 

to decrease the sound level.

13.ENTER Button -

 Use to enter or select 

information for On-Screen operations.

14.EXIT Button -

 Press to remove setup menu.

15.CCD Button -

 Used to display the Closed Caption 

menu screen.

16.DISPLAY Button -

 When you press this button, 

the current information will be displayed on a 

screen. To remove the display from the screen, 

press this button again.

17.AUDIO Button -

 Change soundtrack language.

8
9

11
12

13

15

16

3FR0321A_En.indd   12

3FR0321A_En.indd   12

1/7/11   4:32:09 PM

1/7/11   4:32:09 PM

Содержание DP19241

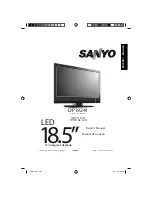
Страница 1: ...tion 19 Z6AE Owner s Manual Manual del usuario DP19241 47cmdiagonal diagonale 18 5 HDTV LCD TVHD de LCD Part No No de parte J3FR0321A Model No No de Modelo LED ESPAÑOL 3FR0321A_En indd 1 3FR0321A_En indd 1 1 7 11 4 31 53 PM 1 7 11 4 31 53 PM ...

Страница 2: ...original dated sales receipt for evidence of purchase Return the defective TV to the retailer along with the receipt and the included accessories such as the remote control The defective TV will be exchanged for the same model or a replacement model of equal value if nec essary Replacement model will be contingent on availability and at the sole discretion of Sanyo Manufacturing Corporation THE FO...

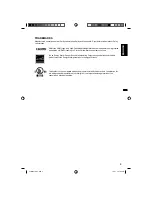
Страница 3: ...s product meets the EnergyStar guidelines for energy efficiency This symbol on the nameplate means the product is Listed by Underwriter s Laboratories Inc It is designed and manufactured to meet rigid U L safety standards against risk of fire casualty and electrical hazards Manufactured under license from Dolby Laboratories Dolby and the double D symbol are trademarks of Dolby Laboratories 3FR0321...

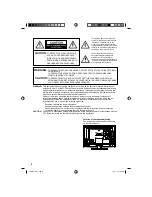
Страница 4: ...e with the instructions may cause harmful interference to radio communications However there is no guarantee that interference will not occur in a particular installation If this equipment does cause harmful interference to radio or television reception which can be determined by turning the equipment off and on the user is encouraged to try to correct the interference by one or more of the follow...

Страница 5: ...ill or spray any type of liquid into the unit 19 If an outside antenna or cable system is connected to the unit be sure the antenna or cable system is grounded to provide some protection against voltage surges and built up static charges Section 810 of the National Electrical Code ANSI NFPA 70 provides information with respect to proper grounding of the mast and supporting structure grounding of t...

Страница 6: ...rers If you have any doubts about your ability to safely install your flat panel display contact your retailer about professional installation Make sure that the wall where you are mounting the display is appropriate to support the weight of the unit product and wall mount If you are unsure contact a professional installer A minimum of two people are required for installation Flat panel displays c...

Страница 7: ... liquid gets in your mouth immediately gargle and consult with your doctor Also if the liquid gets in your eyes or touches your skin consult with your doctor after rinsing for at least 15 minutes or longer in clean water Possible Adverse Effects on LCD Panel If a fixed non moving pattern remains on the LCD Panel for long periods of time the image can become permanently engrained in the LCD Panel a...

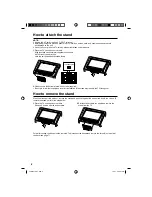
Страница 8: ...ack onto a table Align the stand s bottom plate supplied as seen here It will fit in only one direction Hold the unit and attach the stand slowly 2 Pull the stand toward you again and remove the stand from the TV For wall mounting the base must be removed To disconnect the base stand remove the three 3 screws from the back see page 7 1 Place the TV on its back onto a table Remove 2 screws with the...

Страница 9: ...this unit On Screen 3 Language Display You can select one of 3 languages English French or Spanish for on screen programming NOTE Please make sure to insert the cord securely at both the LCD TV and the wall outlet The AC cord has a polarized type AC line plug If the supplied AC cord does not match your AC outlet contact a qualified electrician WARNING DO NOT CONNECT THIS UNIT TO THE POWER USING AN...

Страница 10: ... setup 17 TV operation 17 Quick guide for menu operation 18 Convenience functions 19 Memorizing channels 20 Checking the digital signal strength 21 Labeling channels 21 Labeling video inputs 21 Setting the V Chip 22 Closed Caption 23 CC advanced 23 Setting the picture size 24 Additional information Reception disturbances 25 Troubleshooting 26 Specifications 27 The American Academy of Pediatrics di...

Страница 11: ...used to select the desired setting during the menu screen operations AC INPUT jack PC DVI AUDIO IN jack VIDEO IN jacks VIDEO AUDIO L MONO R COMPONENT IN jacks DIGITAL AUDIO COAXIAL OUT jack RF ANT IN jack HEADPHONE jack PC MONITOR IN jack Parts and functions HDMI DVI IN jack FOR SERVICE PERSONNEL USE ONLY Do NOT insert ANY USB device into this port Use of this port by other than Service Personnel ...

Страница 12: ...rrent channel number when viewing the program 4 SLEEP Button To set the LCD TV to turn off after a preset amount of time use the SLEEP button on the remote control 5 CH CHANNEL CURSOR Buttons Used to operate the menu functions of the LCD TV and to change the channels of the LCD TV 6 MENU Button Use to display the On Screen menu function 7 RESET Button Press to reset the On Screen picture adjustmen...

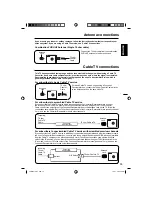
Страница 13: ... TV service with scrambled premium channels If you subscribe to a Cable TV service in which basic channels are unscrambled and premium channels require the use of a Converter Descrambler box you may wish to use a signal Splitter and an A B Switch box available from the Cable TV company or an electronics supply store Follow the connections shown below With the switch in the B position you can direc...

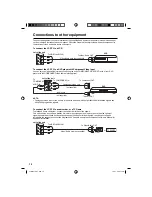
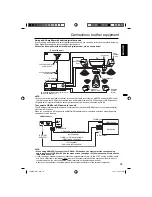
Страница 14: ...upplied To COMPONENT IN Left of the unit To Audio OUT NOTE Component Video input of the unit are for use with a device which output 480i 1080i interlaced signals and 480p 720p progressive signals VCR DVD or To connect the LCD TV to a camcorder or a TV Game To playback from a camcorder connect the camcorder to the unit as shown This unit can also be used as a display device for many video games How...

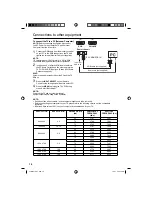
Страница 15: ... the unit The HDMI input receives digital audio and uncompressed video from a HDMI device or uncompressed digital video from a DVI device When you connect to a DVI device with a HDMI to DVI adapter cable it transfers only video signal Separate analog audio cords required Left of the unit HDMI to DVI adapter cable HDMI type A connector not supplied Audio cord not supplied HDMI cable type A connecto...

Страница 16: ...to Adjust NOTE Power on the TV and any other peripheral equipment before powering on the computer NOTE Save and close all documents in case computer might need to be restarted Before connecting your computer to your TV please refer to the following chart to set to a compatible resolution A Refresh Rate value of 60 Hz on your computer is recommended for your TV Rear of the unit RGB DVI JACK a b VGA...

Страница 17: ...nds TO SELECT ANALOG CHANNELS 1 9 Press 1 9 as needed Example to select channel 2 press 2 then press ENTER 10 99 Press the 2 digits in order Example to select channel 12 press 1 2 then press ENTER 100 135 Press the 3 digits in order Example to select channel 120 press 1 2 0 then press ENTER TO SELECT DIGITAL CHANNELS Press the first 1 3 digits then press the button followed by the remaining number...

Страница 18: ...will appear on the screen The sound can be switched back on by pressing this button again or the VOL or SLEEP To set the TV to turn off after a preset amount of time press SLEEP on the remote control The clock will count up 10 minutes for each press of the SLEEP but ton Off 0h 10m 0h 20m 2h 0m After the sleep time is programmed the display will appear briefly every ten minutes to remind you that t...

Страница 19: ...tion When the TV receives a stereo or SAP broadcast the word Stereo or SAP displays on screen every time you press DISPLAY Surround On Off The dynamic presence and sound created offers a thoroughly enjoyable listening experience Auto Volume On Off Volume level will be adjusted automatically between signals Audio Language When two or more audio languages are included in a digital signal you can sel...

Страница 20: ...atient NOTE Memorizing channels is best accomplished during evening PRIMETIME hours as more stations are broadcasting digital signals Memorizing channels can only be accomplished while a station is broadcasting a digital signal to set that channel into memory If you are unsure of the digital channels available in your area you may visit www antennaweb org to receive a list based on your address or...

Страница 21: ...3 Press or to select a channel you want to label then press Ch Label Label Clear Ch Label Channel Number 15 1 CH 1 Adjust Select CH 4 Press or repeatedly until the character you want appears in the first space Label Clear Ch Label Channel Number 15 1 Ch Label CH 1 Adjust Select ENTER Set CH The characters rotation as follows SPACE If the character which you desire appears press ENTER Repeat this s...

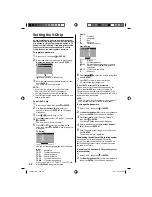
Страница 22: ...A press DISPLAY to explain the rating Genre D Dialogue L Language S Sex V Violence FV Fantasy Violence Movie Rating G PG PG 13 R NC 17 X Movie Rating ENTER Set Select G All ages PG Parental guidance PG 13 Parental guidance less than 13 years old R Under 17 years old parental guidance suggested NC 17 17 years old and above X Adult only 6 Press to select the desired rating then press ENTER 7 Press E...

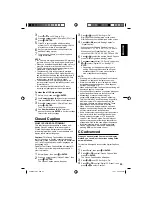
Страница 23: ...ppear 3 Press or to set CC Setting to On On Captions will be displayed on the screen Off Captions will not be displayed on the screen 4 Press or to select Analog Caption or Digital Caption When you select Analog Caption you can choose from C1 C2 C3 C4 T1 T2 T3 and T4 When you select Digital Caption you can choose from CS1 CS2 CS3 CS4 CS5 and CS6 5 Press or to select the desired Closed Caption mode...

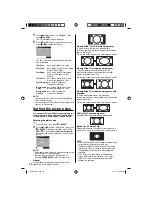
Страница 24: ...Selectable picture sizes may vary depending on the input source or broadcast signal Picture Size menu also can be displayed by pressing SCREEN SIZE on the remote control Natural In some cases this image will display the size of standard 4 3 with a black side bar Cinema Wide1 for 4 3 format programs To fill the screen the right and left edges are extended however the center of the picture remains n...

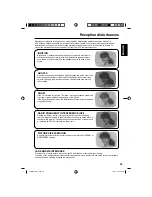
Страница 25: ...ion is normal when you adjust the CONTRAST or BRIGHTNESS settings Most types of television interference can be remedied by adjusting the height and position of the VHF UHF antenna Outdoor antennas are recommended for best results The most common types of television interference are shown below If one of these symptoms appear when the TV is connected to a Cable TV system the disturbance may be caus...

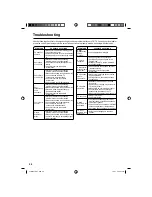
Страница 26: ... outlet if problems persist Be sure all connections are properly made when using with other units SYMPTOMS POSSIBLE SOLUTIONS TV does not operate Make sure the power cord is plugged in Try another AC outlet Power is off check fuse or circuit breaker Unplug unit for an hour then plug it back in Poor sound or no sound Station or Cable TV experiencing problems tune to another station Check sound adju...

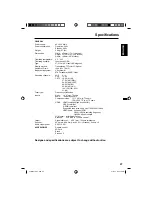
Страница 27: ...35 01 4A Tuner type Frequency synthesized Inputs Video 1 0 V p p 75 ohms Audio 8 dBm 50k ohms Component video Y 1 0 V p p 75 ohms Pb Pr 0 7 V p p 75 ohms HDMI HDMI compliant type A connector HDCP compliant E EDID compliant Suggested scan rates 480p 480i 720p 1080i 1080p HDMI Audio 2 channel PCM 32 44 1 48 kHz sampling frequency 16 20 24 bits per sample PC Monitor Mini Dsub 15pin 1 Antenna VHF UHF ...

Отзывы: