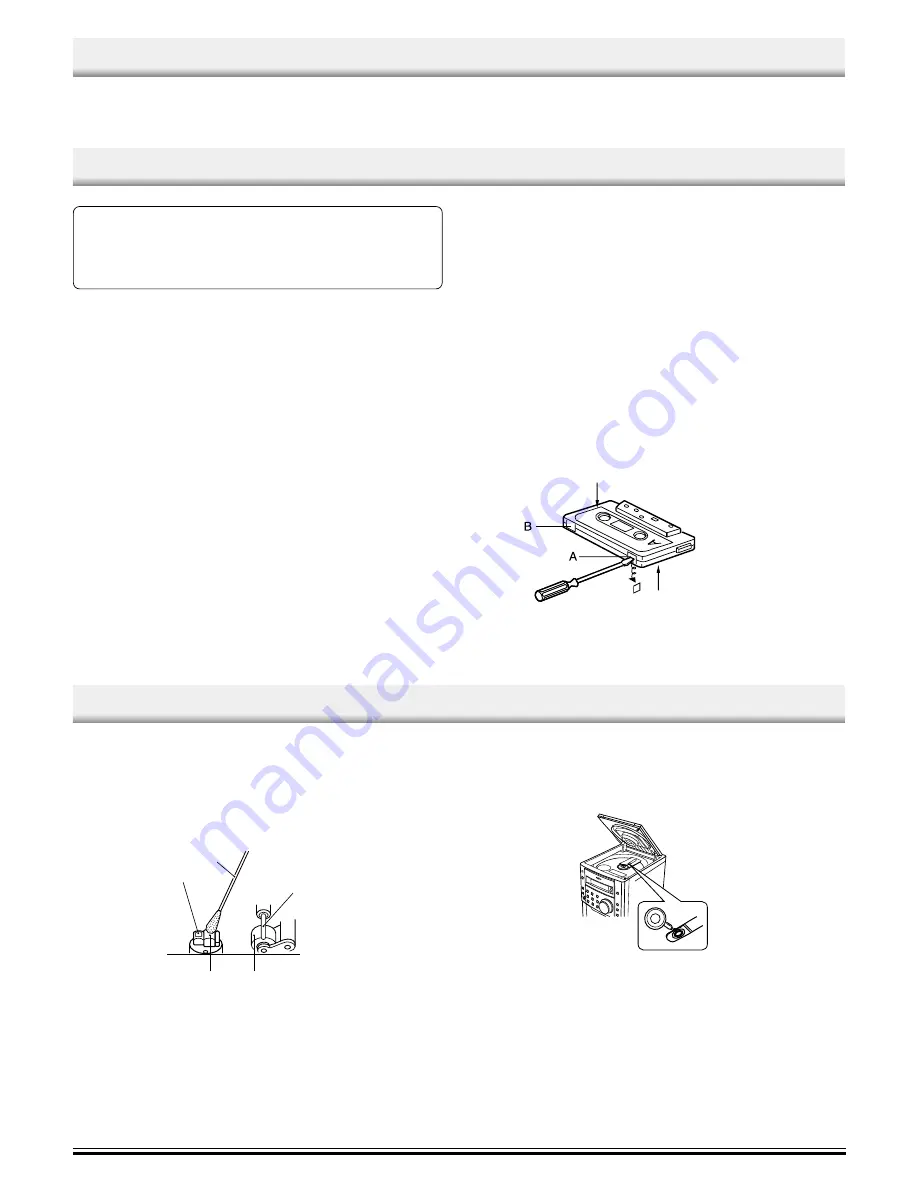
Break out tab A for side A.
Break out tab B for side B.
Side A
Side B
RECORDING
MAINTENANCE
LISTENING TO OTHER SOURCES
1.
Press the FUNCTION button to select “LINE”.
2.
Follow the instructions supplied with the Video/Auxiliary equipment.
-6-
Recording copyright material without permission of the copyright
owners is usually an infringement. If you wish to re-record copyright
material, permission from the copyright owner is necessary. SANYO
does not approve of, and cannot be held responsible for, any unlawful
use of this machine.
Automatic record muting (Remote control only)
Undesirable parts of a programme can be omitted wile recording.
Press the
r
button once while recording. “REC” blinks and a 5-second
unrecorded blank space is created, then the deck enters the recording
pause mode. “REC” remains lit and “
a
” blinks on the display.
-
To add another 5-second blank space, press the
r
button again.
-
To resume recording, press the TAPE button.
Safeguards against accidental erasure
Accidental erasure can be prevented by breaking out the tabs on the end
of the cassette tape (where the tape is not exposed) using a screwdriver
or similar implement.
If a tab is broken out in error and you wish to re-record the tape, simply
block the tab hole using adhesive tape and the tape can be used for
recording again.
Recording compact discs (Synchronous recording)
1.
Press the FUNCTION button to select “CD” function.
2.
Load the disc to be recorded.
-
For programmed recording, programme the material in advance
(as described under “PROGRAMMED PLAY”).
3.
Select the track number to be recorded if required.
-
For programmed recording, this step is unnecessary.
4.
Press the
j
button. The deck enters the recording pause mode
and “REC” appears. “
a
” blinks.
5.
Press the TAPE button. Recording starts.
6.
Press the
N
button to stop recording. Also the CD player stops
automatically.
Recording from the tuner or other sources
1.
Tune in the radio station to be recorded or play other sources.
2.
Press the
j
button.
3.
Press the TAPE button. Recording starts.
4.
Press the
N
button to stop recording.
When beat interference is heard (Remote control only)
A high-pitched noise called “beat” is sometimes heard during the
recording of radio broadcasts. If this occurs.
1.
Press the MEMORY button on the remote control.
2.
While “PROG.” is blinking, press the
f
button to select “bc-1” or
“bc-2”. Select the setting that gives the best results.
Cleaning the tape heads
To ensure continued high performance, use cotton swab to clean the
heads, pinch roller and capstan of the deck after about every 10 hours
of use. If the dirt persists, soak the swab in a little methylated spirit or
head cleaning fluid and then clean.
Cleaning the CD player lens
The lens should never be touched. If dust is on the lens, blow it off using
a camera lens blower. (Consult your dealer.)
Cleaning the unit
Clean the outside of the unit with a clean soft cloth, moistened with
lukewarm water. Do not use benzene, thinner of alcohol since they will
mar the finish of the surfaces.
1.
Cotton swab
2.
Capstan
3.
Pinch roller
4, 5.
Head
5
1
2
4
3

