9
Connect your PC to PC-IN on the rear of the set.
Once connected select PC mode via the
v
button on your
remote control.The set will become a monitor for the PC.
By pressing the
MENU
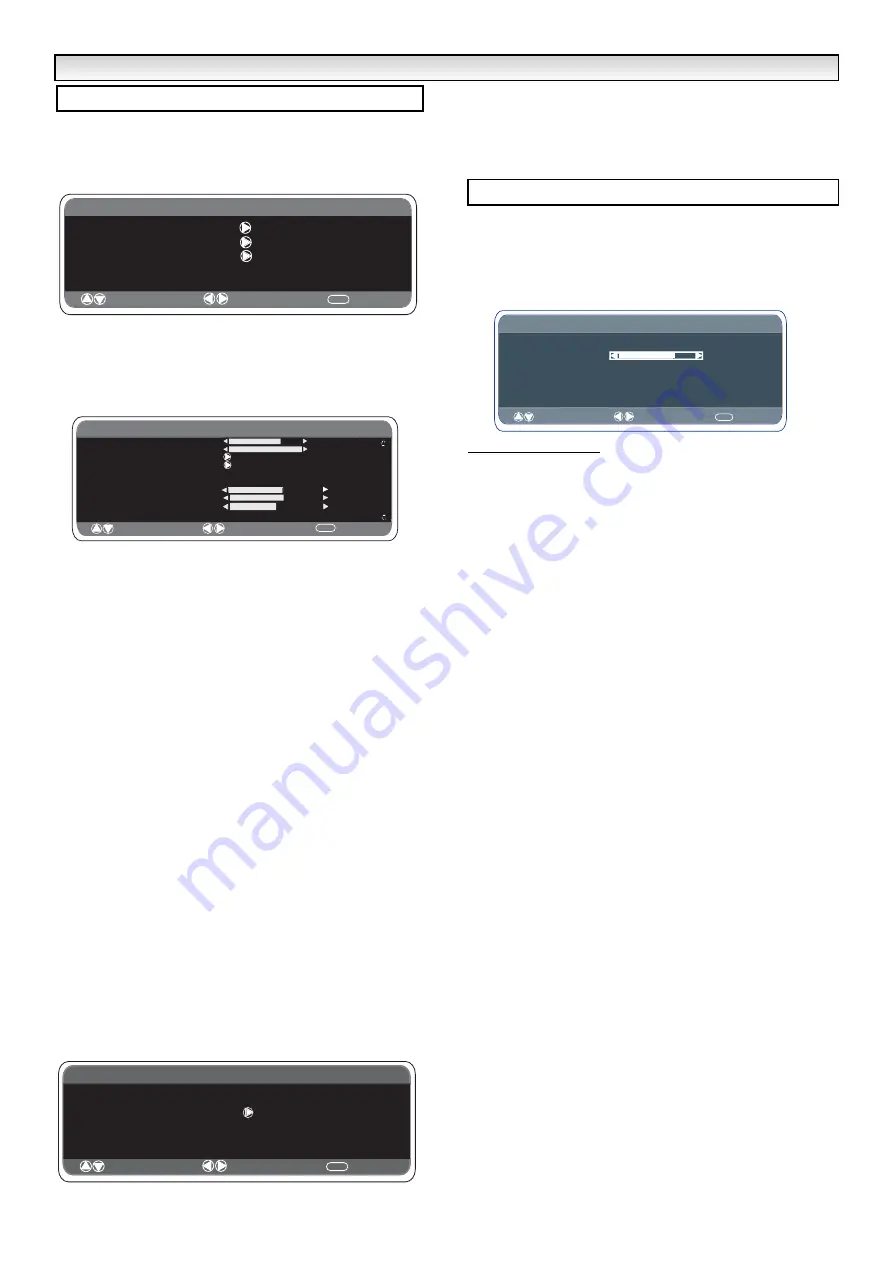
button on the remote control a menu window
will appear on screen, this allows the settings to be adjusted.
To adjust the Picture settings select picture using the
5
or
6
buttons on the remote then the
1
button to enter the following
picture settings menu.
Press the
1
or
2
buttons
to adjusted the Picture brightness
and the same to adjust the contrast of the picture.
Picture position
changes the picture horizontally and vertically.
Press the
1
button
to enter the sub menu, adjustment is carried
out using the
1
or
2
buttons
on the remote control.
Video adjust
changes the Phase and the clock of the screen. If the
picture is blurred or grainy this function will adjust it to a clearer
picture, adjustment is carried out using the
1
or
2
buttons
on
the remote control.
Auto Adjust
will automatically adjust the picture by using the
1
button. This will change all the above settings automatically.
Auto adjust can also be achieved by pressing the
/recall button on the remote control without having to select the
menu.
Resolution
displays the current resolution of the picture. This is for
information only and cannot be adjusted.
White tone:
Using the
1
or
2
buttons
it is possible to adjust
the colour tone of the picture using the White tone
Red(R) / Green
(G)/ Blue(B
). This will adjust the picture to show more or less of the
chosen colour. For example if red is selected you can adjust the pro
portion of red in the picture to increase or decrease using the
1
or
2
buttons
Native Resolution
is used when the PC can output WXGA
1366 x 768. The setting on your Monitor set can be changed
to receive XGA/WXGA signal using the
1
or
2
buttons
. Once
the native resolution has been selected, save the settings by
switching the monitor off then on using the standby button.
For Sound settings refer to sound menu (Page 7)
Setting:
Press the menu button on your remote and using the
5
or
6
buttons to select Settings. The
1
button will enter the
settings menu.
Child lock, OSD Language,Timer and AV2 settings are the same as
in all other input modes (pg 7).
Power save
if turned ON will switch the monitor into Powersave
mode after 1 minute if no signal is detected, the LED light will turn a
brighter blue to indicate stand by. The monitor will automatically turn
back on when a signal has been detected (PC input).
Use
1
or
2
buttons
to select power save ON or OFF.
This LCD monitor set allows you to set up the following:-
■
Prohibition of presetting.
This prohibits the use of tuning.
■
Programme position at Start up
SETTING PROCEDURE
1 .
Press and hold the
green button
on the remote control
handset for 5 seconds to enter the hotel menu.
2.
Use the
5
or
6
button
to highlight
Hotel Mode
, use the
1
to
switch ON or OFF. Use the
5
or
6
button
to highlight
each
option
, use the
1
or
2
button to adjust each option.
3.
Max Volume
:
Select Max volume using the
5
or
6
button,
use the
1
or
2
buttons to set the maximum volume required.
4.
On Program: Select ON program using the
6
button, select the
start up
position using the
1
or
2
buttons.
(OFF- 0 - 1 - 2 - 3 - 4 ........99- AV1 - RGB -AV2 - HDMI-PC)
5.
Winter mode: This Function can be activated when the LCD
monitor is used during cold temperature conditions, approximately
38
˚
F/ 4
˚
C or below to maintain picture performance.
Using the
5
or
6
button
select winter mode, once highlighted
you can select ON or OFF by pressing the
1
or
2
button
.
IMPORTANT: The AC cord should not be disconnected during the
operation of Winter mode function.
When in winter mode, power consumption is higher than normal
standby consumption. This is entirely due to the operation of heating
circuitry. We strongly recommend to turn off Winter mode when the
ambient temperature is above 38
˚
F/ 4
˚
C.
6.
Press the
MENU button
to exit from the menu.
rD
PC menu settings
Main Menu
Picture
Sound
Setting
: Select
: Adjust
MENU
: Exit
Picture
: Select
: Adjust
MENU
: Back
Brightness
C
o
ntrast
Position
Video Adjust
Auto Adjust
Resolution
White Tone R
White Tone G
White Tone B
1024 X 768 @60Hz
Native Resolution
XGA / WXGA 1366 x 768
Setting
: Select
: Adjust
MENU
: Back
CHILD LOCK OFF / ON
Timer
AV2 Settings
Power save OFF/ON
OSD Language
English
Video/S-Video
PC OPERA
PC OPERA
TION / HOTEL
TION / HOTEL
MODE
MODE
Hotel Mode
MENU
Hotel mode
ON / OFF
Max volume
On program OFF/ 0~99
Preset ON / OFF
Winter mode
ON/ OFF
/ AV1/RGB/ AV2 / HDMI/ PC
Hotel
: Select
: Adjust
: Exit
Содержание CE42WPX1
Страница 75: ...75 ...
Страница 76: ...76 Part No 1KA6P1P0386 A N4JP Printed in U K ...


