background image

9

MENU OPERATION

Picture menu

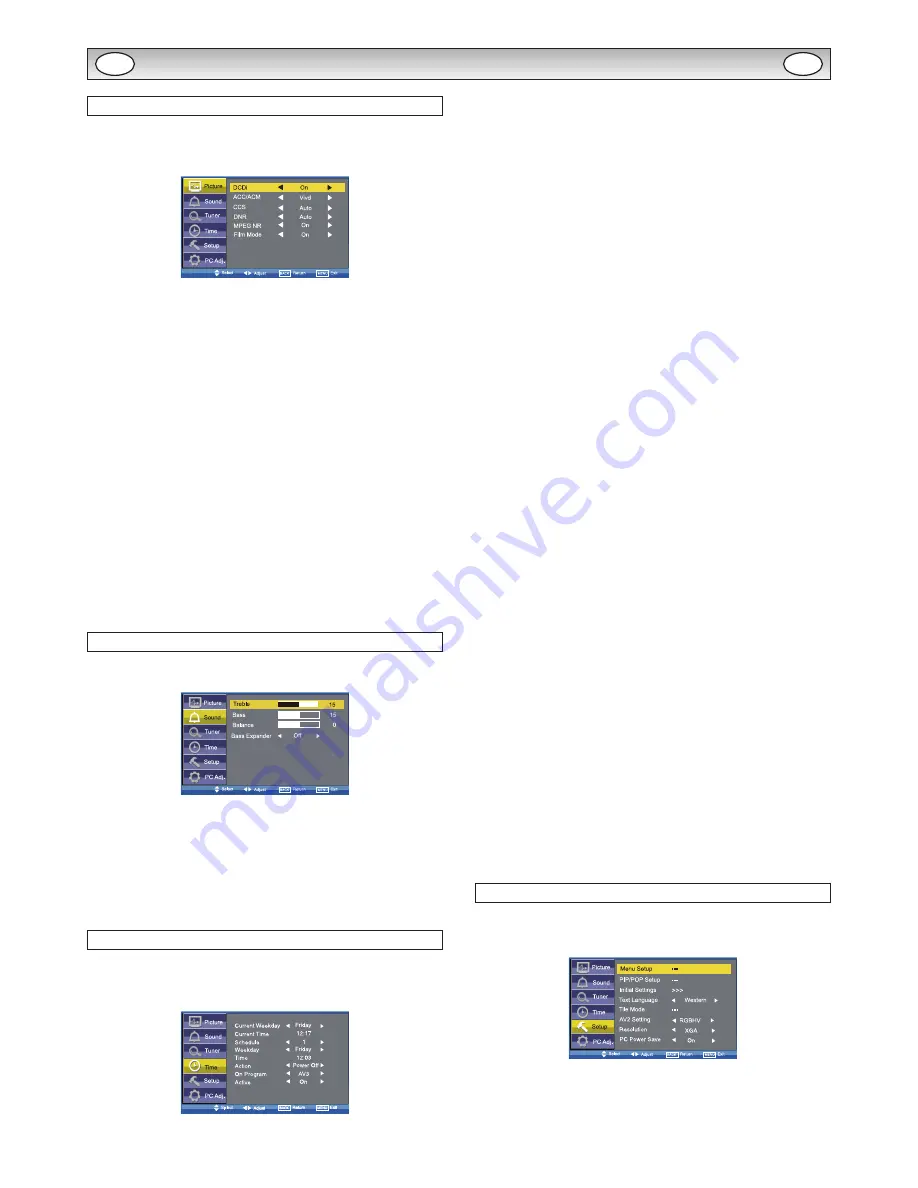
Advanced settings

Use the 

5

 or 

6


button to select Advanced settings and press 

the 

1

 or 

2


button to enter the sub menu as follows .

DCDi (Directional Correlational Deinterlacing) is used to process 
moving angled edge in deinterlacing to get the smoothest and most 
natural image . Press the 

1

 or 

2


button on the remote control to 

select 

On or Off .

ACC/ACM (ACC: Adaptive Contrast and Color; ACM-II: Active Color 
Management-II) is used to select adaptive Brightness, Contrast and 
tone control . Press the 

1

 or 

2


button on the remote control to 

select suitable mode either 

VividCinemaSport or Off .

CCS (Cross Color Separation) is used to remove residual chroma 
information from luminance signal which is the result of imperfect 
decoding of composite video . Press the 

1

 or 

2


button on the 

remote control to select either 

AutoStandard or Off .

DNR (Digital Noise Reduction) is available for noise reduction . Press 
the 

1

 or 

2


button on the remote control to select either Auto

LowMidHigh or Off .
MPEG NR (MPEG Noise Reduction): Removes unwanted ringing and 
block noise from images that have undergone MPEG or JPEG com-
pression and decompression . Press the 

1

 or 

2


button on the 

remote control to select 

On or Off .

Film Mode (Inverse 3:2 pulldown): Film vs .Video-Detect film . Performed 
on material which underwent technologic conversion to video . Press the 

1

 or 

2


button on the remote control to select On or Off .

Sound menu

Press the 

MENU button and select Sound using the 

5

 or 

6


but-

tons, press the 

1

 or 

2


button to enter . 

Select and adjust to obtain the best sound settings for your environ-
ment using the 

5

 or 

6


button to select TrebleBass or Balance 

and the 

1

 or 

2


button to adjust levels .

Bass Expander can also be selected using the 

5

 or 

6


button 

and pressing the 

1

 or 

2


button to select On or Off .

These settings automatically store when you exit the menu .
Press the 

BACK button to return to the previous menu .

Press the 

MENU button to exit menu operation .

Time menu

Press the 

MENU button and select Time using the 

5

 or 

6


but-

tons, press the 

1

 or 

2


button to enter . Press the BACK button 

to return to the previous menu . Press the 

MENU button to exit menu 

operation .

n

 Current Weekday

Use to set current weekday using the 

1

 or 

2


button .

n

 Current Time

Use to set the current time using the Numeric buttons .

  Other items in Time Menu should not be selected until Current 

Time has been set .

n

 Schedule

Use to set up to 20 separate time schedules for “Power On” or “Power 
Off”, select 1 ~ 20 using the 

1

 or 

2


button .

n

 Weekday

Use to set the schedule for “Power On” or “Power Off” of any weekday 
from Sunday through to Saturday or Everyday using the 

1

 or 

2


button .

n

 Time

Use to set the schedule for “Power On” or “Power Off” of any time 
using the Numeric buttons .

n

 Action

Use to set the schedule for “Power On” or “Power Off” active using 
the 

1

 or 

2


button .

You can set Power On timer in Time menu selecting “ON” in “On 
Timer Function” in Installation Mode . If it is selected “OFF”, Power On 
display in Time menu does not functional .

n

 On Program

Use to select 

AV1RGBAV2AV3PCDVI or Network for the 

schedule of “Power On” using the 

1

 or 

2


button .

n

 Active

Use to select ON or OFF using the 

1

 or 

2


button . When set 

“OFF” the above items “Schedule”, “Weekday”, “Time”, “Action” or 
“ON Program” will be inactive .
Use 

NUMERIC buttons [0 ~ 9] to set On Time . (Action “Power On” – 

00:00 ~ 23:59)

  Once On Time has been set, when the set time is reached, the 

monitor will leave the stand-by status and enter to the source 
automatically .

  After On Time has been set, you can go on watching other pro-

grams . When the set time is reached, the monitor will automatically 
switch to the preset program . 

  On Program can only be selected whenAction (Power On) has 

been set .

  Action (Power Off) can be set to turn the monitor into standby at a 

selected time

Once On Program has been set, when the set time is reached, the 
monitor will enter to the preset source automatically .
Use the 

1

 or 

2


button to select On programAV1RGBAV2

AV3PCDVI or Network .

Setup menu

Press the 

MENU button and select Setup using the 

5

 or 

6


but-

tons, press the 

1

 or 

2


button to enter . Press the BACK button 

to return to the previous menu . Press the 

MENU button to exit .

n

 Menu Setup

Whenever Setup menu is accessed initially, Menu Setup will be the 
default selection . Press the 

1

 or 

2


button to enter the sub menu .

GB

GB

Содержание CE42LM6DPB

Страница 1: ...ON MANUAL CE42LM6R CE42LM6DPB CE42LM6WP CE42SR2 CE52LH2R CE52LH2WP CE52SR2 LCD Monitor Please read this Instruction book before using your LCD monitor We wish you many hours of pleasure from your new LCD monitor ...

Страница 2: ...hich protects against mischief in the public display applications and less maintenance when used in a dusty or oily environment Weather proof monitor CE42LM6WP CE52LH2WP Weather resistant and water proof in accordance with the IP66 standard ANTI REFLECTION TAMPER GLASS This monitor set has a tough anti refection tampered glass This offers the protection for the panel surface in the public display ...

Страница 3: ...om the monitor The external surface of the cabinet finned area must not be covered or the airflow restricted in anyway by enclosing the LCD monitor CE42LM6WP CE42SR2 CE52LH2WP CE52SR2 model only The operating temperature range of this monitor is guaranteed 0 C 40 C 32 F 104 F It is not recommended to install the screen in direct sunlight without adequate shading as this will cause the temperature ...

Страница 4: ... digital device pursuant to Part 15 of FCC Rules These limits are designed to provide reasonable protection against harmful interference when the equipment is operated in a commercial environment This equipment generates uses and can radiate radio frequency energy and if not installed and used in accordance with the instruction manual may cause harmful interference to radio communications Operatio...

Страница 5: ...wnership rights in the Software to you The Software provided hereunder may contain or be derived from portions of materials provided to SANYO under license by a third party supplier 5 Except as expressly permitted by statute you may not use the Software in conjunction with any other computer hardware other than the product copy all or part of the Software incorporate all or any of the Software int...

Страница 6: ...etting in Set up menu see page 10 You can connect your DVD player to the Y Pb Pr terminals instead of using a scart lead This can support high definition in analogue component form RGB H V can be used as a PC input via the BNC terminals Both options support a large range of resolutions page 17 AV2 OUT can be used to output the incoming AV2 signal to the other monitor 4 AV3 Composite CVBS signal in...

Страница 7: ... mode Dynamic Suitable for brightly lit rooms Soft Low contrast setting Eco Suitable for dimly lit rooms and gives a cinema like effect Freeze To switch picture still on or off Green Press this button for more than 5 seconds installa tion mode will appear Remote control Remote control battery installation Install two AA 1 5 volt batteries so that the and marks on the batteries match the and marks ...

Страница 8: ...m AV1 RGB AV2 AV3 PC DVI Network Menu Setup PIP POP Setup Initial Settings Text Language Tile Mode AV2 Setting Western Eastern Russian Arabic Farsi Tile Mode Active H V_Sets H V Location Bezel H V Adjustment RGBHV YPbPr Auto Adjust H Position V Position Clock Phase Language H V Position Duration Transparence PIP POP Mode Main Sub Source PIP Position Time Action Active Power On Power Off On Off 1 2...

Страница 9: ...2 button to enter Press the BACK button to return to the previous menu Press the MENU button to exit menu operation n Current Weekday Use to set current weekday using the 1 or 2 button n Current Time Use to set the current time using the Numeric buttons Other items in Time Menu should not be selected until Current Time has been set n Schedule Use to set up to 20 separate time schedules for Power O...

Страница 10: ...tical picture into more than one part and the most is also 5 parts 5 monitors Using the 1 or 2 button to set H Location is used to select one part of the horizonal picture to dis play on the current LCD Monitor using the 1 or 2 button V Location is used to select one part of the vertical picture to display on the current LCD Monitor using the 1 or 2 button Bezel H Adjustment is used to align the i...

Страница 11: ...ppear if buttons are pressed when child lock is On Standby operates normally when childlock is set On n Address Set the address for the LCD monitor 0 999 Setting the monitor address in RS232 mode Each monitor can have a specific Address which helps command that monitor individually and will not effect to other monitors con nected to a controlling PC Address format command The addressing format com...

Страница 12: ...ed even more to allow subtitles to be seen As Zoom 16 9 but bottom is compressed even more to allow subtitles to be seen As Zoom 16 9 but bottom is compressed even more to allow subtitles to be seen As Zoom 16 9 but bottom is compressed even more to allow subtitles to be seen 4 3 14 9 16 9 Letterbox Video The correct picture width is maintained but the top and bot tom are cropped Zooms in slightly...

Страница 13: ...POP mode press the Main Sub Picture Swap but ton will switch the location for main and sub picture Only the sound on the main picture is heard from the monitor speaker The sound on the sub picture cannot be heard The details for PIP POP operation eg location for sub picture or input source for any picture etc please refer to page 10 n PIP1 mode n OFF mode n PIP2 mode n POP mode The left picture is...

Страница 14: ... ture appears on the screen Press this button once again or press TXT TV button CANCEL mode will be cancelled In CANCEL mode CAN is always displayed on the upper left of the screen Text Hold Press Text Hold button to stop page request and updating HOLD ON The Hold symbol will appear instead of the page number Update of TELETEXT is forbidden It holds on the current TEXT screen display now HOLD OFF ...

Страница 15: ...els too low n NO COLOUR PICTURE OK Adjust COLOUR control Check lead connections Does the signal input have colour n REMOTE CONTROL DOES NOT WORK Check batteries are inserted correctly Check condition of batteries Check to see if remote control inhibit is set ON n PICTURE OK NO SOUND Check external speakers are connected correctly Check lead connections to external equipment Check volume turned dow...

Страница 16: ...G AREA H 620 0 546 0 523 0 VIEWING AREA V Control buttons ø4 2 LED INDICATOR Handles x 2 Cables exit terminal cover 227 5 1303 648 712 5 800 800 516 210 3 140 280 420 1216 1152 1304 M6 WALL BRACKET FIXING 140 280 420 560 286 8 373 3 310 9 Control buttons Standby Power LED 90 19 10 4 105 Remote control pickup Handles x 4 Cables exit terminal cover 1120 6 997 376 5 358 4 117 6 217 193 8 176 7 16 9 3...

Страница 17: ...00 31 47 70 09 DOS VGA 640 x 480 31 43 59 88 VGA VESA 60Hz 640 x 480 37 50 75 00 VGA VESA 75Hz 640 x 480 37 86 72 81 VGA VESA 72Hz 640 x 480 43 27 85 00 VGA VESA 85Hz 640 x 480 35 00 66 67 Mac 13 640 x 480 34 97 66 60 Mac LC 13 800 x 600 35 16 56 25 SVGA VESA 56Hz 800 x 600 37 88 60 32 SVGA VESA 60Hz 800 x 600 46 875 75 00 SVGA VESA 75Hz 800 x 600 34 50 55 38 SVGA 800 x 600 38 00 60 51 SVGA 800 x ...

Страница 18: ... CR TINT Status of Tint CR SHARP Sharpness CR WBAL Status of White Balance Mode informa tion CR WBAL R Status of White Balance Red CR WBAL G Status of White Balance Green CR WBAL B Status of White Balance Blue CR NZRED Status of Noise reduction setting CR FILM Status of Film mode setting CR IMAGE Status of Image selection The same as PICTURE mode CR DCDI Status of DCDi setting CR ACCACM Status of ...

Страница 19: ...on Wait and transmit command again 101 The errors not including above n Sound control Read Command Table Status read command Item CR VOLUME Status of volume value CR MUTE Status of MUTE n Other Read Command Table Status read command Item CR STATUS Status of the operation of the monitor CR SIGNAL Status of with or without signal CR FREEZE Status of Freeze setting CR FANLOCK Statuses of fan lock err...

Страница 20: ...N7RRM N7RMM N7RSL N7RTL N7WVT N7WWS N7WYS SANYO Electric Co Ltd ...

Отзывы: