background image

4

■ 

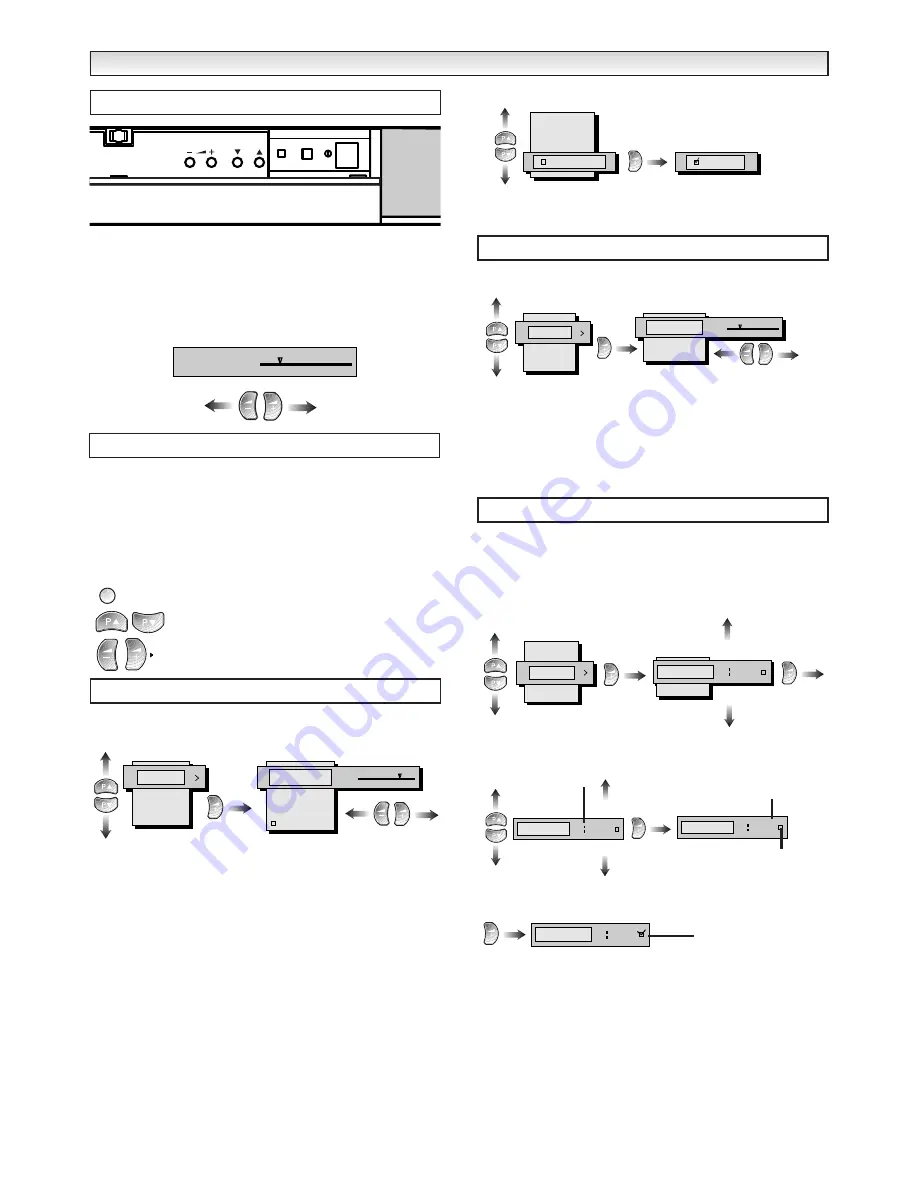
Programme position

Press the 

5


and 

6


to increase or decrease the programme

position.

■ 

Sound Volume Control

Increase or decrease the sound Volume by pressing the 

1


or

2


buttons.

All aspects of your televisions operation can be controlled by Remote
Control.

Many of your TV’s functions are controlled through the menu func-
tion.
During the menu operation the following buttons are used.

u


:

To enter the menu function.

To go back and to exit the menu function.

:

To navigate up and down in the menus.

: To navigate forwards to the next screen or

to  activate settings.

1. Press the MENU button.
2. 
Select Picture.

Select from the following and adjust to obtain the best picture
settings for your environment.

Brightness : To adjust brightness levels.

Contrast :

To adjust Contrast levels.

Colour :

To adjust Colour levels.

Sharpness : To adjust Sharpness levels.

Text bright : (Brightness of Teletext screen) 

MINIMUM / CENTRE / MAXIMUM.

Memory :

To store personal settings.

Tint :

(colour phase if NTSC equipment is detected.)

■ 

Storing personal preferences

If you have altered any of the settings in the Picture menu you can
store them. They can be recalled again later if you wish to change
them again.

In the picture menu select memory.

Press the 

1


button, a tick appears in the box and the settings are

stored.
Press the MENU button repeatedly to return to normal TV picture.

1. Press the MENU button.
2. Select Sound.

Select from the following and adjust to obtain the best sound
settings for your environment.

Volume :

To adjust sound volume.

Bass :

To adjust low frequency sounds.

Treble :

To adjust high frequency sounds.

Balance : To equalise the output from the left and right speakers.

Press the MENU button repeatedly to return to normal TV picture.

On-timer setting

The On-timer will switch the TV on from the standby mode or change
programme positions when the selected time has elapsed.

1. Press the MENU button.
2. Select Timer.

When the time period --:-- is selected its colour changes to yellow. The
time changes in 15 minute steps with a maximum of 24:00hrs.

When the start up programme position --  is selected its colour changes
to yellow.

When you are ready to store your settings press the 

1

button and

both the time period and the start up programme numbers turn green
in colour. The tick appears as shown above and turns yellow.

If you switch your TV into standby it will switch on after the time
elapses. If you do not switch into standby it will switch to the selected
programme position.

If the TV set is switched on by on timer the TV will automatically
switch into Standby 3hrs if no keys are pressed. This is a safety
feature to ensure that you are aware that the TV set is functioning.

TV controls

GENERAL OPERA

GENERAL OPERA

TION

TION

P

Volume

10

Remote control operation

Picture menu

Picture

Sound
Timer
Setting
Preset

Brightness

Contrast
Colour
Sharpness
Text bright
    memory?

memory ?

Brightness
Contrast
Colour
Sharpness
Text bright

memory

Sound menu

Sound

Timer
Setting
Preset

Picture

Volume

Bass
Treble
Balance

10

Timer menu

OFF-Timer

ON-Timer

-- --

--

Picture
Sound

Timer

Setting
Preset

00:30

00:15

24:00

23:45

ON-Timer

01 30 --

ON-Timer

01 30 05

02

01

AV3

AV2

ON-Timer

01 30 05

Set

Time period

Programme
position

Not set

Содержание CE24WN5-B

Страница 1: ...CE24WN5 B CE28WN5 B CE32WN5 B Please read this Instruction book before using your television We wish you many hours of pleasure from your new television Colour Television INSTRUCTION MANUAL L S R D P ...

Страница 2: ...For example near a bathtub kitchen sink in a wet basement etc Before cleaning unplug the television receiver from the wall socket Never stand on lean on or push the television or its stand Never allow children to play with the television or its stand Serious injury may result if it should fall Do not apply liquid cleaners or aerosol cleaners directly onto the television receiver Use a damp cloth f...

Страница 3: ... from 1 to 6 will not have a stored station The remaining stations will be stored from programme position 7 in sequence as found This procedure only appears the first time you switch on If additional channels become available you move to another city or cable is installed please follow the description TUNING on page 5 Now the installation is complete INST INSTALLA ALLATION TION Step 1 AV1 AV2 ANT ...

Страница 4: ...ound volume Bass To adjust low frequency sounds Treble To adjust high frequency sounds Balance To equalise the output from the left and right speakers Press the MENU button repeatedly to return to normal TV picture On timer setting The On timer will switch the TV on from the standby mode or change programme positions when the selected time has elapsed 1 Press the MENU button 2 Select Timer When th...

Страница 5: ...ically searches sorts and stores in the order rel evant to the country you are in Tuning Auto 1 Press the MENU button 2 Select Preset press 1 then select Tuning 3 Select Auto When pressing 1 or 2 all available channels are stored as shown in the diagram below To cancel this tuning operation press the MENU button repeatedly After completing this procedure the TV set returns to normal TV mode and se...

Страница 6: ...ture modes and one adjustable personal picture preference mode You can choose your preferred picture mode by pressing the 9 button repeatedly PERSONAL Personal preference mode STANDARD Normal viewing mode ECO Low contrast brightness and colour picture setting Suitable for dimly lit rooms and gives a cinema like effect when the lights are switched off or Economical mode DYNAMIC High contrast bright...

Страница 7: ...age 11 Switching into from standby mode The Standby mode is used for switching the TV set off for short periods of time In standby mode the TV is switched off but is still receiving mains power To turn the TV set into standby mode press the 4 4 button The red power indicator illuminates more brightly To turn the TV set ON from standby mode press any of the following buttons 4 4 5 5 6 6 or 0 9 butt...

Страница 8: ...aerial to the on the satellite receiver 5 Connect a SCART cable to the AV1 socket on the TV set from the satellite receiver Use of front AV3 terminal This TV provides one pair of AV input terminals on the front panel It is very convenient for use as a game or camcorder connection Press the v button to select the AV3 mode Selection of the sound track from the equipment By pressing the sbutton repea...

Страница 9: ...ows you to set up the following special functions Maximum volume setting and prohibition of pre setting Sets the current volume as the maximum volume level and prohibi tion of the tuning PROHIBITION OFF or PROHIBITION ON Start up programme position Presets the programme position when the set is switched on START POSITION OFF Last programme position start START POSITION P1 Programme position 1 star...

Страница 10: ...eft and right picture height is stretched Black bars left and right picture height is stretched Black bars left right top and bottom 4 3 14 9 16 9 Letterbox Video The whole screen is filled stetching the width The whole screen is filled stetching the height slightly at the edges The whole screen is filled with the corrrect picture ratio The black bars top and bottom are present and the height is c...

Страница 11: ...es or traffic news Select a latest page 1 Press the C button in the teletext mode to view the TV picture When the page is updated the page number will appear over the normal TV picture 2 Press the TXT TV button to view the updated page If the page has sub pages the number will appear when the sub page is changed TELETEXT TELETEXT Reveal switch To reveal hidden items on the text page Sub page acces...

Страница 12: ...t its sole option free of charge any such defective component part of the equipment always provided that 1 The equipment has at all times been used in accordance with the operating instructions issued by the Company and has not been connected to an electrical mains supply for which it has not been adjusted 2 Accidental damage or damage caused by negligence of misuse by the user is specifically exc...

Отзывы: