background image

Important Safety Precautions

2

Electrical energy can perform many useful functions, but it can also cause personal injuries and property damage if improperly handled. 
This  product  has  been  engineered  and  manufactured  with  the  highest  priority  on  safety.  But  IMPROPER  USE  CAN  RESULT  IN 
POTENTIAL ELECTRICAL SHOCK OR FIRE HAZARD. In order to prevent potential danger, please observe the following instructions 
when installing, operating and cleaning the product. To ensure your safety and prolong the service life of your LCD TV product, please read 
the following precautions carefully before using the product.

1. Read these instructions

---All operating instructions must be read and understood before the product is operated.

2. Keep these instructions

---These safety and operating instructions must be kept in a safe place for future reference.

3. Heed all warnings

---All warnings on the product and in the instructions must be observed closely.

4. Follow all instructions

---All operating instructions must be followed.

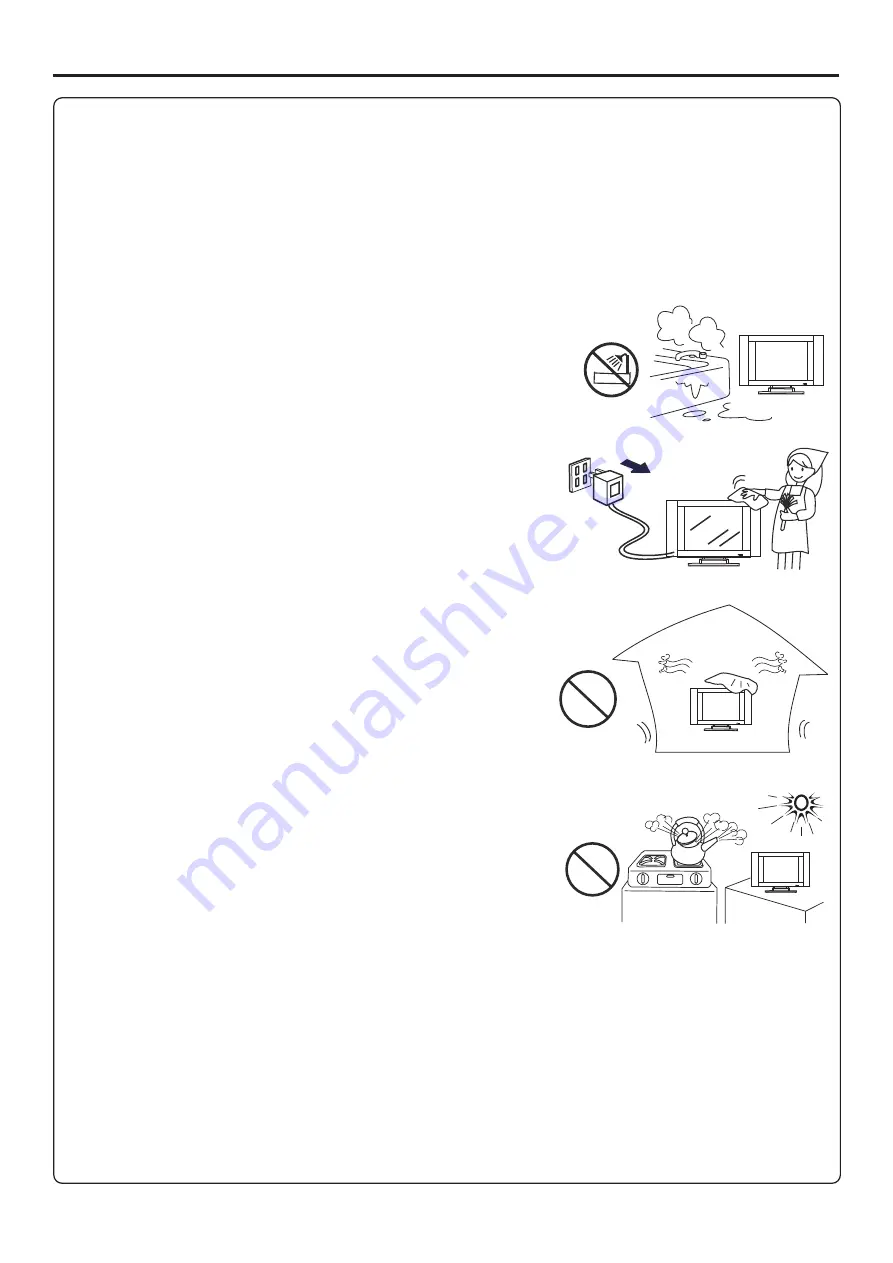
5. Do not use this apparatus near water

---for example, near a bathtub, washbowl, 

kitchen sink, or laundry tub, in a wet basement, or near a swimming pool, and the like.
Do  not  use  immediately  after  moving  from  a  low  temperature  to  high  temperature 
environment, as this causes condensation, which may result in fire, electric shock, or 
other hazards.

6. Clean only with dry cloth

---Unplug this product from the wall outlet before cleaning. 

Do not use liquid cleaners or aerosol cleaners. Use a damp cloth for cleaning.

7. Ventilation

---Do not block any ventilation openings. Install in accordance with the 

manufacturer instructions. The vents and other openings in the cabinet are designed for 
ventilation. Do not cover or block these vents and openings since insufficient ventilation 
can cause overheating and/or shorten the life of the product. Do not place the product on 
a bed, sofa, rug or other similar surface, since they can block ventilation openings. This 
product is not designed for built-in installation; do not place the product in an enclosed 
place  such  as  a  bookcase  or  rack,  unless  proper  ventilation  is  provided  or  the 
manufacturer’s instructions are followed.

8.Heat sources

---Do not install near any heat sources such as radiators, heat registers, 

stoves, or other apparatus (including amplifiers) that produce heat.

9.Grounding or Polarization

---Do not defeat the safety purpose of the polarized or grounding-type plug. A polarized plug has two blades 

with one wider than the other. A grounding type plug has two blades and a third grounding prong. The wide blade or the third prong are 
provided for your safety. If the provided plug does not fit into your outlet, consult an electrician for replacement of the obsolete outlet.

10.Power cord protection

---Protect the power cord from being walked on or pinched particularly at plugs, convenience receptacles, and 

the point where they exit from the apparatus.

NOTE

: where the mains plug or an appliance coupler is used as the disconnect device, the disconnect device shall remain readily operable.

11.Attachments

---Only use attachments/accessories specified by the manufacturer. Do not use attachments not recommended by the 

manufacturer. Use of improper attachments can result in accidents.

Содержание AVL3211

Страница 1: ... Monitor INSTRUCTION MANUAL AVL3211 Help Line 1 800 263 2244 Monday to Friday 9am 5pm Eastern Diagonal measure www sanyo ca For best TV picture quality and channel selection connect to a digital cable or satellite receiver 604 L32HUK19 01 Ver 1 0 ...

Страница 2: ...rols 7 Connections 10 Basic Operations 15 Memorizing the Channels 17 Setting Picture 18 Setting Sound 19 Setting Timer and System 20 Viewing Closed Captions 22 Setting Parental Control 23 Adjusting On Screen Display 27 Adjustment in PC VGA YPBPR Mode 28 Troubleshooting 29 Care and Maintenance ...

Страница 3: ...ontact your local authorities or the Electronic IndustriesAlliance www eia org FCC STATEMENT FCC Notice LCD TV A CLASS B digital device ThisequipmenthasbeentestedandfoundtocomplywiththelimitsforaClassBdigitaldevice pursuanttopart15oftheFCCRules These limits are designed to provide reasonable protection against harmful interference when the equipment is operated in a commercial environment This equ...

Страница 4: ... Do not block any ventilation openings Install in accordance with the manufacturer instructions The vents and other openings in the cabinet are designed for ventilation Do not cover or block these vents and openings since insufficient ventilation can cause overheating and or shorten the life of the product Do not place the product on a bed sofa rug or other similar surface since they can block ven...

Страница 5: ...es replacement parts specified by the manufacturer or those with the same characteristics and performance as the original parts Use of unauthorized parts can resultinfire electricshockand orotherdanger 17 Overloading Do not overload wall outlets extension cords or convenience receptacles on other equipment as this can result in a risk offireorelectricshock 18 Entering of objects and liquids Never ...

Страница 6: ...our product dealer or local power company For added protection for this product during a lightning storm or when it is left unattended and unused for long periods of time unplug it from the wall outlet and disconnect the cable system This will prevent damage to the product due to lightning and power line surges When the unit has to be used with another power supply voltage the power cable must be ...

Страница 7: ...ftheremotecontrolfailstooperatetheLCDTVfunctions replacethebatteriesintheremotecontrol Place the batteries with their terminals correspondingtothe and indications in thebatterycompartment Openthebatterycover 1 Inserttwosize AAAbatteries 2 Replacethecover 3 Using the Remote Control Usetheremotecontrolbypointingittowardstheremotesensorwindowoftheset Objectsbetween theremotecontrolandsensorwindowmayp...

Страница 8: ...d Cable TV converter descrambler not supplied Two set signal splitter not supplied Cable TV Line RF switch not supplied OUT IN ANTENNAS The antenna requirements for good color television reception are more important than those for black white television reception For this reason agoodqualityoutdoorantennaisstronglyrecommended Thefollowingisabriefexplanationofthetypeofconnectionsthatareprovidedwith...

Страница 9: ... button to directly increase or decrease the sound volume level In OSD Menu press these buttons to adjust the value or setting of each item 5 CH 6 CH Press these two buttons to directly change the TV channel In OSD Menu press these buttons to choose the OSD items Press this button to turn the unit ON from STANDBY mode Press it again to turn the set back to STANDBY Identification of Controls 7 Main...

Страница 10: ...put sockets of a DVD player or Set Top Box Antenna input Allows you to connect cable or outdoor antenna AV inputs S Video Video Audio L R Receive video audio signals from external sources such as VCR or DVD player Headphone jack AV outputs Video Audio L R Connect to the VCR input jacks to record programs Note Beforeyouconnectexternaldeviceswiththeunit pleaseremovethebackcover RF PIC HDMI 2 VGA HDM...

Страница 11: ...when in menu operation MENU button To access or exit the menu main page 6 SOUND To select the sound mode 7 STILL To freeze current picture 8 MTS To select STEREO SAP or MONO 9 0 9 NUMBER Use these number buttons to select channel or input password 10 CLOSED CAPTION To select closed caption mode 11 SCALE To select screen aspect ratio 12 PICTURE To select the picture mode 13 SLEEP To set sleep timer...

Страница 12: ...utterminalsharethesameAudioinputterminals 1 TurnonyourTV pressSOURCE buttonontheremotecontrol 2 Use5 or6 repeatedlytoselectAV1 orSVIDEOiftheS Video terminalisconnected andpress or oconfirm 3 Turnontheexternaldeviceandplayit 3 4 t To view signal from AV S VIDEO inputs Connect the Audio Video cables between the Audio L R Video jacks on the unit and external devices How to connect The unit provides t...

Страница 13: ...e different and is dependant on your model Please read the user manual of your camcorder to confirm operation 1 Turn on your TV press SOURCE button on the remote control 2 Press 5 or6 repeatedly to select AV2 and press or to confirm 3 Turn on your camcorder and set it to output mode For details refer to your camcorder user manual 4 Insert the tape into the camcorder and press Play button 3 4 R L V...

Страница 14: ...URCE button on the remote control 2 Press 5 or6 repeatedly to select YPBPR1 or YPBPR2 and press or to confirm 3 Turn on your DVD player insert a DVD disc and press the Play button 3 4 To play DVD Note TheY Pb ProutputsonyourDVDplayeraresometimeslabeledY Cb Cr orY B Y R Y Ifso connectthecablestolikecolours Cables are often color coded to connectors Connect red to red white to white etc PC H D M I T...

Страница 15: ... on the PC and AUDIO input socket on the unit How to connect Connect the HDMI cable between the HDMI input jack on the unit and HDMI output jack on the device Note If the external device has DVI output only use a DVI to HDMI adapter cable to connect to the HDMI jack Connect the audio cable to the VGA AUDIO IN jack on the TV rear How to connect HDMI cable Audio cable VGA cable PC PC H D M I TV AV1 ...

Страница 16: ... and external amplifier or Note The operations of the amplifier may be different depending on model Please read the user manual of your amplifier to confirm properoperation OnlyanalogTVprograms AV1 AV2andSVIDEOinputsourcescanbeoutputthroughtheAVoutputjacks Connections continued To enjoy high quality sound through an external amplifier 14 VCR for recording Cables are often color coded to connectors...

Страница 17: ...nuappearsonthescreen Use the 5 or 6 to select menu item and or to adjust value of item 3 4 or setting the 1 3 Note To clearly introduce the menu operations this operation manual provides a descriptionbasedonoperationwiththeremotecontrol Insertthepowercordintothewalloutlet PressthePower buttonontheremotecontrol theunitwillbeturnedonandyouwillbereadytouseitsfeatures 15 Press 3 4 or to select menu pa...

Страница 18: ...stheCH orCH theunitchangeschannelsinsequence Youwillseeallthechannelsthattheunithasmemorized Youwillnotseechannelsthatwereskipped Direct Accessing Channels Pressthenumberbuttonstogodirectlytoachannel To select a one digit channel input the channel number by pressing the 0 9 number buttons to display X and wait for some seconds theunitgoestotheselectedchannel To select a two digit channel input the...

Страница 19: ...m 2 SCAN 178 25 MHZ CH 8 TV CHANNEL SEL ADJ EXIT SOURCE CHANNEL ADD ERASE AUTO SCAN FINE TUNE CABLE 29 MENU ADD TV CHANNEL SEL ADJ EXIT SOURCE CHANNEL ADD ERASE AUTO SCAN FINE TUNE CABLE 29 MENU ADD The skipped channels can not be selected by using CH buttons unless you use numberbuttonstoinputchannelnumberdirectly Skipping Channels Use 3 or 4 to select ADD or ERASE When the item is set to ERASE t...

Страница 20: ...e sharpness and displays a sharp image Tint 4 greenish 3 purplish Color Tone Normal Warm Cool Note you may directly press PICTURE button on theremotecontroltoselect Selects one of three automatic color adjustments Sets to warm to enhance hotter colors such as red or set to cool to see less intense colors with more blue 4 sharper 3 softer 3D NR Scale Adjusts screen aspect ratio Normal Panorama Full...

Страница 21: ...ect ON to equalize overall volume levels across all channels Customizing the Sound PressMENU buttonrepeatedlytoexit 4 Press MENUtodisplaythemenumainpage 1 Press repeatedly to select SOUND menu and press to access 3 or4 6 2 Within the menu use 5 6 3 or 4 to navigate or adjust 3 Adjusting the Volume Using the volume buttons VOL and VOL PresstheVOL orVOL toincreaseordecreasethevolume Using the MUTE b...

Страница 22: ...s the unit will remind you after how many seconds the set will be turned off During this period if you do not want the unit to be turned off press any buttontoexit IftheTVlosespower theclockandtimersettingswillbeclearedandmustbereset POWER DOWN 21 58 Setting OFF timer Press MENUtodisplaythemenumainpage 1 Press repeatedly to select menu and press6 to access 3 or4 FUNCTION 2 Press repeatedlytoselect...

Страница 23: ...lnosignalinputforacertaintime theTVsetautogoestoSTANDBYmode Press MENUtodisplaythemenumainpage 1 Press repeatedly to select menu and press to access 3 or4 FUNCTION 6 2 Press 5 or 6 repeatedly to highlight COLOR SYSTEM item 3 Press to 3 or4 select a proper color system normally please select AUTO 4 Setting Color System PressMENU buttonrepeatedlytoexit 5 Note ThecolorsystemitemisadjustableonlyinAV1 ...

Страница 24: ...ng please select OFF 4 Setting Closed Caption Note YoucanalsouseCLOSEDCAPTIONbuttonontheremotecontroltoselectadesiredcaptionmode YoumayselectbetweenCC1 CC2 CC3 CC4 TEXT1 TEXT2 TEXT3 TEXT4andONMUTE The Closed Caption broadcasts can be viewed in two modes CAPTION andTEXT For each mode four channels areavailable The CAPTION mode shows subscripts of dialogues and commentaries of video programs while a...

Страница 25: ...rating that is unified with NC 17 but may be encoded in the data of older movies NOT RATED Setting Parental Control This function allows TV programs to be restricted and TV usage to be controlled based on FCC data It prevents children from watchingviolentorsexualscenesthatmaybeharmful Restriction of TV programs includes two ratings that contain information about the program the MPAA rating and the...

Страница 26: ...utomatically blockthehigherratings TV Y7 TV G TV PG TV 14andTV MA When TV G in the age based rating is set to BLOCK this will automatically blockthehigherratings TV PG TV 14 TV MA 24 Rating age based TV Y All children TV Y7 Direct to Older Children TV G General Audience TV PG Parental Guidance Suggested TV 14 Parents Strongly Cautioned TV MA Mature Audience Only content based FV V S L D Setting Pa...

Страница 27: ...ssword to navigate to PARENT CONTROL sub menu press to the MOVIE RATING item 5 or6 repeatedly select Use 3 or4 to select a rating that you would like to set 25 When TV Y in the age based rating is set to BLOCK this will automatically blockthehigherratings TV Y7 TV G TV PG TV 14andTV MA When TV G in the age based rating is set to BLOCK this will automatically blockthehigherratings TV PG TV 14 TV MA...

Страница 28: ...ual content Programming generally considered acceptable for children 8 years and over No profanity nudity or sexual content General programming suitable for all audiences Parental Guidance suggested Some material may not be suitable for children Programming contains themes or content which may not be suitable for viewers under the age of 14 Parents are strongly cautioned to exercise discretion in ...

Страница 29: ...OSDhalftone 4 Setting OSD Timeout Press MENUtodisplaythemenumainpage 1 Press repeatedly to select menu 3 or 4 OSD and press 6 to access 2 Press repeatedly to DURATION item 5 or 6 highlight OSD 3 Press select 3 or 4 a proper time 4 ThissettingallowsyoutosetthetimeforthemainOSDmenutobedisplayedonscreen 27 OSD SEL ADJ EXIT OSD LANGUAGE OSD H POSITION OSD HALFTONE OSD DURATION MENU OSD V POSITION 15 S...

Страница 30: ... VGA YPBPR Mode 28 Adjusting the Picture 1 2 Within the menu use 5 6 3 or 4 to navigate or adjust 3 PressMENU buttonrepeatedlytoexit Press MENUtodisplaythe menu PICTURE andpress6 toaccess Option Function Choice Remarks ...

Страница 31: ...n lights etc Turn off the equipment Check whether the batteries are working Replace if necessary Clean the remote control sensor lens on the unit Do not use the remote control under strong or fluorescent lighting The batteries should be inserted with polarity aligned Snowy picture and noise Horizontal dotted line Remote operation fails Check if you have selected the correct VGA mode in your PC No ...

Страница 32: ...d as such is not covered by Warranty This product is not designed to display fixed image patterns for extended periods of time Note ImportantInformationRegardingUseofVideoGames Computers CaptionsorOtherFixedImageDisplays Theextendeduseoffixedimageprogrammaterialcancauseapermanent shadowimage ontheLCDpanel This background image is viewable on normal programs in ...

Страница 33: ...31 Specifications ...

Страница 34: ...rranty You the original retail purchaser are responsible for any costs of TRANSPORTING the product to and from SANYO Canada Inc or an authorized Sanyo Service Depot You also are responsible for the cost of any MAINTENANCE necessary in respect of the product In home service is only available to the units whose screen size is 40 inches or over and limited to the locations within a 30 km radius of an...

Отзывы: