


SANTOS : User and maintenance manual
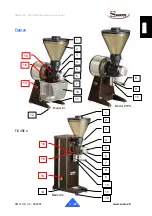
The 2 grinding wheels are identical and can be fitted equally either on the moving plate
(18)
(moving grinding wheel) or on the cast metal adjustment block
(19)
(fixed grinding
wheel).
1. Stop the machine by putting the switch
(13)
to "0" and disconnect the power supply
cord.
2. Close the shutter
(3)
on the bean hopper
(2)
. Take off the bean hopper
(2)
.
3. Turn the grinding wheel gap adjuster button
(6)
clockwise until it comes to a halt at
the “
COARSE
” setting."
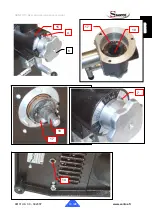
4. Unscrew the nuts
(16)
and remove the whole grinding unit
(15)
, to gain access to the
grinding wheels.
5.
Change the grinding wheels (3 fastening screws) after carefully cleaning the
supporting surfaces.
TAKE CARE: The slightest small coffee particle under the grinding wheel may
prevent the machine from operating correctly. It is recommended that the grinder
body is cleaned with a compressed air jet or a dry brush.
6. Reassemble the grinding unit
(15)
and adjust the grinding gap to its minimum setting.
TAKE CARE
•
Before tightening the fastening nuts
(16)
on the grinding unit
(15)
, check that the dial
(4)
of the grinding wheel adjuster button
(6)
is set to “
COARSE
”"
This precaution is essential to prevent any risk of the grinding wheels being brought
too close to each other, which could cause damage to the grinding unit.
!
ADJUSTING THE MINIMUM GAP BETWEEN THE GRINDING-WHEELS
This should be done after replacing the grinding wheels.
1. Plug the appliance in and run it empty.
2. Unscrew hexagon socket screw
(7)
on the dial
(4)
using a 2-mm Allen wrench.
Check that the dial
(4)
is free to rotate without turning button
(6)
.
3.
Turn button
(6)
anticlockwise until the grinding wheels come into contact (a slight
sound of friction will be heard) then back one notch in the reverse direction.
ATTENTION
This is a delicate operation, and prolonged contact between the grinding wheels
should be avoided, since this could damage them.
!
4. Turn the appliance off by placing switch
(13)
on
"0"
.
5. Without moving the button
(6),
place the dial
(4)
on the
"FINE"
position then tighten
the hexagon socket screw
(7)
fully home
.
98101 US 3.0 - 09 2007
7
/ 20
www.santos.fr


