background image

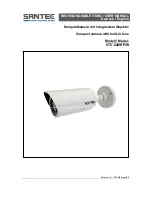
Bedienungsanleitung / User manual VTC-249IRP/W


_________________________________________________________________________________ 


- 5 - 


Allgemeine


Vorsichtsmaßnahmen 


Vorsicht 


Erläuterung der verwendeten Symbole 


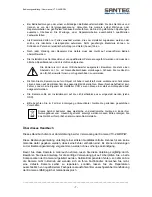
Gefahr:

 Das Gefahrensymbol weist auf lebensgefährliche Spannung hin. Öffnen 


Sie niemals das Gerätegehäuse, Sie könnten einen lebensgefährlichen elektri- 


schen Schlag erleiden. 


 Achtung:

 Das Achtungssymbol weist auf unbedingt zu beachtende Betriebs-


und Wartungsanweisungen hin. 


CE-Richtlinien 

 
Vorsicht: Änderungen und Modifizierungen, die nicht ausdrücklich durch die zuständige 
Genehmigungsbehörde genehmigt worden sind, können zum Entzug der Genehmigung zum 
Betreiben des Gerätes führen. 
 
Dieses Gerät entspricht den CE-Richtlinien. 


VORSICHT


LEBENSGEFAHR 

NICHT ÖFFNEN 

VORSICHT:

SETZEN SIE SICH NICHT DER 

GEFAHR EINES ELEKTRISCHEN SCHLAGES 

AUS UND ÖFFNEN SIE NICHT DIE 

GEHÄUSEABDECKUNG ODER DIE 

GERÄTERÜCKSEITE. 

IM GERÄTEINNERN BEFINDEN SICH KEINE 
KOMPONENTEN, DIEGEWARTET WERDEN 

MÜSSEN. 

ÜBERLASSEN SIE WARTU NGSARBEITEN 

QUALIFIZIERTEM PERSONAL. 


Содержание VTC-249IRP

Страница 1: ...Version 1 3k f 1210 dt engl A6 BEDIENUNGSANLEITUNG USER MANUAL Deutsch English Kompaktkamera mit integriertem Objektiv Compact camera with built in lens Modell Model VTC 249IRP W...

Страница 2: ...o com Impressum Das Copyright dieser Bedienungsanleitung liegt ausschlie lich bei Sanyo VideoVertrieb AG Jegliche Vervielf ltigung auch auf elektronischen Datentr gern bedarf der schriftlichen Genehmi...

Страница 3: ...This publication may not be reproduced stored in a retrieval system or transmitted in any form or by any means electronic mechanical photocopying recording or otherwise without the written prior permi...

Страница 4: ...itshinweise 6 Installation 8 Die Kamera im berblick 10 Einstellung der Kamera ber das OSD Bildschirm Men 11 Besondere Ausstattungsmerkmale 18 Technische Daten 18 Anordnung der Montagel cher 19 ENGLISH...

Страница 5: ...nbedingt zu beachtende Betriebs und Wartungsanweisungen hin CE Richtlinien Vorsicht nderungen und Modifizierungen die nicht ausdr cklich durch die zust ndige Genehmigungsbeh rde genehmigt worden sind...

Страница 6: ...r dass das Ger t nicht berhitzt wird Verwenden Sie nur die empfohlene Betriebsspannungsversorgung Wenn Sie nicht sicher sind ob die am Installationsort vorhandene Stromversorgung verwendet werden kan...

Страница 7: ...k nnen auf dem Bildschirm das gesamte Bild berstrahlen Dieser Nachzieheffekt ist kein Fehler sondern eine Eigenart der Halbleiter CCD s wenn diese einer starken Lichtquelle direkt ausgesetzt werden Di...

Страница 8: ...tragen kann Sollten die beigef gten Schrauben nicht ausreichend sein so verwenden Sie bitte geeignete Schrauben f r eine sichere Installation der Kamera 2 Stromversorgung und Monitor Impedanz Benutzen...

Страница 9: ...en Joystick Folgen Sie zur Einstellung der Kamera den Anweisungen unter Einstellung der Kamera ber das OSD auf den folgenden Seiten Zus tzlicher Videoanschluss Bild 2 Diesen zus tzlichen Videoanschlus...

Страница 10: ...ra im berblick Bild 1 Bild 2 Bild 3 Bild 4 Bild 5 1 Bild 5 2 Vorderansicht Seitenansicht Alle Ma angaben in mm hier ffnen korrekte Platzierung des Sonnenschutzdachs IR Strahler Schrauben f r Objektive...

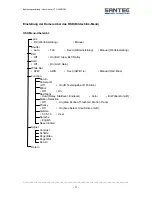
Страница 11: ...anual Werteinstellung BLC Off On BLC Area BLC Ratio AGC Off On AGC Gain White Bal ATW AWB Fixed AWB 1 4 Manual Red Blue Function Return Camera ID Off On ID Texteingabe ID Position Mirror Off On Day Ni...

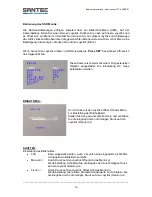
Страница 12: ...ch das folgende Men Diese Kamera ist bereits mit einem DC gesteuerten Objektiv ausgestattet Die Einstellung DC muss beibehalten werden BRIGHTNESS Durch Druck auf den Joystick ffnet sich das Men zur Ei...

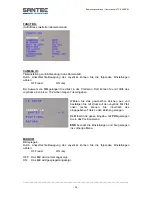
Страница 13: ...ab Mit der Auswahl Exit verlassen Sie die Eingabe BLC Ratio Hiermit stellen Sie den gew nschten BLC Wert ein Return Hiermit verlassen Sie die BLC Einstellung AGC OFF aus ON ein AGC Gain Stellen Sie h...

Страница 14: ...Dort k nnen Sie mit Hilfe des Joysticks einen bis zu 15 Zeichen langen Titel eingeben W hlen Sie das gew nschte Zeichen aus und best tigen Sie mit Druck auf den Joystick Mit Pfeil links rechts k nnen...

Страница 15: ...ntermen zur Einstellung von Delay Einschaltverz gerung Startlevel Startpegel Endlevel Endpegel Color Stetige Einstellung auf Farbbild B W Stetige Einstellung auf Schwarzwei bild Burst on Schaltet den...

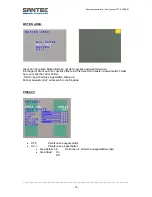
Страница 16: ...dem Joystick ausgew hlt werden Ein l ngerer Druck auf den Joystick ffnet ein Untermen zur direkten Auswahl aller Felder bzw zum L schen aller Felder Return speichert die eingestellten Werte ab Mit de...

Страница 17: ...t einer Links Rechts Bewegung des Joysticks k nnen Sie den Gamma Wert ver ndern SPRACHE Die Sprachauswahl ist auf Englisch festgelegt ADJUST Hier k nnen mit Hilfe des Joysticks die Werte eingestellt w...

Страница 18: ...1 0 0 Lux Signal Rauschabstand 50dB AGC ja Synchronisation intern Wei abgleich automatisch Videoausgang 1 0 Vss an 75 Ohm BNC Objektiv integriertes DC gesteuertes 4 0 9 0 mm Objektiv OSD Bildschirmme...

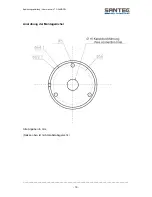
Страница 19: ...ngsanleitung User manual VTC 249IRP W _________________________________________________________________________________ 19 Anordnung der Montagel cher Alle Angaben in mm Skizze oben ist nicht ma stabs...

Страница 20: ...Bedienungsanleitung User manual VTC 249IRP W _________________________________________________________________________________ 20...

Страница 21: ...hat may be of sufficient magnitude to constitute a risk of electric shock to a person Warning This symbol is intended to alert the user to the presence of important operating and maintenance servicing...

Страница 22: ...nce should only be operated from the type of power source indicated on the marking label If you are not sure of the type of power supplied at the installation location please contact your local dealer...

Страница 23: ...revent eye damages Never point the camera at an object with a high degree of luminance Bright vertical or horizontal lines can result in a distortion outshine of the entire image on the monitor This a...

Страница 24: ...o fix the camera onto a solid basis which is capable to carry the weight of the camera Ensure that the camera is safely installed by using only suitable screws 2 Power supply and monitor impedance Onl...

Страница 25: ...confirming your choice press onto the joystick See chapter Camera adjustments via OSD menu for further details Additional video connection picture 2 This additional video connector can be used with th...

Страница 26: ..._ 26 Camera overview Picture 1 Picture 2 Picture 3 Picture 4 Picture 5 1 Picture 5 2 front view side view All dimensions in mm open here correct position of sun roof IR LEDs screws for lens adjustment...

Страница 27: ...al value setting BLC Off On BLC Area BLC Ratio AGC Off On AGC Gain White Bal ATW AWB Fixed AWB 1 4 Manual Red Blue Function Return Camera ID Off On ID text ID position Mirror Off On Day Night Auto del...

Страница 28: ...ed Press SET the following menu pops up This camera is pre equipped with a DC lens The setting has to stay at DC BRIGHTNESS Press onto the joystick and a menu to adjust the picture brightness pops up...

Страница 29: ...tly select or delete all areas Return saves the values Select Exit to quit BLC Ratio Select the desires BLC value Return Exit the BLC settings AGC OFF ON AGC Gain Select the desired AGC value WHITE BA...

Страница 30: ...e title menu Using the joystick you can enter a title of max 15 characters Select the desired character and confirm by pressing onto the joystick Use the arrow left right to navigate within the entere...

Страница 31: ...o day or night operation By pressing onto the joystick you will get into a sub menu for Delay Start level End level Color Pictures are displayed in color B W Pictures are displayed in black white Burs...

Страница 32: ..._______________________ 32 MOTION AREA Use the joystick to select the active motion area By longer pressing onto the joystick a sub menu pops up to directly select or delete all areas Return saves the...

Страница 33: ...______________________________________________________________ 33 GAMMA Move the joystick left right to set the gamma value LANGUAGE The language is set to English ADJUST Use the joystick to set value...

Страница 34: ...o 50dB AGC yes Synchronisation internal White balance automatical Video output 1 0 Vpp at 75 Ohm BNC Lens Integrated 4 0 9 0 mm lens DC OSD adjustment Camera adjustments by menu displayed into the vid...

Страница 35: ...ungsanleitung User manual VTC 249IRP W _________________________________________________________________________________ 35 Drilling holes scheme All dimensions in mm The above drawing is not true to...

Страница 36: ...__________________________________________________________________________ www santec video com Ihr Fachh ndler Your local distributor...

Отзывы: