background image

10

Connections to other equipment

The exact arrangement you use to interconnect various video and audio components to the TV is dependent on
the model and features of each component. Check the Owner's Manual provided with each component for the
location of video and audio inputs and outputs.

The connection diagrams below are offered as suggestions. You may need to modify them to accommodate
your particular assortment of components. The diagrams are intended to show component video and audio
interconnections only.

Pressing 

TV/AV

 on the remote control displays the current signal source

(press 

TV/AV

 again or 

0

-

5

 to change).

Selecting the video input source

Press 

TV/AV

 to view a signal from another device connected to your TV, such

as a VCR or DVD player. You can select ANT, VIDEO1, VIDEO2, VIDEO3 (on
the front panel), COMPONENT1, or COMPONENT2 depending on which
input jacks you used to connect your devices.

SOURCE SELECTION

0. ANT 
1. VIDEO1
2. VIDEO2
3. VIDEO3
4. COMPONENT1
5. COMPONENT2

SELECT :     /0-5
       SET : ENTER 

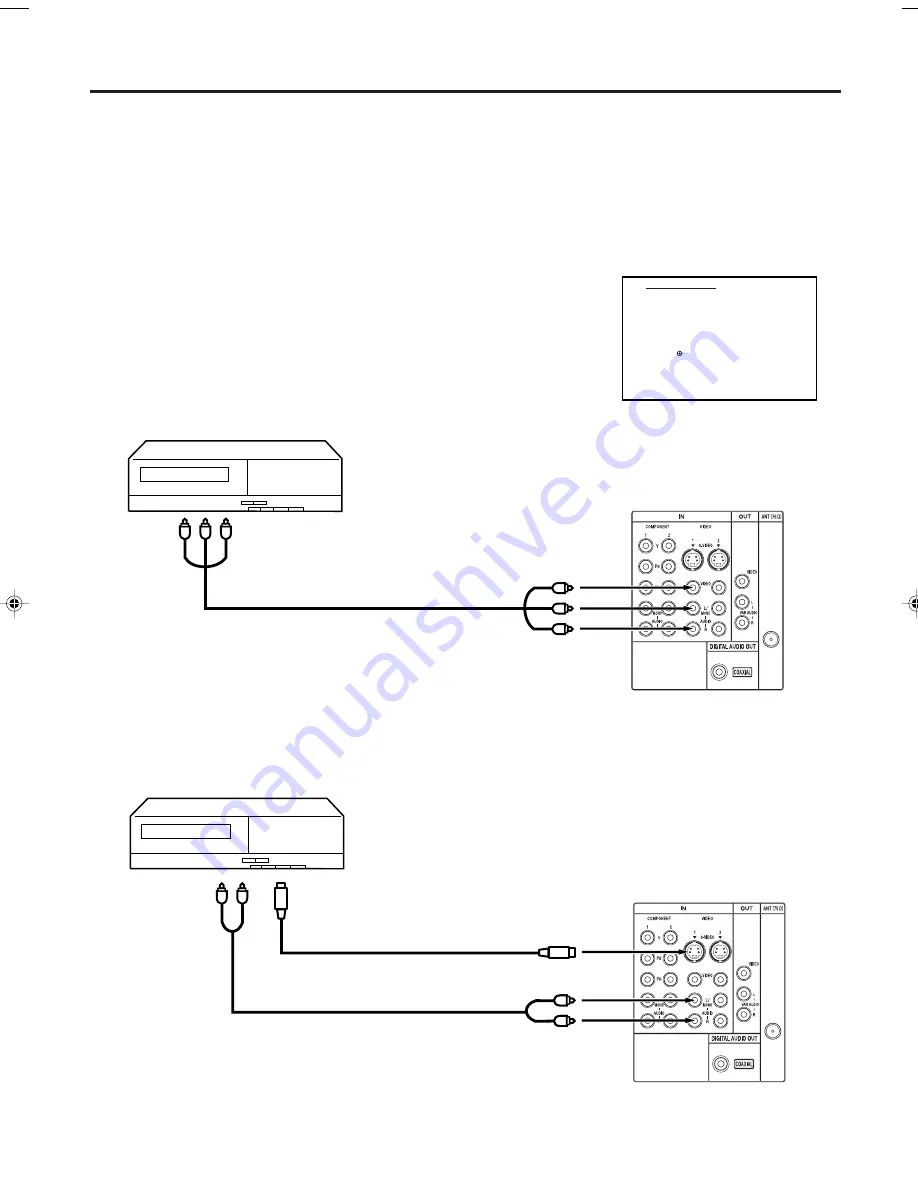
To connect the TV to a VCR with an S-Video cord

If you connect a VCR with a S-VIDEO cord to the S-VIDEO IN jack on the rear of the TV, you must also connect
the audio cords to the AUDIO IN jacks on the rear of the TV. The S-VIDEO cord only carries the video signal.
The audio signal is separate.

NOTE:

When the S-video cord and the video cord are connected to each jack at the
same time, the S-video cord takes precedence over the video cord.

Rear of the TV

To S-Video OUT

To Audio OUT

Audio cord (not supplied)

S-Video cord (not supplied)

To S-VIDEO IN 1 (or 2)

To connect the TV to a VCR

Rear of the TV

To Audio/Video OUT

Audio/Video cord (not supplied)

To AUDIO/VIDEO IN 1 (or 2)

To AUDIO IN 1 (or 2)

 3S60201A_En_p10-14

7/30/05, 12:10 PM

10

Содержание HDTV3000

Страница 1: ...efore operating the unit please read this manual thoroughly ATTENTION If you purchase a universal remote control from your local retailer please contact the remote manufacturer for the required progra...

Страница 2: ...urn 9 VENTILATION Slots and openings in the cabinet back or bottom are provided for ventilation to ensure reliable operation of the unit and to protect it from overheating These openings must not be b...

Страница 3: ...e 18 SERVICING Do not attempt to service this unit yourself as opening or removing covers may expose you to dangerous voltage or other hazards Refer all servicing to qualified service personnel 19 DAM...

Страница 4: ...Resetting your picture adjustment 36 Closed Caption 37 CC advanced 38 Selecting stereo 39 Second Audio Program SAP 39 Sound control adjustment 39 Turning off the built in speakers 40 Selecting the BB...

Страница 5: ...E BBE gives you vivid sound with incredible presence 2 sets of S Video Component Video jacks A VCR DVD player satellite receiver or other audio video component can be connected to this unit Video Inpu...

Страница 6: ...OLUME buttons POWER button CHANNEL buttons POWER indicator Remote sensor AUDIO L R VIDEO IN jacks VIDEO3 AUDIO L R VIDEO IN jacks VIDEO1 AUDIO L R VIDEO IN jacks VIDEO2 To display the menu screen Pres...

Страница 7: ...button to display SOURCE SELECTION menu to select the video input source 15 FAV buttons Press to select your favorite channels 16 PICTURE SIZE button Press this button to display PICTURE SIZE menu 1...

Страница 8: ...te VHF UHF Antennas 75 ohm VHF Cable and 300 ohm UHF Twin lead Wires RF IN jack RF IN jack RF IN jack Combiner RF IN jack Combiner Connect the 75 ohm Cable from the Combination VHF UHF Antenna to the...

Страница 9: ...75 ohm CABLE TV Cable A B Switch 75 ohm Cable to unit Incoming 75 ohm CABLE TV Cable 75 ohm Cable to unit Converter Descrambler RF IN jack RF IN jack RF IN jack Converter Descrambler This unit has an...

Страница 10: ...DVD player You can select ANT VIDEO1 VIDEO2 VIDEO3 on the front panel COMPONENT1 or COMPONENT2 depending on which input jacks you used to connect your devices SOURCE SELECTION 0 ANT 1 VIDEO1 2 VIDEO2...

Страница 11: ...ith component video If your DVD player has component video out jacks connect your TV to a DVD player using a component video cord It can greatly enhance picture quality and performance Rear of the TV...

Страница 12: ...DTV receiver set top box If you connect a DTV receiver set top box connect your TV to a DTV receiver set top box using a component video cord Rear of the TV To Component OUT To Audio OUT Audio cord n...

Страница 13: ...equipment continued Amplifier To Audio L Input To Audio R Input Audio cord not supplied To connect an audio system This connection allows you to use an audio amplifier and external speakers and adjust...

Страница 14: ...hook up variations required they have not all been included in the suggested connection diagrams You ll need to consult each component s Owner s Manual for additional information To playback from a c...

Страница 15: ...PORTANT Make sure that the antenna or cable TV system connection is made Press or to select TV or CABLE then press ENTER The STARTING SETUP menu appears the first time you turn on the TV and helps you...

Страница 16: ...SETUP LANGUAGE ENGLISH ENGLISH FRAN AIS ESPA OL CLOCK SET 12 00 AM TV CABLE CABLE AUTO CH MEMORY ADD DELETE SELECT ADJUST Press MENU The menu screen will appear 5 Setting the language You can choose f...

Страница 17: ...memory This TV can receive up to 250 VHF UHF channels and 500 cable TV channels To use this TV with an antenna set the TV CABLE menu option to the TV mode When shipped from the factory this menu optio...

Страница 18: ...5 001 DIGITAL ADD 5 002 DIGITAL ADD CLEAR ALL SETUP MENU SELECT ADJUST 3Press or to select ADD DELETE then press ADD DELETE ADD DELETE CH SIGNAL 1 ANALOG ADD DELETE 2 ANALOG ADD 3 ANALOG DELETE 4 ANA...

Страница 19: ...for up to 11 additional channels To watch your favorite channels Press FAV or on the remote control to select your favorite channels To delete your favorite channels 1 Select a channel you want to re...

Страница 20: ...also decreases 1 2 3 4Press the Direct Channel Selection buttons to select the channel TO SELECT ANALOG CHANNELS 1 9 Press 0 twice then 1 9 as needed Example to select channel 2 press 0 0 2 10 99 Pre...

Страница 21: ...nel you were watching ANT ABCD 7 MUTE Press MUTE to switch off the sound The unit s sound will be silenced and MUTE will appear on the screen The sound can be switched back on by pressing this button...

Страница 22: ...from viewing or hearing violent scenes or picture that you may choose to exclude The restriction applies to TV RATING and MOVIE RATING if this data is transmitted You may set this restriction separat...

Страница 23: ...ng Press or to select the desired rating you want Press or to select the setting ON or OFF Press or to select MOVIE RATING Then press or to display the desired rating OFF MOVIE RATING is not set G All...

Страница 24: ...ss ENTER 5 1 Press or to display the password entering mode Use the number buttons 0 9 to enter your password then press ENTER The LOCKS menu appears Press MENU then press or to select LOCKS menu 3Pre...

Страница 25: ...ock the front panel Press and hold VOLUME on the front panel of TV for about 10 seconds until the message FRONT PANEL LOCK OFF appears on the screen 3Press or to select FRONT PANEL LOCK then press or...

Страница 26: ...blank space in the label name you must choose the empty space from the list of characters otherwise a dash will appear in that space When you finish inputting label name press ENTER 4 5Press EXIT to...

Страница 27: ...ult label name VCR Video cassette recorder DVD DVD video DTV Digital TV set top box SAT Satellite box CBL Cable box Press EXIT to return to the normal screen 5 OPTION ON OFF TIMER OFF FAVORITE CH CH L...

Страница 28: ...or to set the hour Please note if the hour is AM or PM and choose desired setting Then press to select the minute position You must set the clock correctly for the ON OFF TIMER to activate at the corr...

Страница 29: ...s any button to cancel the one hour automatic shut off If a station being viewed stops broadcasting the TV will automatically shut itself off after 15 minutes To cancel ON TIMER Select CLEAR in step 6...

Страница 30: ...ired hour then press Please note if the hour is AM or PM and choose desired setting Press or to set the desired minutes and press or to select DAILY then press ENTER NOTE To cancel OFF TIMER press to...

Страница 31: ...the desired picture size as described below and on the next page then press ENTER You can view 480i and 480p format programs in a variety of picture sizes NATURAL CINEMA WIDE1 CINEMA WIDE2 CINEMA WIDE...

Страница 32: ...the width of the screen it is extended horizontally However it is only slightly extended at the top and the bottom The top and bottom edges of the picture may be hidden To view the hidden areas such a...

Страница 33: ...A WIDE3 mode Then press or to select SETUP menu Press or to select PICTURE SCROLL You can scroll the picture in CINEMA WIDE2 and CINEMA WIDE3 Setting the picture scroll NOTE The scroll amounts are as...

Страница 34: ...fter your desired setting press EXIT to return to the normal screen Adjusting the picture preference Mode Picture Quality SPORTS Bright and dynamic picture factory set STANDARD Standard picture qualit...

Страница 35: ...to adjust the setting 1 2 3 Picture control adjustment After your desired setting press EXIT to return to normal screen SHARPNESS BRIGHTNESS CONTRAST COLOR TINT decrease brightness decrease contrast p...

Страница 36: ...ress EXIT to return to the normal screen 3 Selecting the Scan Velocity Modulation SVM The SVM feature enhances picture contrast and sharpness This feature has three modes HIGH LOW and OFF Press or to...

Страница 37: ...tion WHAT IS CLOSED CAPTIONING This television has the capability to decode and display Closed Captioned television programs Closed Captioning will display text on the screen for hearing impaired view...

Страница 38: ...select the item you want to adjust then press or 4 Press or to select desired setting then press ENTER 5 You can select from among the following items and parameters TEXT SIZE AUTO SMALL STANDARD LARG...

Страница 39: ...Sound control adjustment Sound controls are factory preset but you can adjust them individually as follows AUDIO MTS STEREO BASS 25 TREBLE 25 BALANCE 0 SPEAKERS ON SELECT ADJUST AUDIO MTS STEREO BASS...

Страница 40: ...hat reaches your ears is as natural as the original sound Human voices are clearer and music is natural and well defined Press or to select BBE then press or to select ON Press MENU then press or to s...

Страница 41: ...menu 4Press EXIT to return to the normal screen Press or to select your desired language then press ENTER AUDIO MTS STEREO BASS 25 TREBLE 25 BALANCE 0 SPEAKERS ON SELECT ADJUST Press or to select RES...

Страница 42: ...ormal TV operation automatically Checking the Digital signal strength You can view the digital signal meter 1 2 3 Press MENU then press or to select SETUP menu Press or to select SIGNAL METER Press or...

Страница 43: ...s off check fuse or circuit breaker Unplug unit for an hour then plug it back in Station or CABLE experiencing problems tune to another station Check sound adjustments Volume and Mute Check for source...

Страница 44: ...ms PB 0 7 V p p 75 ohms Output VIDEO 1 V p p 75 ohms AUDIO 150 mV rms Antenna input VHF UHF In 75 ohm coaxial Picture tube 30 inches 760 0 mm diagonal Tuner type Quartz PLL Frequency Synthesized Recei...

Страница 45: ...ass of product or by the ORION Factory Service Center d Damaged because it is improperly connected to the equipment of other manufacturers This warranty does not cover a Damage to video disc b Damage...

Страница 46: ...46 Memo...

Страница 47: ...47...

Страница 48: ...Printed in Thailand...

Отзывы: