background image

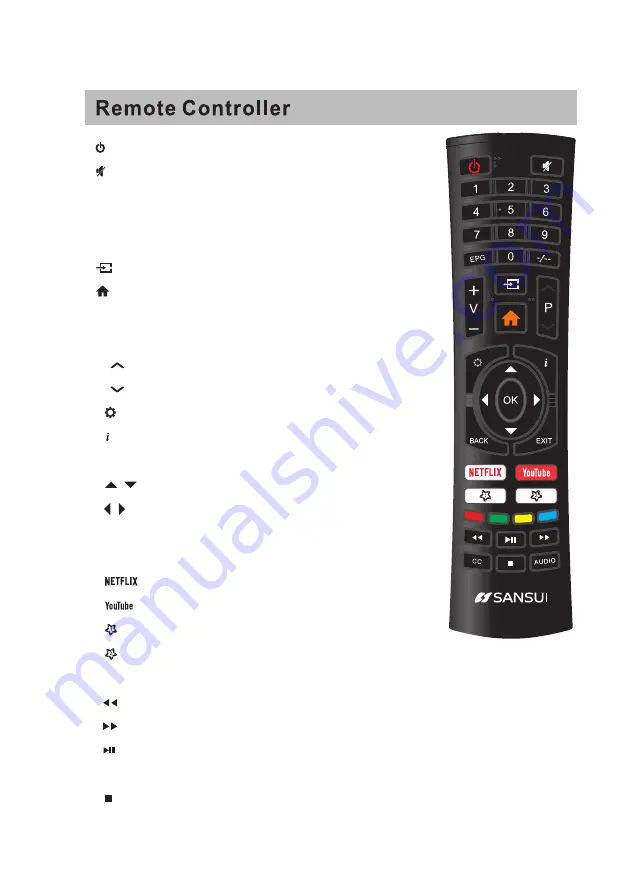
1.   :Turn on the TV or enter standby mode.

2.   :Turn on/off the sound by pressing this button.

3.0~9:


Figures

 “

0-9

” 

are


used


to


directly


input


channel


number.

4.EPG:Press to display Electronic Program Guide


and


select


y

our 

favorite


channel.


5.-/--:Press to change the channel which name contains

 “.”.

6.     :


Input source selection button.

7.    :Press to enter the Home Page.

8.V+:


Increase


the


volume.

9.V-:Decrease the volume.

10.P    :Channel up.

11.P    :Channel down.

12.    :Start system menu.

13.  :Press to display


the


source


and


channel

'

s display.

14.OK:To confirm the choice of a highlighted menu item. 

15.     /    :Press these buttons


to


m

ove within the menu

.

16.   /   :Press these


buttons to move 

 .

within the menu

17.BACK:Go back to the previous step.

18.EXIT:Press to exit the OSD menu.

19.           :Press to launch  Netflix.

20.          :Press to launch  YouTube.

21.     :Press to launch NetRange app store.

22.     :Press to launch VUDU.

23.

GREEN/RED/YELLOW/CYAN  buttons: 

Press these buttons according the different prompts.

24.     :Press to fast reverse


in USB mode.

25.     :Press to fast forward in USB mode.

26.    :Press to play the video and press again to pause the video. 

27.CC:Press to display the close caption.

28.   :Hold on or off for current page display

/

Press


to


stop


in


the


USB


mode.

29.AUDIO:Press to change the language when paly the stream


which


contains multi-language.

19 

Содержание GQTVOMV03

Страница 1: ...nd functionality in this product e g Picture Mode Volume may increase its energy consumption possibly beyond the limits required for ENERGY STAR qualification This product has earned the ENERGY STAR q...

Страница 2: ...ONS Install and Connect TV Preparations Guide 11 HOME PAGE HOME PAGE TV USB Instructions 11 Main Menu 12 Picture 12 Sound 13 Setting 13 Lock 14 Program 14 Network 15 About 16 USB NOTE Spanish and Fren...

Страница 3: ...2...

Страница 4: ...Instructions a tip over and or injury 3...

Страница 5: ...AL CODE S2898A 26 designed in such a way that it does not require a safety connection to electrical earth 27 Correct disposal of this product This marking indicates that this product should not be dis...

Страница 6: ...Warning batteries pack or batteries installed should not be exposed to excessive heat such as sunshine fire or other heat sources Instructions 5...

Страница 7: ...Instructions have bright spots pixels 6...

Страница 8: ...10cm 10cm below Instructions Note Drawing is a representative example only operate To avoid damage to the TV place the TV on a table face down on a soft surface the 7...

Страница 9: ...Digital Audio Output OPTICAL USB Input Connect to your USB device ANT 75 RF Connection Connect to the antenna cable TV output of your device or wall plate HDMI Input HDMI1 2 3 Connect to a HDMI output...

Страница 10: ...to the HDMI input s on the rear or side of TV Plug the TV into the wall power outlet AC120 60Hz Turn on the TV 3 While in standby mode the power indication light will be red Press the power button on...

Страница 11: ...ect the language Press button to continue OK The User Interface defaults to the Skip option Press the OK button to skip the DTV channel tuning then enter the ATV channel tuning Press button to select...

Страница 12: ...TFLIX Input source and Settings options Press button to select the corresponding sub option and press the OK button to confirm Press button to enter main menu Press button to select Picture Sound Sett...

Страница 13: ...ess Tint Backlight Color Temperature Aspect Ratio Noise Reduction 3 Press button to adjust or select 1 Press button to enter main menu Press button to select Sound menu 2 Press button to select Sound...

Страница 14: ...Setting Lock 13...

Страница 15: ...Program Network 14...

Страница 16: ...l a new version software from a USB stick if available Insert the USB stick containing a new version of the software into Follow the on screen instructions to complete the process a USB socket of the...

Страница 17: ...B flash device then press the OK button to access the started media on the USB device Press the buttons to select ALL Photo Music Video options Press the button to select the file type OK Select the R...

Страница 18: ...to change the direction of the external antenna Perhaps the location of the antenna is not good Use of a taller antenna can improve the quality of the images If you use an antenna reception may be dif...

Страница 19: ...CABLE 1 135 NTSC AIR 2 69 CABLE 1 135 NTSC AIR 2 69 CABLE 1 135 NTSC AIR 2 69 CABLE 1 135 NTSC AIR 2 69 CABLE 1 135 NTSC AIR 2 69 CABLE 1 135 Operation Frequency Transmitting Power WiFi 2400 2483 5 L...

Страница 20: ...highlighted menu item 15 Press these buttons to move within the menu 16 Press these buttons to move within the menu 17 BACK Go back to the previous step 18 EXIT Press to exit the OSD menu 19 Press to...

Страница 21: ......

Страница 22: ...3471 N UNION Drive Olney I1 62450 618 392 3456...

Страница 23: ......

Страница 24: ......

Страница 25: ......

Страница 26: ......

Страница 27: ......

Страница 28: ......

Страница 29: ......

Страница 30: ......

Страница 31: ......

Страница 32: ......

Страница 33: ......

Страница 34: ......

Страница 35: ......

Страница 36: ......

Страница 37: ......

Страница 38: ......

Страница 39: ......

Страница 40: ......

Страница 41: ......

Страница 42: ......

Страница 43: ......

Страница 44: ......

Страница 45: ......

Страница 46: ......

Страница 47: ......

Страница 48: ......

Страница 49: ......

Страница 50: ......

Страница 51: ......

Страница 52: ......

Страница 53: ......

Страница 54: ......

Страница 55: ......

Страница 56: ......

Страница 57: ......

Страница 58: ......

Страница 59: ......

Страница 60: ......

Страница 61: ......

Страница 62: ......

Страница 63: ......

Страница 64: ......

Страница 65: ......

Страница 66: ......

Отзывы: