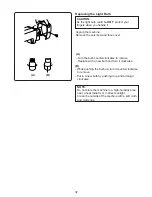
background image

20

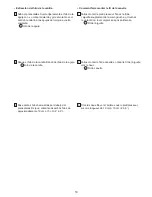
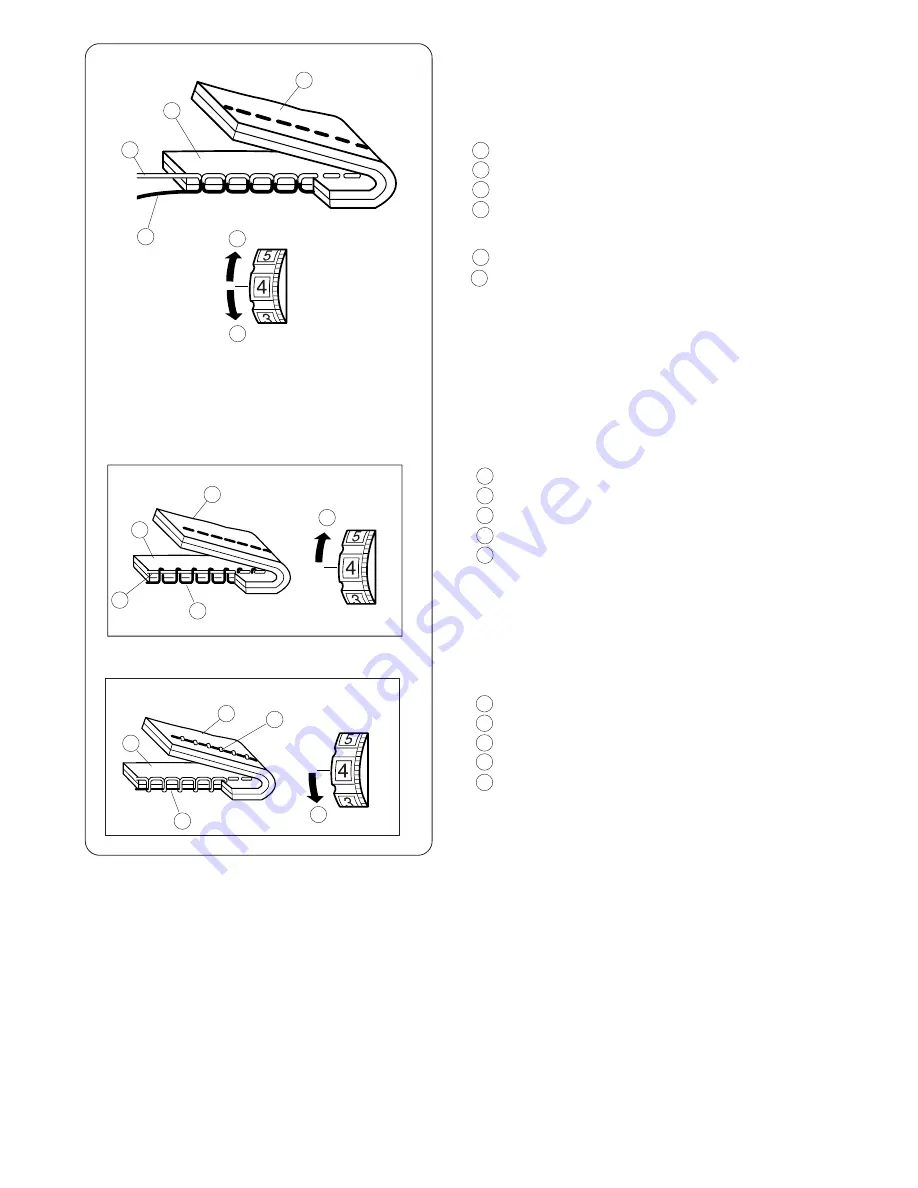
• Tension is too loose

Needle thread (Top thread)
Bobbin thread (Bottom thread)
Right side (Top side) of fabric
Wrong side (Bottom side) of fabric
To tighten

If the needle thread shows through on the wrong
side (bottom side) of the fabric, turn the dial to a
higher tension setting number to tighten the needle
thread tension.

 •Tension is too tight

Needle thread (Top thread)
Bobbin thread (Bottom thread)
Right side (Top side) of fabric
Wrong side (Bottom side) of fabric
To loosen

If the bobbin thread shows through on the right
side (top side) of the fabric, turn the dial to a lower
tension setting number to loosen the needle thread
tension.

1

5

4

3

2

1

4

3

2

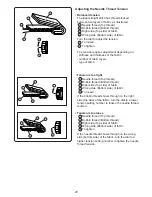
Adjusting the Needle Thread Tension

• Balanced tension

The ideal straight stitch has threads locked
between two layers of fabric, as illustrated.

Needle thread (Top thread)
Bobbin thread (Bottom thread)
Right side (Top side) of fabric
Wrong side (Bottom side) of fabric

Turn the dial to adjust the tension.

To loosen
To tighten

The tension requires adjustment depending on:
- stiffness and thickness of the fabric
- number of fabric layers
- type of stitch

1

6

4

3

2

1

2

3

4

1

2

3

4

5

6

1

2

3

4

5

6

5

6

Содержание Hello Kitty

Страница 1: ...JAMAC INC 1822 Brummel Drive Elk Grove Village IL 60007 USA Copyright JAMAC INC Printed in Thailand Impreso en Tailandia Imprimé au Thaïlande ...

Страница 2: ......

Страница 3: ...1 ...

Страница 4: ...ad tension dial Needle Needle plate Extension table Presser foot Reverse stitch control Carrying handle Spool pin Handwheel Power switch Machine socket Free arm Presser foot lifter Standard Accessories Bobbin Seam ripper Felt Sliding buttonhole foot Needle set 8 1 2 3 4 5 7 1 2 3 4 5 6 9 10 11 12 13 14 15 16 17 18 19 13 19 18 17 16 15 14 12 11 10 9 8 7 6 5 4 3 2 1 1 2 3 4 5 ...

Страница 5: ... Nombre de las partes Selector de patrón Freno del devanador de canillas Eje del devanador de canillas Guíahilos del hilo de la canilla Tirahilos Guíahilos superior Ajuste de tensión del hilo superior Aguja Placa de aguja Estuche de accesorios Ampliación móvil de la superficie de costura Prensatelas Control de puntada reversa Asa de agarre Portacarrete Volante Interruptor de corriente Enchufe de l...

Страница 6: ...esser Foot Lifter Presser foot lifter Normal up position Highest position The presser foot lifter raises and lowers the presser foot You can raise it about 1 4 0 6 cm higher than the normal up position for easy removal of the presser foot or to allow you to place heavy fabric under the foot 3 2 1 2 3 Operating Instructions This appliance has a polarized plug one blade wider than the other To reduc...

Страница 7: ... de corriente invierta la clavija Si tampoco encaja de esta forma póngase en contacto con un electricista cualificado para que le instale una toma de corriente apropiada No intente modificar la clavija de ninguna forma Con esta máquina de coser Modelo 639X deberá usarse el pedal de control Modelo YC 482J o TJC 150 Prise polarisée Pour les appareils ayant une prise polarisée une lame plus large que...

Страница 8: ...the needle to its highest position Raise the presser foot Press the lever on the back of the foot holder The presser foot will drop To attach Place the presser foot so that the pin on the foot lines up directly below the groove of the foot holder Lower the foot holder to lock the foot in place 1 2 3 2 1 1 3 Stitch Selector Setting mark Stitch selector Raise the needle above the fabric Turn the dia...

Страница 9: ...er la rallonge Poussez la rallonge jusqu à ce qu elle s encliquète sur la machine 1 Rallonge de plateau 2 Patte 3 Trou Ampliación móvil de la superficie de costura Desmontaje de la ampliación móvil Tire de la ampliación móvil hacia afuera de la máquina tal como se ve en la ilustración Instalación de la ampliación móvil Empuje la ampliación móvil hacia que entre completamente en la màquina producie...

Страница 10: ...ause permanent snags or runs in knits fine silks and silk like fabrics Selecting Needle and Thread 1 2 3 Fabric Thread Needle Light Weight Medium Weight Heavy Weight Crepe de Chine Voile Lawn Organdy Georgette Tricot Linen Cotton Pique Serge Double knit Percale Denim Tweed Gabardine Coating Drapery and Upholstery Fabric Canvas 80 to 100 Fine Silk 80 to 100 Fine Cotton 80 to 100 Fine Polyester 50 S...

Страница 11: ...tanto como le permita el tope superior y apriete firmemente el tornillo de sufeción de la aguja Para verificar que aguja está bien ponga el lado plano de la misma sobre una superficie plana placa de aguja tapa de acceso a canilla cristal etc La separación entre la aguja y la superficie plana deberá ser uniforme No emplee nunca agujas dobladas o con la punta en mal estado Changer l aiguille Eteigne...

Страница 12: ...case Remove the extension table from the machine by pulling it to the left Open the shuttle cover by pulling down the tab on the left of the cover Raise the needle to its highest position by rotating the handwheel toward you Shuttle cover 1 2 Removing the bobbin To remove the bobbin release the latch and the bobbin will drop out of the bobbin case as illustrated Bobbin 1 2 3 4 3 3 4 ...

Страница 13: ...vette en tirant le loquet de la canette vers vous Sortez le porte canette en le tirant tout droit de la navette Porte canette Loquet Remplir la canette Retrait de la porte canette Retirez l emboîture du socle en la tirant vers la gauche A l aide de le bouton située à la gauche du couvercle de la navette tirez le couvercle vers le bas Faites remonter l aiguille à sa position la plus elevee en faisa...

Страница 14: ... Place the felt and the spool in order The end of the thread should be coming out from the spool as shown Spool pin Felt Spool of thread Push the bobbin to the right With the free end of the thread held in your hand depress the foot control Stop the machine when it has made a few turns and cut the thread close to the hole in the bobbin 6 7 8 Depress the foot control again When the bobbin is fully ...

Страница 15: ... sur la pédale de contrôle Arrêtez la machine après quelques tours et coupez le fil au ras du trou dans la canette Pise nuevamente el pedal de control Cuando la canilla esté llena dejará de girar automáticamente Empuje el eje del devanador hacia la izquierda para volverlo a poner en su posición original y corte el hilo Sujete el final del hilo con los dedos y pise el pedal de control Cuando haya d...

Страница 16: ...e thread through the slot of the case 3 Continue to draw the thread under the tension spring and through the opening Pull out about 4 10 cm of thread Tension spring 4 Holding the latch open position the bobbin case into the shuttle and then release the latch The case should lock into the place when the latch is released 4 1 1 ...

Страница 17: ...lo Resorte tensor Tire del hilo a través de la ranura Coloque la canilla en el portacanilla asegurándose que el hilo se alimente en el sentido a las agujas del reloj y salga de la bobina Ouvrez le loquet pour engager le porte canette à fond dans la navette puis relâchez le loquet Tirez le fil sous le ressort de tension et faites le passer par le trou Tirez environ 10 cm 4 de fil Ressort de tension...

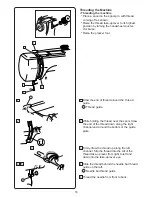
Страница 18: ...round the thread guide Thread guide Slide the thread behind the needle bar thread guide on the left Needle bar thread guide Thread the needle from front to back Firmly draw the thread up along the left channel Slip the thread into the slit of the thread take up lever from right to left and down into the take up lever eye 5 4 3 While holding the thread near the spool draw the end of the thread down...

Страница 19: ...rior Sosteniendo el hilo cerca al carrete tire del extremo del hilo hacia abajo y páselo alrededor del alojamiento del muelle recuperador del hilo Tire del hilo con firmeza y páselo de derecha a izquierda por el tirahilos Tire hacia abajo y páselo por el guíahilos de la barra de aguja Guíahilos de la barra de aguja Enhebre la aguja pasando el hilo de adelante hacia atrás Tenez le fil de l aiguille...

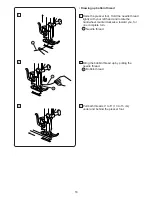
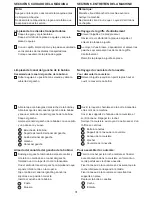
Страница 20: ... foot 2 Bring the bobbin thread up by pulling the needle thread Bobbin thread Drawing up bobbin thread Raise the presser foot Hold the needle thread lightly with your left hand and rotate the handwheel counterclockwise toward you for one complete turn Needle thread 1 1 2 1 2 1 ...

Страница 21: ...a atrás por debajo del prensatelas Deje un sobrante de ambos hilos de aproximadamente 10 cm a 15 cm 4 a 6 Tirez les deux fils vers l arrière sous le pied presseur sur une longueur de 10 cm à 15 cm 4 à 6 Faites monter le fil de canette en tirant le fil de l aiguille vers le haut Fil de canette Comment faire monter le fil de la canette Faites monter le pied presseur Tenez le fil de l aiguille souple...

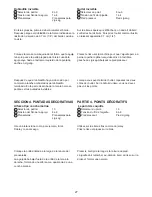
Страница 22: ...n If the bobbin thread shows through on the right side top side of the fabric turn the dial to a lower tension setting number to loosen the needle thread tension 1 5 4 3 2 1 4 3 2 Adjusting the Needle Thread Tension Balanced tension The ideal straight stitch has threads locked between two layers of fabric as illustrated Needle thread Top thread Bobbin thread Bottom thread Right side Top side of fa...

Страница 23: ...rosor del tejido el número de capas de tejido el tipo de puntada Réglage de la tension du fil de l aiguille Tension correcte Le point droit parfait doit présenter des fils croisés entre les deux épaisseurs de tissu comme illustré à gauche Fil de l aiguille Fil supérieur Fil de la canette Fil inférieur Pour relâcher la tension Pour augmenter la tension Lors du réglage de la tension du fil de l aigu...

Страница 24: ...rst Then start sewing forward Turning a Square Corner The cornering guide is useful to maintain a 5 8 seam allowance when turning a square corner 1 Stop stitching when the front edge of the fabric reaches the cornering guide lines 2 Lower the needle by turning the handwheel counterclockwise 3 Raise the presser foot and turn the fabric counterclockwise 90 4 Lower the presser foot and begin stitchin...

Страница 25: ...a las líneas de la guía para esquina 2 Baje la aguja girando la rueda manual en sentido antihorario 3 Eleve el prensatelas y gire la tela 90 grados en sentido antihorario 4 Baje el prensatelas y comience a coser en la nueva dirección Pour coudre un angle droit Afin de coudre un angle droit et afin d assurer que la couture reste à distance égale du bord lorsque vous cousez sur le bord d un tissu à ...

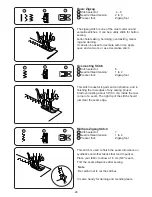
Страница 26: ...ny sewing project Start overcasting about 1 8 0 3 cm inside the raw corner of a seam The right tip of the stitch should just clear the seam edge Overcasting Stitch Stitch selector 6 Needle thread tension 1 to 4 Presser foot Zigzag foot Multiple Zigzag Stitch Stitch selector 7 Needle thread tension 1 to 4 Presser foot Zigzag foot 1 3 2 1 3 2 1 3 2 1 2 3 1 2 3 1 2 3 This stitch is used to finish the...

Страница 27: ...rán mal cruzadas Ce point est utile pour le montage des vêtements et pour finir les bords bruts de tous les ouvrages de couture Commencez à surfiler à environ 0 3 cm 1 8 à I intérieur du bord brut du tissu Si vous commencez tout au bord le tissu se fronce et les points s emmêlent Surfilage Sélecteur de point 6 Tension du fil de aiguille 1 à 4 Pied presseur Pied zig zag Puntada de múltiple zig zag ...

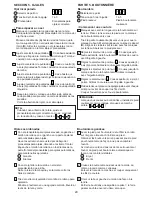
Страница 28: ...tion just pierces the edge of the fold After hemming is completed press together both sides of the finished hem The top side of the fabric should show only the blind stitches 1 2 3 1 2 3 Use a light weight fabric such as tricot Fold and stitch on bias Place the folded edge along the slot of foot The needle should fall off the edge of the fabric on the right forming a tuck Shell Tuck Stitch selecto...

Страница 29: ...z les deux côtés de l ourlet Sur l endroit du tissu vous ne devez pas voir les points Dobladillo invisible Selector de patrón 8 o 9 Tensión del hilo de la aguja 1 a 4 Prensatelas Prensatelas para zig zag Ourlet invisible Sélecteur du point 8 ou 9 Tension du fil de l aiguille 1 à 4 Pied presseur Pied zig zag Use una tela liviana como por ejempro tricot Doble y cosa al sesgo Coloque la orilla doblad...

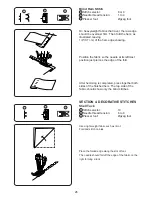
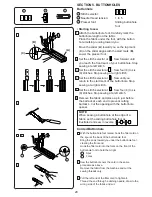
Страница 30: ...ce the fabric under the foot with the button hole marking running toward you Move the slider A toward you so the top mark C on the slider aligns with the start mark B Lower the presser foot Set the stitch selector at Sew forward until you reach the front mark of your buttonhole Stop sewing at a left stitch 1 SECTION 5 BUTTONHOLES 1 4 2 3 3 4 2 1 2 3 3 2 1 4 2 3 1 4 2 4 2 A B C With the buttonhole ...

Страница 31: ...ARTIE 5 BOUTONNIÈRE Boutonnière Sélecteur de point Tension du fil de l aiguille 1 à 5 Pied presseur Pied à boutonnière coulissant Commencer une couture Marquez avec soin la longueur de la boutonnière sur le tissu Placez le tissu sous le pied avec la marque de la boutonnière vers vous Tirez la partie coulissante A vers vous pour que la marque du haut C soit alignée avec la ligne de départ B Alignez...

Страница 32: ... brush clean out dust and lint clogging the feed dog teeth Reset the needle plate Note Turn off the power switch and or unplug the machine before cleaning the machine Do not dismantle the machine other than as explained in this section Cleaning the Hook Race Area To assemble hook race unit Hold the hook by the center pin and fit it carefully back into the hook race forming a perfect circle with th...

Страница 33: ...l canal del gancho de la bobina con un cepillo y un paño seco y suave Armado del canal de del gancho de la bobina Sostenga el gancho tomándolo del poste central y móntelo con cuidado en el canal del gancho formando un círculo perfecto con la lanzadera Una el anillo del canal del gancho comprobando que el poste inferior entre en la muesca Fije el anillo del canal del gancho girando los soportes a s...

Страница 34: ...r a heat radiator or in direct sunlight Clean the outside of the machine with a soft cloth and mild soap Unplug the machine Remove the setscrew and face cover B While pushing the bulb up turn it counterclockwise to remove Put in a new bulb by pushing it up and turning it clockwise A Turn the bulb counterclockwise to remove Replace with a new bulb and turn it clockwise ...

Страница 35: ...n doux et du savon doux Desenchufe la máquina Quite el totnillo y la tapa Débranchez la machine Enlevez le vis et le couvercle frontal B Empuje y gire la bombilla en el sentido contrario a las agujas del reloj Coloque la bombilla nueva empujándola y girándola en la misma dirección de las agujas del reloj B Poussez l ampoule vers le haut et tournez la en sens antihoraire pour la retirer Installez u...

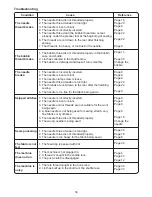
Страница 36: ...e thread tension is too tight 5 The threads are not drawn to the rear after the finishing sewing 6 The needle is too fine for the fabric being sewn 1 The needle is incorrectly inserted 2 The needle is bent or blunt 3 The needle and or threads are not suitable for the work being sewn 4 A blue needle is not being used for sewing stretch very fine fabrics or synthetics 5 The needle thread is not thre...

Страница 37: ...4 La tensión del hilo de la aguja está excesiva 5 La tela no se ha extraído hacia atrás al terminar la costura 6 La aguja es demasiado fina para la tela que se está cosiendo 1 La aguja no está bien colocada 2 La aguja está despuntada o doblada 3 La aguja y o los hilos no son los adecuados para el trabajo que se está cosiendo 4 No se está utilizando una aguja azul para coser tejidos elásticos tejid...

Страница 38: ...s tiré vers l arrière à la fin de la couture 6 L aiguille est trop fine pour le tissu employé 1 L aiguille n est pas installee correctement 2 L aiguille est tordue ou émoussée 3 L aiguille et ou le fil ne conviennent pas pour le tissu 4 Vous n utilisez pas une aiguille à bout bleu pour une couture extensible un tissu très fin ou synthétique 5 Le fil de l aiguille n est pas passé correctement 6 Vou...

Страница 39: ... repair electrical or mechanical adjustment 4 Never operate the appliance with any air opening blocked Keep ventilation openings of this sewing machine and foot controller free from accumulation of lint dust and loose cloth 5 Never drop or insert any object into any opening 6 Do not use outdoors 7 Do not operate where aerosol spray products are being used or where oxygen is being administered 8 To...

Страница 40: ... próximo si es necesario examinarla repararla o someterla a ajustes eléctricos o mecánicos 4 No utilice nunca el aparato si tiene bloqueada alguna vía de ventilación Mantenga las vías de ventilación de esta máquina de coser y el pedal de control libres de pelusa polvo y trozos de tela 5 No deje caer ni introduzca ningún tipo de objeto en ninguna abertura 6 No utilice la máquina en exteriores 7 No ...

Страница 41: ...iner réparer ou d effectuer des réglages électriques ou mécaniques 4 Il ne faut jamais faire fonctionner cette machine si les orifices d aération sont colmatés Tenir les orifices d aération de cette machine à coudre et le curseur d escamotage du pied de biche exempts de toute accumu lation de peluches poussières et de morceaux de chiffon 5 Il ne faut jamais laisser tomber ou introduire d objet dan...

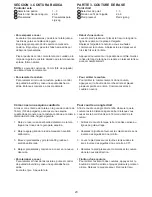
Страница 42: ...Threading the Machine 16 Threading the machine 16 Drawing up bobbin thread 18 Adjusting the Needle Thread Tension 20 Balanced tension 20 Tension is too tight 20 Tension is too loose 20 SECTION 3 BASIC SEWING Straight Stitch 22 Turn a Square Corner 22 Basic Zigzag 24 Overcasting Stitch 24 Multiple Zigzag Stitch 24 Blind Hem Stitch 26 SECTION 4 DECORATIVE STITCHES Shell Tuck 26 SECTION 5 BUTTONHOLES...

Страница 43: ...de la aguja 17 Enhebrado del hilo de la aguja 17 Extracción del hilo de la canilla 19 Ajuste de la tensión del hilo de la aguja 21 Tensión correcta 21 El hilo está demasiado tenso 21 El hilo está demasiado flojo 21 SECCION 3 COSTURA BASICA Puntada recta 23 Cómo coser una esquina cuadrada 23 Puntada de zig zag 25 Puntada de sobrehilado o remate 25 Puntada de múltiple zig zag 25 Dobladillo invisible...

Страница 44: ...age de la machine 17 Enfilage de la machine 17 Comment faire monter le fil de la canette 19 Réglage de la tension du fil de l aiguille 21 Tension correcte 21 Si la tension est trop élevée 21 Si la tension est trop faible 21 PARTIE 3 COUTURE DE BASE Point droit 23 Pour coudre un angle droit 23 Zig zag simple 25 Surfilage 25 Point zig zag multiple 25 Ourlet invisible 27 PARTIE 4 POINTS DÉCORATIFS Le...

Страница 45: ...Instruction Book Libro de Instrucciones Livre D Instructions ...

Страница 46: ...639 800 774 E S F Printed in Taiwan ...

Страница 47: ...639 800 774 E S F Printed in Thailand ...

Отзывы: