background image


Parts List 

1


Main unit 

2


Blower pipe A 

3


Blower pipe B 

4


Blower pipe C 

5


Blower pipe D 

6


Control Box 

7


Hose 

8


(40

1)Oil Can 

9


Clip 

Assembling the unit 


Adjusting the control handle


·

Put the unit on your back


·

Release the clamp screw


·

Slide the control handle along the pleated hose to the most 

comfortable position


·

Retighten the clamp screw 


Adjusting the screw 

Adjusting the harness straps


·

Pull the end of the straps downward to tighten the harness. 

Содержание BSB 33

Страница 1: ...PLEASE KEEP THIS MANUAL IN A SAFE PLACE BSB 33 Back Pack Leaf Blower...

Страница 2: ...nd repair 6 4 Technical specifications 7 5 Parts list 8 6 Assembling the unit 8 7 Fueling 9 8 Starting Stopping 11 9 Operating instructions 13 10 After finishing work 13 11 Storing the machine 15 12 P...

Страница 3: ...ial attention to some operating instructions They are marked by the symbols described below Warning there is a risk of an accident or personal injury or serious damage to property Warning there is a r...

Страница 4: ...injury Your dealer has shown you how to operate your blower Observe all applicable local safety regulations standards and ordinances Minors should never be allowed to use a blower Bystanders especial...

Страница 5: ...carves neckties jewelry flared or cuffed pants unconfined long hair or anything that could get into the air intake Wear sturdy boots with nonslip soles Steel toed safety boots are recommended Wear saf...

Страница 6: ...e fuel cap Tighten as described in chapter Fueling Check for fuel leakage while refueling and during operation If fuel leakage is found do not start or run the engine until the leak is fixed Store gas...

Страница 7: ...and odorless To reduce the risk of serious or fatal injury from breathing toxic fumes never run the blower indoors of in poorly ventilated locations Ensure proper ventilation when working in trenches...

Страница 8: ...usage is prolonged by Hand protection wearing warm gloves Break The period of usage is shortened by Any personal tendency to suffer from poor circulation symptoms frequently cold fingers itching Low...

Страница 9: ...nition outside the cylinder move the stop switch to OFF before turning the engine over on the starter with the spark plug cap removed or the spark plug unscrewed Check the condition of muffler periodi...

Страница 10: ...n 9 Clip Assembling the unit Adjusting the control handle Put the unit on your back Release the clamp screw Slide the control handle along the pleated hose to the most comfortable position Retighten t...

Страница 11: ...han those specified may result in serious damage to the engine Gasoline Use only regular branded gasoline with a minimum octane rating or 90 If the octane rating of the regular grade gasoline in your...

Страница 12: ...mixture in the container before fueling your machine Pressure may build up in the container open it carefully Clean the fuel tank and container from time to time Dispose of cleaning fluid properly at...

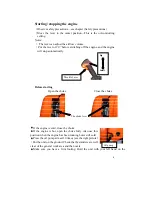
Страница 13: ...cally Before starting Open the choke Close the choke The choke lever If the engine is cold close the choke If the engine is hot open the choke fully Also use this position when the engine has been run...

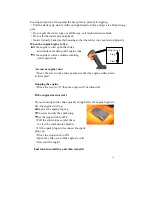
Страница 14: ...e cranking until engine runs As soon as engine runs Move the lever to the center position so that the engine settles down to idle speed Stopping the engine Move the lever to 0 then the engine will be...

Страница 15: ...can be dissipated by flow of cooling air This protects engine mounted components ignition carburetor etc from thermal overload After finishing work Storing for short period Wait for engine to cool dow...

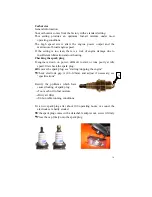
Страница 16: ...spark plug If engine is down on power difficult to start or runs poorly at idle speed first check the spark plug Remove the spark plug see starting stopping the engine Check electrode gap A 0 6 0 7mm...

Страница 17: ...essarily long period UV rays can make the container material brittle which could result in leaks or breakage Minimum wear and avoid damage Observing the instructions in this manual helps reduce the ri...

Страница 18: ...be performed by an authorized dealer If these operations are not carried out as specified the user assumes responsibility for any damage that may occur Among other things this includes Damage to the e...

Страница 19: ......

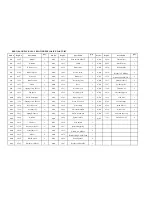
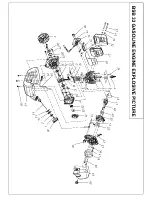
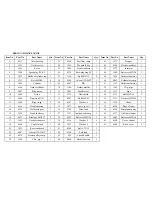
Страница 20: ...6526 Blower Pipe B 1 2 51 0010 Threaded pipe 10 1 2 10 4809 Shock Absorption 3 2 31 6545 Blower Pipe C1 1 2 52 1330 Lead wire 1 2 11 7150 Tapping screw ST5 25 6 2 32 4318 Screw ST2 8X18 5 2 53 0300 P...

Страница 21: ......

Страница 22: ...1041 Muffler assy 1 53 1277 Pipe 3 10 5606 Piston 1 32 6132 Heat shield 1 54 2323 Bolt M5X12 2 11 5608 Pin piston 9X31 1 33 4247 Bolt M5X55 2 55 3357 Washer GB T896 1 12 5609 Ring snap 2 34 4451 Wash...

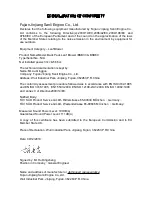
Страница 23: ...Industrial Park Jinjiang Fujian 362263 P R China The conformity assessment procedure followed was in accordance with EN ISO3744 1995 and EN ISO 3746 1995 EN 15503 2009 EN ISO 12100 2 A1 2009 EN ISO 14...

Страница 24: ...Notes...

Страница 25: ...Address BSB 33...

Страница 26: ...enance he she has been provided with instructions to use the machine safely and correctly by the seller he she is aware of the conditions governing the guarantee contract and accepts them without rese...

Отзывы: