background image

6  

Sanli Brushcutter User Guide

Attaching the handle 
- straight shaft.

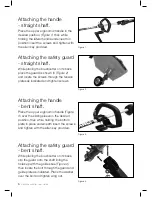
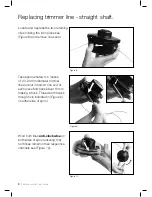
Place the upper ergonomic handle in the 
desired position, (

Figure 1) 

then while 

holding the lateral handle underneath in 
position insert the screws and tighten with 
the allen key provided.

Attaching the safety guard 
- straight shaft.

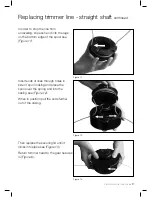
While placing the brushcutter on its back 
place the guard as shown in 

(Figure 2)


and locate the screws through the tension 
plates as indicated and tighten screws.

Figure 1.

Figure 2.

Attaching the handle 
- bent shaft.

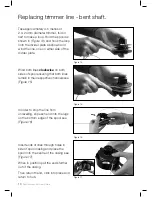
Place the upper ergonomic handle (

Figure 

3)

 over the sliding sleeve in the desired 

position, then while holding the bottom 
plate in place underneath insert the screws 
and tighten with the allen key provided.

Attaching the safety guard
- bent shaft.

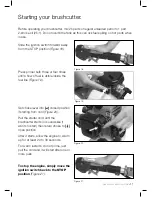
While placing the brushcutter on its back, 
clip the guard onto the shaft lining the 
holes up with the guides see 

(Figure 4)


then locate the bolt through the guard and 
guide plate as indicated. Place the washer 
over the bolt and tighten wing nut.

Figure 3.

Figure 4.

Содержание BCB260

Страница 1: ...Please read this instruction manual carefully before operating your new Sanli Brushcutter Bent Shaft Brushcutter BCB260 Straight Shaft Brushcutter BCS260 Brushcutters...

Страница 2: ...ser guide you have any questions on usage safety or any other issue please call our Customer Help Line on 1800 466 068 Sanli products are monitored and enhanced on an on going basis to comply with cha...

Страница 3: ...16 1 6 7 2 3 4 4 8 1 Spark Plug 2 Choke Lever 3 Air Filter 4 Fuel Tank 5 Ignition Switch 6 Throttle Control 7 Shoulder Strap Mount 8 Shoulder Strap 9 Handle 10 Line trimmer Head 11 Brushcutter Blade...

Страница 4: ...9 12 14 15 1 6 2 3 4 7 1 Spark Plug 2 Choke Lever 3 Air Filter 4 Fuel Tank 5 Ignition Switch 6 Throttle Control 7 Fuel Mixing Bottle 8 Tool Kit 9 Ergonomic Handle 10 Sliding Sleeve 11 Spark plug and...

Страница 5: ...y hot during and right after use 7 Turn off the engine and disconnect the spark plug cap before cleaning transporting or making adjustments 8 We recommend you avoid trimming when it is raining or afte...

Страница 6: ...the tension plates as indicated and tighten screws Figure 1 Figure 2 Attaching the handle bent shaft Place the upper ergonomic handle Figure 3 over the sliding sleeve in the desired position then whi...

Страница 7: ...rts are required when fitting the cutting blade which is supplied with this unit Insert the allen key provided into the hole on the gear head to stop it from rotating Then wind the trimmer head anti c...

Страница 8: ...ake approximately 4 5 metres of 2 0 2 4mm diameter trimmer line and cut in half At one end of each piece fold back about 10mm making a hook Thread both hooks though hole indicated in Figure 9 on eithe...

Страница 9: ...e of the spool see Figure 11 Insert ends of lines through holes in side of spool casing and place the spool over the spring and into the casing see Figure 12 When in position pull the ends further out...

Страница 10: ...spool ensuring that both lines remain in their respective channels see Figure 15 In order to stop the line from unravelling slip each end into the lugs on the bottom edge of the spool see Figure 16 I...

Страница 11: ...mes until a flow of fuel is visible inside the fuel line Figure 19 Set choke lever into closed position if starting from cold Figure 20 Pull the starter cord until the brushcutter starts or sounds lik...

Страница 12: ...ard should be placed between the body and the brushcutter Attaching the cutting blade straight shaft model only When heavy duty cutting is required utilise the cutting blade Figure 23 Remove the trimm...

Страница 13: ...petrol engine Fuel mix 25 1 unleaded petrol to 2 stroke oil 25 1 unleaded petrol to 2 stroke oil Engine idling speed 2 800rpm 2 800rpm Engine power 0 71kW 6 000rpm 0 71kW 6 000rpm Spark plug type NGK...

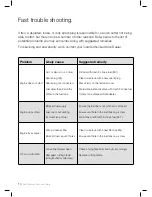
Страница 14: ...ill tank with fresh 2 stroke fuel 25 1 Clean or replace with a new spark plug Press firmly on the terminal cover Drain stale fuel and replace with fresh 2 stroke fuel Contact an authorised Sanli deale...

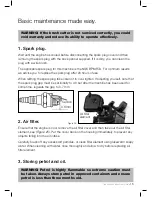
Страница 15: ...adjusting yourself note that the spark plug gap must be set initially to 0 6 but after the machine has been used for some time regulate the gap to 0 7 mm 2 Air filter Ensure that the engine is cool r...

Страница 16: ...Call the Sanli Customer Service Desk on 1800 466 068 Email support sanli com au Web www sanli com au Head Office 4 100 Belmore Road Riverwood NSW 2210...

Отзывы: