background image

5

Thermostat Configuration

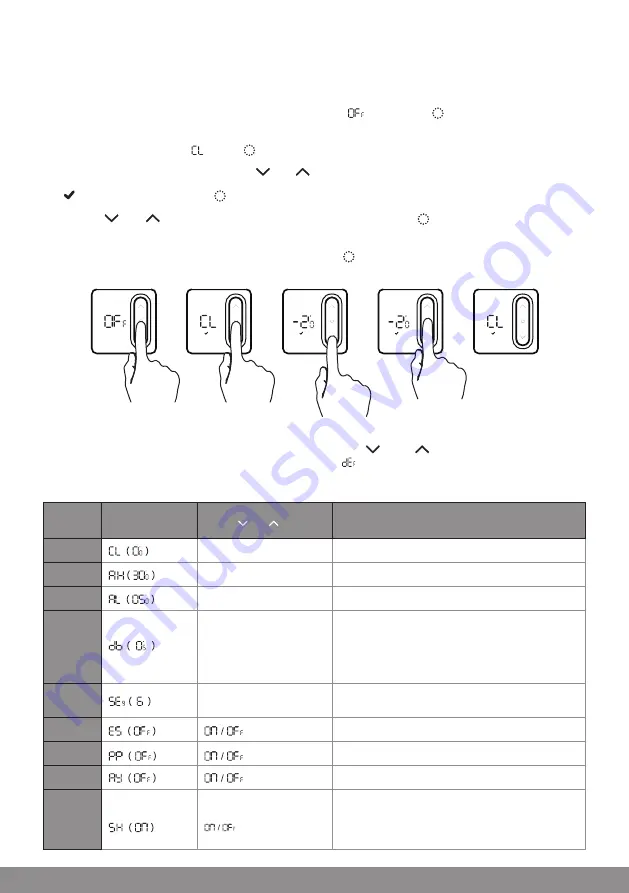
To configure the thermostat using its controls you will need to do the following:
(1) In standby mode indicated by the Thermostat displaying “       ”, long press “    ” to enter the  

configuration menu.
(2) The first item will display “    ”, press “    ” to enter the configuration for the first item.
(3) You can adjust the setting by pressing “      ” or “      ”.
(4) “     ” will flash, and then press “    ” will save current settings, and exit to the configuration menu.
(5) Use the “      ” or “      ” to select the configuration menu, and then press “    ” to enter the next 

configuration, and follow the steps 3 & 4.
(6) Finally once all menus have been configured, long press “    ” to save and exit the configuration menu.

Restore factory settings:

After entering the configuration menu, press and hold both the “      ” and “       ” buttons,  to restore the 

thermostat to factory settings, the thermostat will display “     ” and flash 3 times.

This will remove any custom configuration setting(s) and programming setting(s)

Step No.

Displayed  

(Factory Default)

Press “    ” or “    ” to select

Descriptions

1

-4°C to +4°C

Temperature calibration

2

+20°C to +35°C

Select maximum setting temperature range

3

+5°C to +20°C

Select minimum setting temperature range

4

0.5°C to 3°C

Start heating conditions:

When setting temperature -Room temperature ≥ 

0.5°C (0.5~3°C option), start heating.

Room temperature ≥ Setting temperature,  

stop heating.

5

4 / 6

Number of programming periods per day;

2 ON & 2 OFFs / 3 ON & 3 OFFs

6

Intelligent function (Optimal start)

7

Frost Protection function

8

Thermostat Relay Output

9

Thermostat LED Display option

ON: LEDs displays on Thermostat VIA app.

OFF: LEDs don’t display on Thermostat VIA app.

OFF: LED lights

Содержание CHPWIFI

Страница 1: ...U S E R M A N U A L Fort Programmable The rmostat with R F and WiFi CHPWIFI...

Страница 2: ...llation Page 6 Installation Plan A Page 7 Installation Plan B Page 8 Pairing the Thermostat and Receiver Page 9 Product Description Preparation for use Installation Instructions Page 10 How to intergr...

Страница 3: ...g power loss One button Holiday mode Programming Periods 7 Day individual 5 2 split Monday Friday Saturday Sunday 6 Separate time temperature periods per day Key lock facility Low battery indication F...

Страница 4: ...mode icon 5 Low battery alert 6 Confirm icon 7 Up button 8 ON OFF button 9 Room temperature or setting temperature display 10 Down button Output Indicator Call for heat Green Control Button With power...

Страница 5: ...n to normal operation Press any button to cancel this function when it is active When the thermostat is critically low on power it will alert the user by displaying to notify them to change the batter...

Страница 6: ...uration menu press and hold both the and buttons to restore the thermostat to factory settings the thermostat will display and flash 3 times This will remove any custom configuration setting s and pro...

Страница 7: ...Installation Note Ensure the batteries are correctly installed and the polarities are correctly aligned 1 Desk mounted 1 Hang Thermostat on stand 1 Put the back board on the installation box 2 Secure...

Страница 8: ...in the desired wireless networks signal area The Thermostat can be installed anywhere within range of the receiver Note Distance between thermostat and receiver cannot be greater than 100m open field...

Страница 9: ...y to the boiler ensure the receiver is within the WiFi coverage area Note Distance between thermostat and receiver cannot be greater than 100m open field When the Thermostat is connected directly to t...

Страница 10: ...tically go back into the OFF interface 2 On the Thermostat when in Standby mode press and hold for 3s 1 Press to turn off the receiver when in the OFF condition press and hold the button for at least...

Страница 11: ...you have a mobile device running iOS 8 or higher or Android 4 1x or higher and a sufficient WiFi network connection It is important to know your Wi Fi network and W Fi network s password before pairin...

Страница 12: ...Binding Process you must use the ClickSmart Account you used to pair your CHPWIFI 7 Alexa will start searching for Alexa Voice compatible Click Smart products 2 Press Skills Games 3 Press the magnify...

Страница 13: ...ur CHPWIFI 6 Google Home will now contain all compatible Click Smart products 1 Open the Google Home app and press settings 2 Press Add Device 3 Press Works with Google 4 Press on the magnifying glass...

Страница 14: ...elow voice commands Turn On DEVICE NAME Turn Off DEVICE NAME What is the temperature of DEVICE NAME Make it warmer in DEVICE NAME Make it cooler in DEVICE NAME Set DEVICE NAME to NUMBER VALUE Turn On...

Страница 15: ...14 Notes...

Страница 16: ...w e s p u k c o m Elite Security Products Unit 7 Target Park Shawbank Rd Lakeside Redditch B98 8YN Telephone 01527 51 51 50 Fax 01527 51 51 43 email sales espuk com E OE Errors and Omissions Excepted...

Отзывы: