background image

Cust
omising T

Settings

27

GB

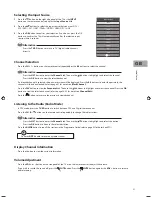
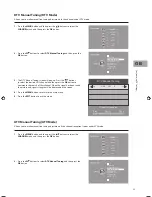
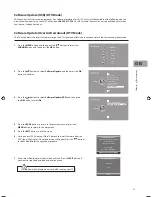
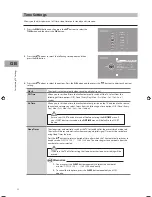
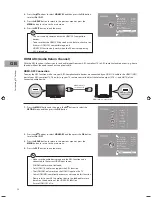
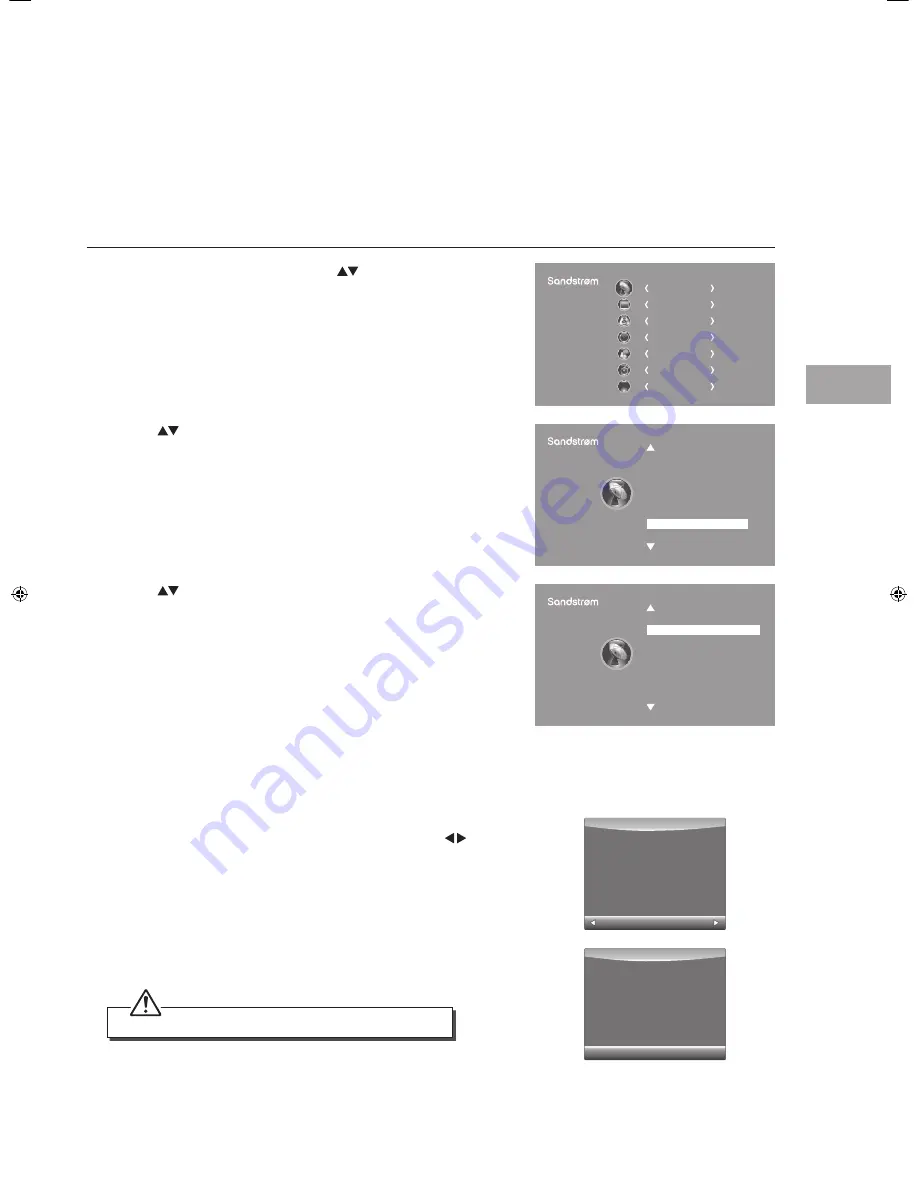
7.  If you select Yes, the over air download will start. Press the EXIT button if 

you want to stop the download and exit the menu.

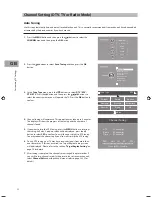
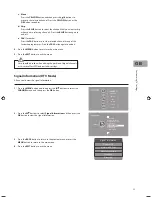
3.  Press the 

 buttons to select Software Update(OAD) and then press 

the OK button to select On.

Software Update (USB) (DTV Mode)

This function is only for servicing purposes. Any update information for this TV (if any) will be available at the following website: 
http://knowhow.com/ or call our UK Call Centre on 0844 561 1234. Our UK Customer Contact Centre is open Monday-Saturday 
8am-8pm or Sunday 8am-6pm.

Software Update (Over Air Download) (DTV Mode)

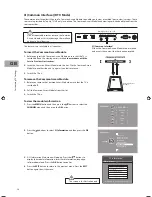
The TV auto detects the latest firmware through the DTV signal and allows you to accept or refuse the firmware upgrade service.

1.  Press the MENU button and then press the 

 buttons to select the 

CHANNEL menu and then press the OK button.

2.  Press the 

 buttons to select Software Update and then press the OK 

button to confirm.

4.  Press the BACK button to return to the previous menu or press the 

MENU button to return to the main menu.

5.  Press the EXIT button to exit the menu.

6.  During normal DTV viewing, if the TV detects the latest firmware from the 

DTV signal, the Over Air Download screen will appear. Press the     buttons 
to select Yes No for the upgrade procedure.

During download, please do not turn off or unplug your TV.

CHANNEL


PICTURE

SOUND

TIME

OPTION

LOCK

EXIT

EXIT

Auto Tuning
DTV Manual Tuning
ATV Manual Tuning

Signal Information
CI Information

Software Update

Channel Edit

CHANNEL

Software Update (USB)

Software Update (OAD)

Off

CHANNEL

Yes

                            No

New FW is available for upgrading

TV Version V0.01

Stream Version v0.03

Yes to upgrade.

No to ignore this upgrade.

EXIT

Download

20%

S32HED13_IB_RC130906_Annie.indd   27

6/9/13   3:59 PM

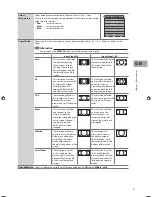
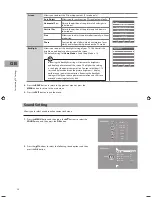
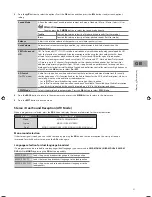
Содержание S32HED13

Страница 1: ...Instruction Manual 32 HD Ready LED TV with DVD Player S32HED13...

Страница 2: ......

Страница 3: ...itial Setup 19 Turning the TV On for the First Time 19 Target Region Setting 20 Selecting the Input Source 21 Channel Selection 21 Listening to the Radio Radio Mode 21 Display Channel Information 21 V...

Страница 4: ...3 Using the DVD Features 54 Using the Built in DVD Player 54 Compatible Disc Types 54 Supported Formats 54 Region Code 54 Basic DVD Playback Functions 55 Playing the DVD 55 Menu Playback for DVD 55 St...

Страница 5: ...connecting other devices or moving the unit Unplug the unit from the mains socket during a lightning storm Mains Cable Make sure the unit or unit stand is not resting on top of the mains cable as the...

Страница 6: ...ormance of procedures other than those specified herein may result in hazardous radiation exposure Before moving the unit ensure the disc tray is empty Always remove the disc when the unit is not in u...

Страница 7: ...recommend that you spend some time reading this instruction manual so that you fully understand these features You will also find some hints and tips to help you resolve any issues Read all the safet...

Страница 8: ...ing to the instructions included in the mounting kit Due to space restrictions we recommend that you make all connections refer to page 15 18 and page 46 for details before mounting on to the wall Ins...

Страница 9: ...ot Insert the disc with the label side facing the rear of the TV 12 cm discs only Don t insert 8 cm discs 4 Press to eject disc DVD mode 5 Press to start playback or pause DVD mode 6 INPUT Press to se...

Страница 10: ...o the audio socket on the digital standard 5 1 audio system 4 SCART Connects to a VCR DVD Player or other AV device with a SCART output socket 5 RF Aerial Connects to the aerial socket on the wall wit...

Страница 11: ...nly use the battery type indicated in this manual When the batteries are exhausted the remote will not function Replace both batteries at the same time with new ones Do not install new batteries with...

Страница 12: ...DVD mode 10 S MODE Select sound mode Standard Music Movie Sports User 11 ASPECT Watch the screen in various formats Auto 4 3 16 9 Zoom Subtitle Smart Zoom 12 GUIDE Displays the EPG Electronic Programm...

Страница 13: ...ff the teletext function ATV DTV mode MENU Display the DVD menu DVD mode 24 S Subtitle Display subtitles which are broadcast with the programme DTV mode Display subtitles on the DVD DVD mode 25 REC Re...

Страница 14: ...e 33 Reverse playback rapidly DVD USB mode SUBPAGE Display the subpage on the teletext screen ATV mode 34 Advance playback rapidly DVD USB mode INDEX Select the page number of the index from teletext...

Страница 15: ...tton on the remote control to display the Source List Use the buttons to select HDMI1 HDMI2 and then press the OK button to confirm Making Video and Audio Connections Not all AV devices have the abili...

Страница 16: ...ket 2 Plug the connected devices into the mains socket before switching on the TV 3 Press the button on the right side panel of the TV or on the remote control to turn on your TV 4 Press the button on...

Страница 17: ...yellow Audio Left white and Audio Right red 2 Plug the connected devices into the mains socket before switching on the TV 3 Press the button on the right side panel of the TV or on the remote control...

Страница 18: ...i channel audio receiver 1 Use an audio cable not included to connect the TV s SPDIF OUT output socket to an external audio receiver s audio coaxial input socket 2 Plug the connected devices into the...

Страница 19: ...TV on it will go straight into the First Time Installation menu Please ensure the aerial is plugged in and then press the OK button If you have already installed the TV using the Quick Start Guide pl...

Страница 20: ...regional country e g England Wales Scotland NI Secondary Region This will allow you to set the region for your local news service on BBC and ITV e g London Beds and Cambs etc Tertiary Region You may...

Страница 21: ...yed Press the 0 9 buttons to enter the password the channel will then be unlocked refer to page 41 for details on Block Channel Press the FAV button to view the Favourite List Then use the buttons to...

Страница 22: ...nel Edit under the channel menu refer to page 24 25 for details 3 In the Tune Type menu press the buttons to select DTV ATV DTV ATV Press the button and then press the buttons to select the country wh...

Страница 23: ...and then press the buttons to select the CHANNEL menu and then press the OK button CHANNEL PICTURE SOUND TIME OPTION LOCK EXIT EXIT Auto Tuning DTV Manual Tuning ATV Manual Tuning Signal Information C...

Страница 24: ...ANNEL menu and then press the OK button ATV Manual Tuning Storage To 1 System I Current CH 1 Search Fine Tune Frequency 255 25 MHz Save MENU a Delete Press the RED button to delete the selected channe...

Страница 25: ...o return to the previous menu or press the MENU button to return to the main menu 4 Press the EXIT button to exit the menu Signal Information DTV Mode Allows you to view the signal information 1 Press...

Страница 26: ...button and then press the buttons to select the CHANNEL menu and then press the OK button 2 Press the buttons to select CI Information and then press the OK button CI Common Interface DTV Mode The com...

Страница 27: ...MENU button and then press the buttons to select the CHANNEL menu and then press the OK button 2 Press the buttons to select Software Update and then press the OK button to confirm 4 Press the BACK bu...

Страница 28: ...eset the setting 3 The TV will restore all settings and go to the First Time Installation Follow the First Time Installation steps refer to page 19 21 for details CHANNEL PICTURE SOUND TIME OPTION LOC...

Страница 29: ...oportion Black bars will appear on both the left and right of the screen 16 9 This selection will allow you to adjust the picture horizontally in linear proportion to fill the entire screen This selec...

Страница 30: ...ness 6 BACK MENU EXIT 4 Press the BACK button to return to the previous menu or press the MENU button to return to the main menu 5 Press the EXIT button to exit the menu Increasing the backlight setti...

Страница 31: ...on is an auxiliary audio function that provides an additional audio track for visually challenged persons This function handles the Audio Stream for the AD Audio Description when it is sent along with...

Страница 32: ...ime has elapsed The clock will be set automatically when receiving a digital signal Time must be set before using Sleep Timer function Press the buttons to select a period of time after which the TV a...

Страница 33: ...return to the previous menu or press the MENU button to return to the main menu 5 Press the EXIT button to exit the menu OK The unit will automatically switch to standby mode in 5 minutes Press the O...

Страница 34: ...ubtitle language or turn off the subtitle Available for digital channels if multiple subtitle languages are broadcast 1 Press the MENU button and then press the buttons to select the OPTION menu and t...

Страница 35: ...grammes For DTV channels only if available 1 Press the MENU button and then press the buttons to select the OPTION menu and then press the OK button CHANNEL PICTURE SOUND TIME OPTION LOCK EXIT EXIT 2...

Страница 36: ...t HiSpeed FS press the button and then press the buttons to select your preferred file size Press the OK button to confirm and then press the button to start formatting Warning All data will be lost S...

Страница 37: ...ontrolling a TV set set top box and DVD player using only the remote control of the TV CEC also allows individual CEC enabled devices to command and control each other without user intervention Make s...

Страница 38: ...to ARC compliant audio devices e g home theatre without the need to connect an optical cable HDMI ARC Connection To enjoy the ARC function make sure your ARC compliant audio devices are connected by a...

Страница 39: ...OCK menu and then press the OK button CHANNEL PICTURE SOUND TIME OPTION LOCK EXIT EXIT 2 Press the OK button to select Lock System Lock System Set Password Block Channel Parental Guidance Off Off LOCK...

Страница 40: ...ster password 9527 4 Press the buttons to select Set Password and then press the OK button Lock System Set Password Block Channel Parental Guidance LOCK Off Off CHANNEL PICTURE SOUND TIME OPTION LOCK...

Страница 41: ...and then press the OK button 5 A Block Channel screen will pop up Press the buttons to select a channel Press the GREEN button on the remote control to block or unblock the channel Press the GREEN but...

Страница 42: ...ss the OK button CHANNEL PICTURE SOUND TIME OPTION LOCK EXIT EXIT Lock System Set Password Block Channel Parental Guidance Off Off LOCK Clear Cancel Please enter password 2 Press the OK button to sele...

Страница 43: ...desired channel and then press the buttons to select the desired programme Press the OK button to confirm Button Functions in a 7 Day Guide Remote Control Button Function RED Record DTV mode only Tim...

Страница 44: ...have difficulty reading the text on the TV you can double the height of the text Press the SIZE button The top half of the page will be displayed in double height text Press the SIZE button again The...

Страница 45: ...to page 34 for details Teletext within Digital Service 1 In DTV mode press the TEXT button to display teletext page 2 Follow the instructions on digital teletext and move onto the next step by pressi...

Страница 46: ...portable hard disk may require more power than the TV USB socket can provide To ensure correct operation please use the power adapter for that device If a USB hub is used make sure its mains adapter i...

Страница 47: ...select the specified photos press the buttons to select the picture file and then press the OK button A tick box will be displayed If you want to delete the file press the RED button to enter the Sub...

Страница 48: ...aylist Info Aspect Ratio 3 Press the buttons to select your storage device and then press the OK button Viewing Movies 1 Press the button on the right side panel of the TV or the INPUT button on the r...

Страница 49: ...view 6 Press the OK button or the i button to display the function bar Press the buttons and then press the OK button to select the function Prev page Next page Prev Next Stop Music Playlist Info 7 Pr...

Страница 50: ...screen and then press the button again to resume playback Stop If you want to exit the PVR Time Shift progress bar and return to the current live broadcast press the Stop button The PVR Time Shift Pro...

Страница 51: ...e recording progress bar will disappear 3 Press the Stop button to stop recording If you want to turn off your TV during recording press the button on the right side panel of the TV or on the remote c...

Страница 52: ...justments press the OK button to confirm your settings Timer Programming This function is used to perform scheduled recording The recording from timer programme or direct recording may have a little b...

Страница 53: ...d then press the OK button 4 Press the buttons to select the MY PVR folder and then press the OK button 5 Press the buttons to select your recorded programme and then press the OK button A tick box wi...

Страница 54: ...PEG DVD R DVD Recordable Audio Video format or JPEG files DVD R AUDIO VIDEO JPEG CD R CD Recordable Audio Video format or JPEG files AUDIO VIDEO JPEG CD RW CD Rewritable Audio Video format or JPEG fil...

Страница 55: ...n and then press the button on the unit or on the remote control to eject the disc When the disc is ejected hold the disc edge slightly and remove it from the disc slot When not using the DVD function...

Страница 56: ...GOTO button to activate the on screen scroll down menu for selecting Input your Title Chapter Time by pressing the 0 9 buttons or input the playback time After editing press the OK button to start If...

Страница 57: ...ight the Edit mode To leave the Edit mode press the OK button on the remote control again to cancel the highlight 3 Press the button on the remote control to skip to the left screen Press the buttons...

Страница 58: ...l to change from Browser view to Program view 2 Press the buttons on the remote control to select Edit mode then press the OK button on the remote control to leave the Edit mode Picture CD Playback Wh...

Страница 59: ...the buttons to select the Video menu and then press the button to enter the sub menu Press the buttons to select the menu options Press the SETUP button to exit the menu Aspect Ratio TV System Languag...

Страница 60: ...tton on the remote control Press the buttons to select the Misc menu and then press the button to enter the sub menu Press the buttons to select the menu options Press the SETUP button to exit the men...

Страница 61: ...tly with a slightly moistened soft cloth and finish with a dry cloth Do not use any type of solvent such as thinner benzine commercially available cleaners or antistatic spray They may damage the disc...

Страница 62: ...tre if the picture has not appeared after five minutes No or poor colour or poor picture Adjust the settings in the PICTURE menu Try another channel The problem may be caused by the broadcaster Check...

Страница 63: ...r local aerial installer Why do I get blocking on my digital picture In most cases blocking is caused by a reception problem either the signal is too weak or there is some kind of interference Talk to...

Страница 64: ...om 480P 720 x 480 576I 720 x 576 50 576P 720 x 576 720P 1280 x 720 50 60 1080I 1920 x 1080 50 60 1080P 1920 x 1080 50 60 PC Mode Please check the display settings of your computer before connecting to...

Страница 65: ...y Approx 80 cm 31 5 inch Power Consumption In HOME STANDBY mode 38 W Average Annual Energy Consumption 55 kWh Standby Power Consumption 0 3 W Operating Temperature 0 C 40 C Operating Humidity 10 80 Me...

Страница 66: ...Maintenance Hints and Tips Specification 66 GB A A B C D E F ENERG Y IE IJA IA 2010 1062 2014 55 kWh annum 38 Watt 80 cm 31 5 inch S32HED13 A A...

Страница 67: ......

Страница 68: ...ing and disassembly are prohibited Restriction on Use Rovi Trade Mark Rights Use of the copyright protection technology contained in this product must be authorised by Rovi Corporation and is intended...

Отзывы: